Showing posts with label Indian - Tamil Nadu. Show all posts

Tuesday, 13 January 2015

Kathirikka Podi Kari - Eggplant cooked in freshly ground spices

I am big fan of side dishes made with spices and lentils roasted and powdered together. It can be made with a variety of vegetables. Usually people think it is hard to make these sides. On the contrary they are very easy to make and are packed with flavours.


Ingredients

Kathirikka/Eggplant/Aubergine 2 big ones (4-5 cups when chopped)
Channa Dal 2 tsp
Coriander Seeds 2 tsp
Cumin 1 tsp
Dry Red Chilli 1 (more for spicy curry)
Mustard Seeds 1/2 tsp
Turmeric powder 1/2 tsp
Hing/Asafoteda a pinch

Oil and Salt to taste

Method of Preparation

1. Heat a little oil in a pan. Add the channa dal. Roast till it starts to brown. Add the coriander seeds, cumin seeds and red chilli. Saute for a minute more.

2. Let this cool and then powder it.

3. In the same pan, add a little more oil. Add mustard seeds. When it sputters, add the hing and turmeric powder.

4. When it sizzles, add chopped eggplant. Saute till it is nearly cooked.

5. Add the spice powder and salt. Mix well. Saute for a couple more minutes.

Serve with some rice and gravy like Kozhambu, Sambar or Rasam. 

Wednesday, 7 January 2015

Pudina Thogayal - Mint Thogayal - South Indian Mint Chutney with Coconut - Vegan

Wishing you all a very Happy New Year. I hope you all enjoyed a great holiday season. I have been seeing a lot of people post New Year Resolutions. I am very scared of them. They have failure written all over them. When it comes to resolutions, I think New Year ones have the highest failure rate. But that does not stop anyone of us from taking up a resolution, does it? So like every one I decided to change my life in some small ways possible. So for the sake of the blog, and my love for it i think I should get more regular in blogging. So hoping this to be the beginning of a wonderful year filled with recipes and friendship!


Today's recipe is a very simple one. Its a healthy side dish for your rice. For me, I love thogayals as a side for dosa and idlis better. It can be used as sandwich spread or instead of pesto :-) So whichever is your choice, do make this and enjoy with your family!

Tuesday, 21 October 2014

Chocolate 7 Cup Cake - Chocolate Burfi - Diwali Sweet

Diwali is just a day away and I am totally enjoying making sweets to share with friends and family. Hope your Diwali preparations are coming along well. Wishing you all a very Happy and Prosperous Diwali!

Its another celebration in my blog. It is nearly 3 years old (just 2 more weeks). And this is my 601st post (well, I missed celebrating the 600th post)! I made the 7 cup cake and posted for you a couple of years back. This time I am presenting an even yummier version with some chocolate!


Kara Boondi - Kaara Boondi - Diwali Special

Boondi is basically fried balls made from Chick pea flour. It is the main component of South Indian Mixture. The spicy version of the Boondi called Kara Boondi can be made as a snack on its own. You could just make the boondi part or add a few things like Cashews, Peanuts, Pottu Kadalai, Curry Leaves etc for enhanced taste.


People think Boondi is a very difficult thing to make. But trust me. Just figure out the right consistency of the batter and you will be done in no time at all.

Tuesday, 14 October 2014

Boondi Ladoo - Diwali Sweet - Step by Step recipe - Vegan, Gluten Free

Diwali is just a week away. We are all busy planning what we are going to make for our loved ones. I am also working on what I am making for my family (collecting their wish list). How can I forget the blog? I need something new to celebrate Diwali with my wonderful readers. I will start off this year with an awesome sweet - Boondi Ladoo.


Monday, 6 October 2014

Mini Shape Idlis - Kids Lunch Box

Lunch - Mini Shape Idlis, Tomato Thokku (Pickle), Madeleine, Yogurt. Thokku recipe here. Madeleine recipe here.

Idlis can be prepared in regular idli molds. I got the idea of using silicone molds to make idlis from a friend. I took the idea a little further and made these mini idlis in small silicone chocolate molds. They are a treat to the eyes and my little one cannot get enough of it. These are the molds that I used.


Tuesday, 3 June 2014

Tiffin Sambar with Pumpkin - Pumpkin Sambar

Sambar is a side dish prepared almost every day in South India. It works as a side dish for rice and vegetables. Another wonderful use of Sambar is as a side dish for Idli and Sambar. Recipe varies slightly when making as a side for Idli/Dosa.


I have a huge variety of sambar dishes in my blog. Each one has its own speciality. Try it all and tell me which one you like best. This one has the awesome flavours imparted from Pumpkin.

Wednesday, 19 March 2014

Zucchini Kara Kozhambu


Zucchini is a vegetable that is widely available here and so I always look out for dishes which can be adapted to include the vegetable. My little loves Zucchini. It is no wonder I make it so often. It makes a great substitute for most Indian watery vegetables.

Wednesday, 12 March 2014

Green Apple Thokku - Green Apple Pickle


Thokku is a pickle preparation very popular in Tamil Nadu. A pickling vegetable is grated and cooked in spices till all the water evaporates. I have prepared the Tomato Thokku and posted here before. Another popular thokku is made with Garlic. I am yet to post a recipe for that. I will definitely post it this summer!

Coming to today's thokku, it was a result of a discussion we had in a facebook group. I just knew it will be amazing. Ran off to the kitchen to make it immediately. What a wonderful preparation. Do try this unusual thokku today and let me know what you think.


Ingredients

Green Apple 5 (450gms when pealed and cored)
Sesame Oil  6 tbsp
Mustard 1 tsp
Fenugreek Seeds 1/2 tsp
Curry Leaves 1 sprig
Hing generous pinch
Kashmiri Chilli Powder 3 tsp (for mild thokku)
Salt to taste (I used a little less than 1 tsp)

Method of Preparation

1. Peal, quarter and core the green apples. Chop them finely, grate or pulse in a food processor.

2. Heat oil in a heavy bottomed pan. Add mustard seeds.

3. When it sputters, add fenugreek seeds, curry leaves and hing.

4. When it sizzles, add apples.

5. Cook till the water drains from the apples and oil starts to ooze.

6. Keep stirring well towards the end.

7. Cool and store in an airtight container in the refrigerator. Use a clean dry spoon to take the thokku every time.

It will stay good for a week or even upto a month  (if care is taken while handling and cooking). I would recommend using it in a week or 2. 

Monday, 10 March 2014

Kadala Paruppu Kurma - Channa Dal Kurma

Kurma is a gravy usually made with Veggies of some sort (and in many cases mixed vegetables) and a coconut based sauce. It usually has a lot of masala items like clove, cinnamon etc to add flavour to it. I have made my share of Kurma recipes and posted in this blog. Do check them out. This one was quite unique and I found it in my friend PT's blog. Do check her space for the original recipe. Here is my take on the Kurma.


Friday, 28 February 2014

Milagu Kozhambu - Pepper Kozhambu - Spicy Black Pepper Sauce for Rice

I have been trying to make a proper South Indian (read tamil) lunch on Sundays lately. Given a choice my husband would request for Sambar with Potato fry every week. And my son would want Rasam with Vendakka Fry. After going thru weeks of doing this, I decided it is time to change. Now I have convinced them that I will try something else for a change. I run it by them a few days before so that I can buy the ingredients.


Wednesday, 15 January 2014

Kanu Pongal - Pongal Special Recipes

Day 3 of Pongal is celebrated as Kanu Pongal. Here are some yummy recipes prepared for Kanu Pongal. Hope you enjoy these at home. I still remember my mom preparing all varieties of Kalanda Sadam (Variety Rice) for Kanum Pongal. 

On Kanu Pongal, we put Kanu Pidi. Balls of rice are prepared and fed to crows. A white rice, a sweet rice, a red rice (with red kum kum) and a yellow rice (with turmeric). 

Monday, 13 January 2014

Murungakka Sambar - Drumstick Sambar - Arachu Vitta Sambar


Arachu Vitta Sambar is a special kind of Sambar. It is made with freshly ground spices, without the use of Sambar Powder. This adds to the taste of the Sambar. Today I present to you a very popular sambar made in Tamil Nadu with Drumsticks (Murungakka). Drumstick has an awesome fragrance that is imparted to the sambar making it a wonderful delight.

Saturday, 11 January 2014

Pongal Sappadu - Pongal Meals - Tamil Festive Meal

Pongal is the harvest festival of Tamilnadu. A Chakkara Pongal (sweet pongal) is prepared on the Pongal Morning. Read more about the celebration and specific recipes here. This post is for the meal served for lunch.

Pongal Recipes here

The banana leaf is usually used to serve Feast. The top portion is used to serve different curries and bottom side is used for rice, sambar, snacks, payasam etc. The leaf usually used should be the end leaf (nuni ela) with the smaller end on the left of the person sitting in front. 
The order of serving

On the top from right to left - Thayir Pachadi, Sweet Pachadi, Poriyal(s), Kootu, Urugai(Pickle)
On the bottom payasam at the right corner. rice in the middle (with paruppu, sambar, nei etc), on the left corner - Appalam, Medhu Vadai

I have a lot of recipes in my blog. But still not the complete collection. I will update this page as and when I post all the recipes.

Meal I served in 2014 for Pongal. I cooked this meal with a friend and totally enjoyed the experience.


Monday, 9 December 2013

Poodu Kozhambu - Garlic Gravy for Rice

Garlic is one of those ingredients used in all parts of the world. Sometimes it is just used in little portions to add flavour, while some other cases it forms the key ingredient of the dish. Kozhambu is a south indian gravy usually served with rice and a vegetable side dish. This Kozhambu has loads of Garlic and is full of flavour. It kind of reminds of delicious Non Veg gravy. You can serve this as a side dish for Dosa or Idli as well.


Friday, 22 November 2013

Parippu Vada - Masala Vadai - Paruppu Vadai - With tips to making crunchy vadas


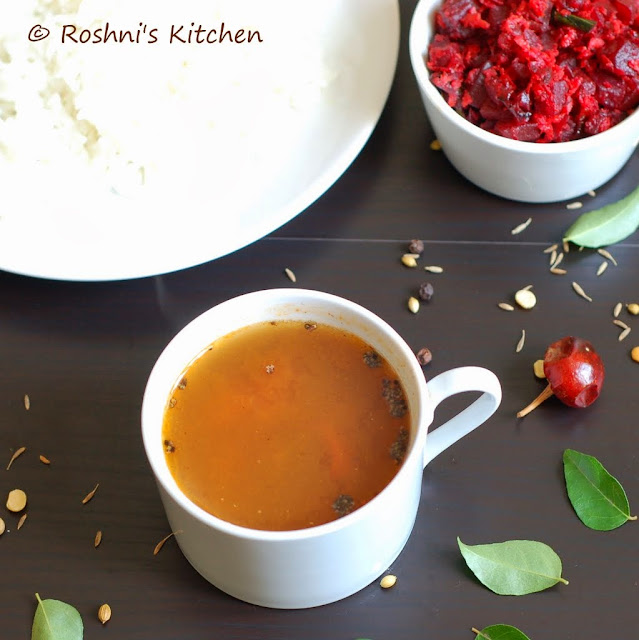
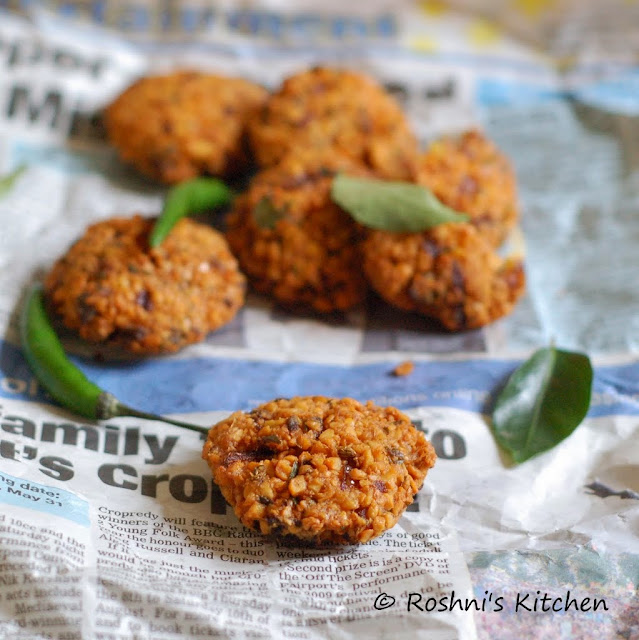
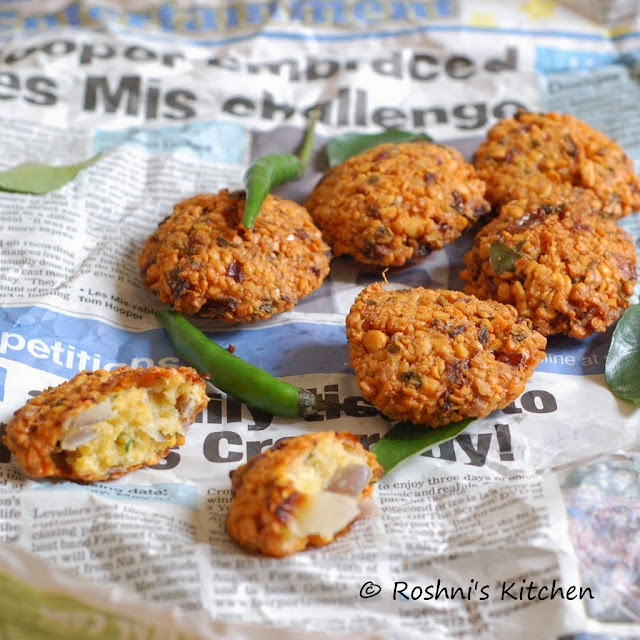
Parippu Vada (as it is known in Kerala) or Masala Vadai or Paruppu Vadai (as it is known in Tamil Nadu) is a very popular snack in Southern India. Nothing can beat the taste of a good Parippu Vada with some tea (or coffee may be) on a cloudy/rainy day.


When munching on Vada or any savoury fried items for that matter with some tea, I always wonder about the cultural difference. To start closer to home, in Kerala most people prefer to have tea with Vada where as in Tamil Nadu (especially in my husbands place) it is always coffee. I like my vada and tea at the same time (one in each hand), where as I find most tamilians prefer to finish their snacks and then drink their coffee.

Now moving on to place where I am now, yes you got it in UK. On a daily basis biscuits are enjoyed with tea (by dunking). Well, that is one thing Indians have learned from British. The taste of dunked biscuits is just awesome. On special days or when a few ladies meet (what could be more special than friends getting together), it is cakes with tea/coffee. In India we almost always associate cake with dessert. So for me it is quite hard to get my head around cake with tea. Does something sweet not affect the taste of the drink? Well, to each their own.

What is your tea time story? Do share with me!


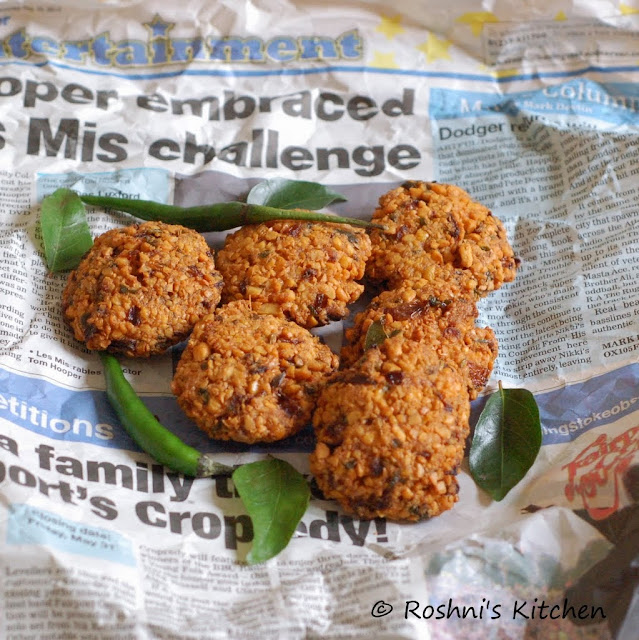
The Key to a good Parippu Vada is the crunchiness. Though quite simple to make, getting the texture right can be quite daunting if you do not know the trick. If you add too much water, the batter will be too soft resulting in a vada that does not have that crunch and texture to it. If you add little and you do not shape it right, it will disintegrate the moment you drop it in oil. Read below for tricks of how to get that perfect crunch!

Ingredients

Channa Dal  1 cup
Rice Flour 2 tbsp
Onion 1 finely chopped
Coriander Leaves finely chopped
Salt little less than 1 tsp (or to taste)
Oil for Deep frying

Make a paste
Curry Leaves 2 sprigs
Ginger 1 inch piece
Fennel seeds 1 tsp
Green Chilli 1 (more for spicier vada)

Method of Preparation

1. Soak the channa dal for 3 hours. Drain the water.

2. Make a rough paste of curry leaves, ginger, fennel seeds and green chilli without adding any water.

3. Pulse the channa dal without any water in a food processor till it is broken dal kind of stage. Take 1/3 of this and add to a blender with 1-2 tbsp of water and make a fine paste. If you do not have food processor, take 2/3 of dal and pulse in a blender/mixie. Then take the rest 1/3 and make a paste.

4. Take all of the dal in a bowl. Add the curry leaf paste to it. Add rice flour, salt, finely chopped onions and finely chopped coriander leaves to this. Mix everything well.

5. Heat oil in pan for frying. Keep a big bowl of water for dipping your hand.

6. When the oil is ready, keep it in low flame. Dip your fingers in the bowl of water. Take a small walnut size portion of the vada mix. Roll into a ball. Wet your fingers again and gently flatten the ball making sure that it does not crack on the top or sides.

7. Gently slide it into the oil.

8. Repeat for 2 or 3 more balls.

9. Increase the flame to medium. Do not touch it till the bottom side is cooked.

10. Once done, flip them over and cook the other side.

11. Drain on to a paper towel.

12. Repeat from step 6 for the rest of the mix.

Enjoy with a piping cup of tea (or coffee). 

Sunday, 17 November 2013

Kalyana Rasam

Rasam is a perfect South Indian Meal Accompaniment. Usually served after Sambar, it had a clear broth like consistency. It has so many variants that you will never be short of variety! And what's more in India, little ones are given Rasam and rice with lots of ghee and a vegetable side dish. It is probably the favourite childhood meal of every tamilian. It can also work as a great easy to digest food when you are feeling poorly.

Today's Rasam is a special one. Made on Special Occasions. It does not require any Rasam Powder, so anyone can make it. And the fresh ground masala makes it just stand out.


Ingredients

Tomato 3
Tamarind Paste 1 tsp
Toor Dal 2 tbsp
Curry leaves 1 sprig
Hing a little

For Grinding
Cumin 1/2 tsp
Coriander Seeds 2 tsp
Toor Dal 2 tsp
Pepper 1 tsp
Dry Red Chilli 1
Ghee 1 tsp

For Seasoning
Ghee 2 tsp
Mustard 1/2 tsp

Method of Preparation

1. Add a tsp of ghee to a pan. Add the coriander seeds, toor dal, pepper and red chilli. Roast till it starts to brown. Add the cumin at the end and switch off.

2. Make it into a powder. Keep aside

3. Pressure cook the 2 tbsp of dal and keep ready.

4. Puree 2 tomotoes. Add to the pot.

5. Chop the other tomato and add that as well along with the tamarind paste and 1 cup of water.

6. Also add the curry leaves and hing.

7. Boil till the tomatoes are cooked.

8. Add the cooked dal and some extra water as required. Add salt as well at this stage.

9. When it comes to a boil and froths up, add the powdered masala.

10. Cook for another minute and switch off.

Serve with Rice, a dollop of ghee and a vegetable side. I served with this awesome Beetroot Poriyal.

Sending this to our group Avant Garde Cookies making South Indian recipes this week.

Saturday, 16 November 2013

Beetroot Thoran - Beetroot Stir Fried with Coconut and Spices

Thoran (poriyal) is a side dish that is very popular in Southern India. It is prepared with a variety of vegetables like Cabbage, Beans, Carrots or sometimes even a combination of those. No festive meal is complete without this humble Thoran.


When I signed up for VVP (Virtual Vegan Potluck) I knew I wanted to make a dish that would showcase my native place. The key ingredient of this Potluck is Beets. I have prepared a variety of dishes with Beetroot. I have a couple more that are coming soon. So you get the idea, we love this humble vegetable a lot.

Beetroot Masala (british style beetroot curry)
Beetroot Stir fry
Beetroot Kichadi (Raita)
Beetroot Kootu

Ingredients

Beetroots 4
Onion 1
Coconut 1/2 cup
Cumin seeds 1 tsp
Turmeric Powder 1/2 tsp
Curry leaves few
Green Chilli 1

Oil and salt to taste

Method of Preparation

1. Finely chop the onions and beetroot.

2. Heat a little oil in a pan. Add the cumin seeds, turmeric powder and curry leaves.

3. When it sizzles, add the onions.

4. Saute till it is slightly browned.

5. Add the beetroot and saute till it is cooked. Do not add any water.

6. Pulse the coconut and green chilli in a food processor. Add to the beets along with some salt.

7. Mix well and cook for another 2-3 min.

Serve with some rice!

This Potluck is a linkup of more than a 100 recipes (Yes, All Vegan and Oh, yes All Super Tasty). I am off to check out all the recipes.. Why don't you join me? If you want to start at the beginning of the chain, click here and check out the details of the Potluck here!


Wednesday, 6 November 2013

Aval Kozhakattai - Steamed Dumplings made with Beaten Rice Flakes

Kozhakattai of many forms are made in South India. I have posted many variations in my blog. This one was quite unique and I had never eaten it before. I saw the recipe here and wanted to try it.


It is a Savoury Kozhakkatai made from Aval (Beated Rice Flakes).


Ingredients (each cup makes 8 Kozhakattais)

Aval (Poha, Beaten Rice Flakes) 2 cups
Coconut 1/4 cup
Water 1.5 cups
Salt to taste

Tempering

Oil 2 tsp
Mustard 1 tsp
Urad Dal 1 tsp
Curry Leaves 2 sprigs
Green Chillies 2

Method of Preparation

1. Pulse Poha to a coarse powder.

2. Heat oil in a pan. Add the mustard seeds. When it sputters, add the urad dal. Let it brown a little. Add the curry leaves and finely chopped green chillies.

3. When it sizzles, add the water and bring it to boil. Add salt and coconut.

4. Add the Poha and mix well. In a low flame cook till almost all the water is absorbed, but the dough should still be moist.

5. Roll into balls when cool enough to handle. Steam for 10 min. 

Thursday, 31 October 2013

Mysore Pak - Ghee Mysore Pak - Diwali Sweets - Easy Foolproof Recipe


Mysore Pak is a very popular South Indian Sweet made with Chickpea Flour. It just has 3 ingredients - Chickpea Flour, Sugar and Ghee. Growing up I always saw my mum make mysore pak with such ease that I thought it was the easiest sweet ever. When I first moved out of my house for work, I made Mysore Pak for my first Diwali. I had my mom on phone all the while :-)


There are 2 kinds of Mysore Pak. One is called the Ghee Mysore Pak which as the name suggests will be soft and dripping with Ghee. The other kind is the Porous Mysore Pak also called Honeycomb Mysore Pak. It has a beautiful porous texture cause of the tiny air bubbles trapped inside. There is no argument as to which one is better. There are people who love both. I will post recipe for Porous kind some other day.


Now coming to this Mysore Pak recipe. Most people find making mysore pak very daunting. You have to know about the 1 string, multi string etc. (need to know more about what it is, read here). This recipe calls for none of that. I learned it a few years ago from a colleague's wife. I have been making it this way for years now and never had a bad lot.


Ingredients (Makes 16 pieces)

Chickpea flour (Besan) 1 Cup
Sugar 1.5 Cups
Ghee 1 Cup (Use upto 2 cups if you like. for me 1 was good enough. i have made with 2 cups and it will be wet with ghee and awesome. you can try that as well sometime!)

Method of Preparation

1. Melt the ghee in a pan and keep it warm and ready. Grease a 7*7 square cake tin (or any plate) ready.

2. Sieve the chickpea flour well. In a heavy bottomed pan, add the besan and roast it till the raw smell is gone. It will take around 3-5 min. Keep aside in a bowl.

3. Add 1/2 cup of ghee to the besan. Mix well till there are no lumps. You can optionally cool the besan and then sieve it one more time before adding ghee.

4. In the same pan, wipe with a cloth and add the sugar along with 3/4 cup of water. Mix well.

5. Let the sugar mix come to a rolling boil. Switch off.

6. Add the besan-ghee mix to the sugar and mix well.

7. Put the mix back on the stove and start stirring.

8. Add the rest of the ghee a little at a time mixing well. Cook in a medium low flame.

9. Mix till the whole thing starts to come together. If you work your spatula thru the middle of the pan, you can see the line clearly before the sweet joins up together. :-) It will start to collect at the base and change colour.

10. That is your cue. Pour the sweet into the greased plate. It will be quite liquid like at this stage. Don't worry. It will set.

11. After about 10-15 min, cut the pieces (draw lines). Do not separate or try to take it out of the plate.

12. Once it is completely cooled, take the pieces out.

Store in an airtight container. Enjoy!