Showing posts with label Avant Garde Cookies. Show all posts

Sunday, 17 November 2013

Kalyana Rasam

Rasam is a perfect South Indian Meal Accompaniment. Usually served after Sambar, it had a clear broth like consistency. It has so many variants that you will never be short of variety! And what's more in India, little ones are given Rasam and rice with lots of ghee and a vegetable side dish. It is probably the favourite childhood meal of every tamilian. It can also work as a great easy to digest food when you are feeling poorly.

Today's Rasam is a special one. Made on Special Occasions. It does not require any Rasam Powder, so anyone can make it. And the fresh ground masala makes it just stand out.


Ingredients

Tomato 3
Tamarind Paste 1 tsp
Toor Dal 2 tbsp
Curry leaves 1 sprig
Hing a little

For Grinding
Cumin 1/2 tsp
Coriander Seeds 2 tsp
Toor Dal 2 tsp
Pepper 1 tsp
Dry Red Chilli 1
Ghee 1 tsp

For Seasoning
Ghee 2 tsp
Mustard 1/2 tsp

Method of Preparation

1. Add a tsp of ghee to a pan. Add the coriander seeds, toor dal, pepper and red chilli. Roast till it starts to brown. Add the cumin at the end and switch off.

2. Make it into a powder. Keep aside

3. Pressure cook the 2 tbsp of dal and keep ready.

4. Puree 2 tomotoes. Add to the pot.

5. Chop the other tomato and add that as well along with the tamarind paste and 1 cup of water.

6. Also add the curry leaves and hing.

7. Boil till the tomatoes are cooked.

8. Add the cooked dal and some extra water as required. Add salt as well at this stage.

9. When it comes to a boil and froths up, add the powdered masala.

10. Cook for another minute and switch off.

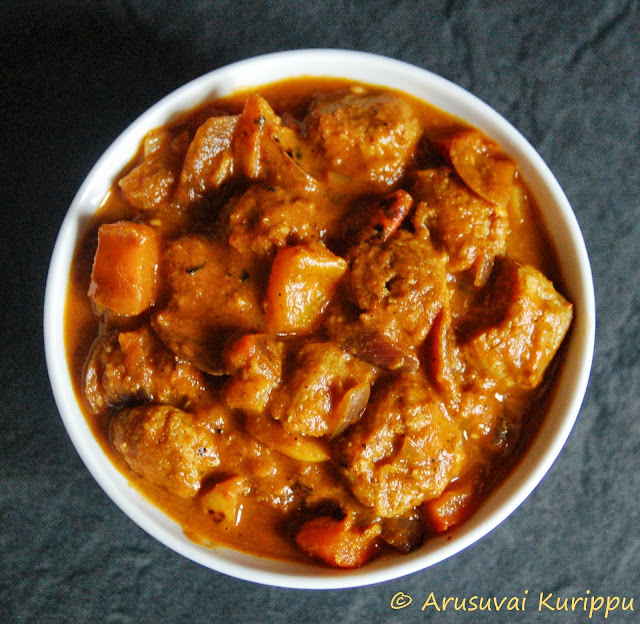
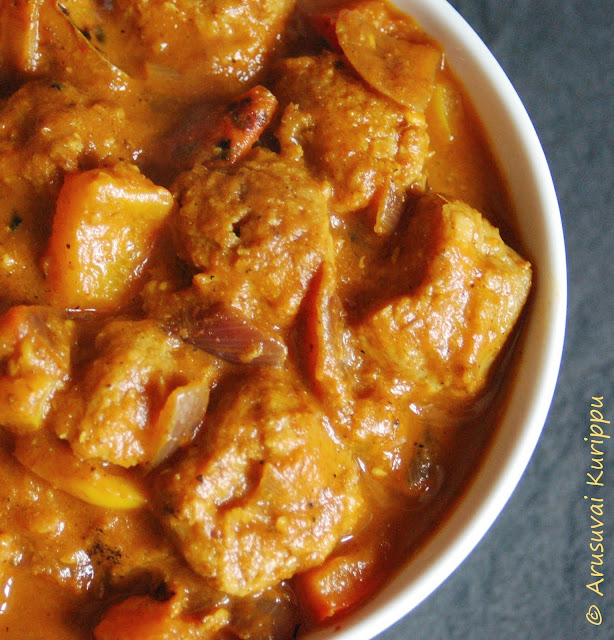
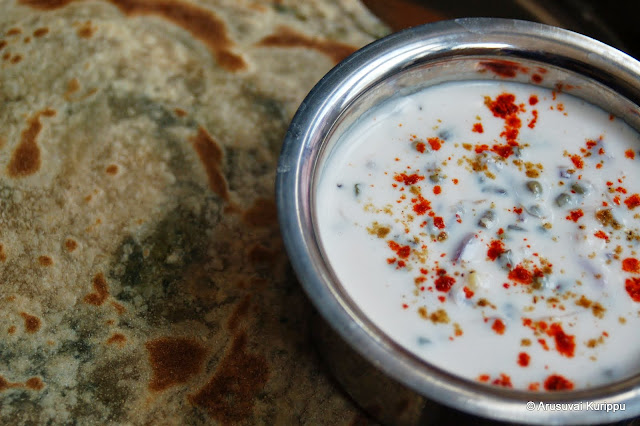
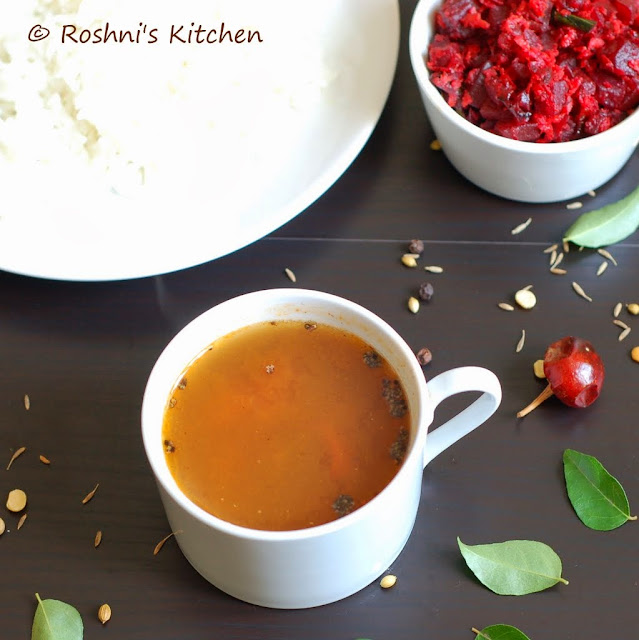
Serve with Rice, a dollop of ghee and a vegetable side. I served with this awesome Beetroot Poriyal.

Sending this to our group Avant Garde Cookies making South Indian recipes this week.

Tuesday, 8 October 2013

Sweet Corn Sundal

Sundal forms an integral part of Navarathri in south India. When it comes to Sundal, the first thing that comes to my mind is dried lentils and legumes. Mostly salt version is  made with a few that are made as sweet versions as well. When challenged with making something different for Navarathri by my group AGC, I decided to make a sundal that is not made by my mom or for that matter, that I have never eaten before. This is unique because it is not made with dried stuff but with fresh vegetable! Hope you enjoy this sundal!


Ingredients

Frozen Corn 1 cup
Coconut 2 tbsp
Cumin 1/2 tsp
Turmeric 1/2 tsp
Dry Red Chilli 1
Oil and Salt to taste

Method of Preparation

1. Steam corn in microwave for 2-3 min.

2. Heat oil in a pan. Add the cumin, turmeric and red chilli.

3. When it sizzles, add the corn along with some salt. Stir well.

4. Cook in low flame for 2 min.

5. Add coconut and saute for 2 more minutes.

Corn Sundal is ready!

Monday, 30 September 2013

Musur Dal er Bora - Masoor Dal Dumplings in a spicy sauce - Bengali Recipe

Bengali Cuisine reminds me of two things - the amazing fish dishes and the sweets in no particular order. Avant Garde Cookies decided to make something Bengali. I loved this recipe from here. I decided to make it. It was awesome. Just out of the world. The only issue was the it was supposed to be a gravy. But the dumplings absorbed all the liquid. Well another issue was we were fighting at home to decide who gets more.

(sorry about the poor photo)


Ingredients

For Dumplings
Split Red Masoor Dal 1 cup
Ginger 1" piece
Green Chillies 1
Water 1/4 cup (or as needed)

Cumin Powder 1 tsp
Salt as needed
Onion finely chopped 1
Coriander leaves chopped 1/4 cup

For the sauce

Cinnamon 2" piece
Bay leaf 1
Cardamom 4
Cumin 1/2 tsp

Potato cubed 2
Turmeric 1/2 tsp

Tomato 2 (pureed)
Ginger 1 inch piece
Green Chilli 1

Cumin Powder 1 tsp
Kashmiri Chilli Powder 1/2 tsp

Warm Water 1 - 1.5 cups (as needed)
Salt as neeed
Sugar 1/2 tsp

Method of Preparation

1. Soak Masoor Dal in water for an hour.

2. Drain water and add the lentils, ginger, green chillies and water (as required) to a blender. Make a thick paste.

3. To the paste cumin powder, salt, onion and coriander leaves. Mix well.

4. In a pan, heat oil and deep fry tablespoon of this. (i did not do this). I used a pan called Paniyaram pan to shallow fry. It looks like the ebelskiver pan. Keep aside.

5. Heat some Oil in a pan. Add cinnamon, bay leaf, cardamom and cumin seeds.

6. When the spices sizzle, add the potato.and Turmeric Powder and saute till the potatoes start to cook.

7. Make a puree of the tomato along with ginger and green chillies. Add this to the pan along with some salt. Cook till the tomato is done and oil starts oozing out.

8. Now add the cumin powder and chilli powder. Saute for 3-4 min till a nice reddish colour develops.

9. Add 1 cup of warm water. Add salt and sugar to taste. Cover and cook till potatoes are done.

10. Finally add the fried lentil fritters. Let them simmer in the gravy at low heat for a few minutes. The fritters will soak up the gravy. I did not get the liquid consistency that the original recipe had, but tasty nevertheless.

Serve with rice or roti. 

Monday, 16 September 2013

Neeragaram - Neer Choru - Pazham Choru - Spiced Rice and Buttermilk Porridge

When I think of simple village food (gramathu sappadu), the first thing that comes to my mind is the Pazham Choru. It is basically a way to eat up left over rice. In our homes, my mom used to add some water to the left over rice and leave it in the kitchen counter. Next morning, you can drain the water and make this Pazham Choru. Though in those days it was not considered as a fancy food, it has great cooling properties. Yes, I know what you are thinking. Why am I posting it now as summer is over. Well in India it is always summer enough for Neer Choru!


I saw a couple of bloggers (Sangee and Radhika) posting recipes similar to this with Oats (a modern twist to the traditional staple). I am yet to try with Oats. Will update once I do.

This is traditionally served in Man Chatti (earthen pots). It adds to the cooling properties of the buttermilk. You can add all of the below spices or just some. It will taste awesome just like that.

Ingredients (makes 2 cups)

Cooked Rice 1/3 cup packed
Yogurt 2-3 tbsp
Water 2 cups
Shallots 1 sliced (you can use onions if you don't have shallots)
Green chilli 1 finely chopped
Curry leaves few
Ginger a small piece finely chopped
Coriander leaves few
Salt to taste

Method of Preparation

1. Mash the rice finely.

2. Take the yogurt in a bowl. Add water to it and churn it. You can use a wire whisk for this. In India we use a wooden churner (called Mattu in tamil).

3. Add the salt, green chilli, ginger, curry leaves, coriander leaves and shallots. Mix well.

4. Add this to the mashed rice. Mix well.

This works as a great dinner for the day when you had a heavy lunch or did I tell you a great food for dieting!


Check out the other AGC thoughout this week 
AnushaJayanthiKavithaPriya MRadhikaPriya S

Saturday, 17 August 2013

Mini Checker Board Cookies - Chocolate and Almond Butter Cookies - Eggless Cookies


Checker Board Cookies are so pretty to look at. The more the squares, the better they look, don't they? There are some versions with a dark or white wrap on the outside. I have been dreaming about baking them for ages. Was not bold enough to try a complicated design. Just started off with a 2*2 square.  All in good times :-) This is a beginner version of the cookie and is very very easy to make.


Like I told you before, Avant Garde Cookies have completed an year of cooking together and we are celebrating this month with a lot of specials. Week 1 was Cakes. Check out all our cakes -

Anu - Jamaican Banana Layer Cake
Radhika - Vanilla Sponge Cake with Chocolate frosting
Jayanthi - Tres Leches
Kavi - Oreo Cream Cake
Me - Dinosaur Cake (Vanilla Sponge with Buttercream Frosting)


Now for Week 2, it is cookies!! My son and I had loads of fun baking these. He called it day and night cookies :-) These cookies are nothing but variations of butter cookies or ice box cookies as they are called because of the chilling that is required to cut them into slices. Usually it is cooled in the fridge overnight, but I took a short cut and used the freezer :-) Works well actually.


Ingredients

Butter 113gms (1/2 cup)
Caster Sugar 100gms (1/2 cup)

Yogurt 1/4 cup
Vanilla Extract 1 tsp

Baking Powder 1/4 tsp
Baking Soda a pinch
Salt a pinch

All Purpose Flour 195gms (1.5 cups)

Almond Powder 2 tbsp
Cocoa Powder 2 tbsp


Method of Preparation

1. Beat the butter and sugar till light and fluffy.

2. Add the yogurt, vanilla extract, baking powder, baking soda and salt. Mix well.

3. Add the flour and mix till every thing is combined together. The dough will be very soft at this stage.

4. Split the dough into 2 sections.

5. Add Almond Powder to one portion and mix till combined.

6. Add the Cocoa Powder to the other portion and mix till combined.

7. Shape both into logs and wrap in cling film. Place in freezer for 30-45 min till it sets a little. The square of the log should be the size you want your final cookies to be.

8. Cut the logs into 4 portions.

9. Arrange the strips - chocolate and almond at base. and another almond and chocolate on top. Press them gently to make it stick.

10. Wrap again and place in freezer for another 30 minutes.

11. Slice into thin slices and place on a parchment lined baking sheet. I got about 4 dozen miniatures out of this. So I used 2 sheets.


12. Preheat the oven to 175 C.

13. Bake them for about 8-9 min. They will be very soft when they are done. It will become crunchy when they cool. So do not over bake.


Notes :

1. The bake time depends on how thick or thin you cut the cookies.

2. Make sure that the white portion does not change colour. If it browns, you have baked too long.

3. The cookies will not expand in size much, so you can arrange them near each other. Just leave a little space. 

Thursday, 8 August 2013

Dinosaur Cake (with the recipe for the Perfect Vanilla Sponge Cake)


My son wanted to do a Dinosaur Theme for his 4th Birthday! I ordered some balloons, banners, candles, plates, cups etc with that theme. Planned for a little tea party with his friends and their family. I have not made any elaborate cakes before. So the option was to order some fancy cake or to make a simple (no frosting one) at home.

With the new KitchenAid Stand Mixer sitting on my counter, ordering cake seemed wrong. So I was thinking of making something super simple. While looking online to see how complicated making a dino cake is, I saw a lot of 3D ones and I knew they were not for me. I suddenly chanced upon this one and this seemed alright. My husband promised me all the support and so we embarked on the cake making journey. Have to say it was not as bad as I thought it is going to be.

This cake also is for the wonderful group of bloggers part of Avant Garde Cookies (AnushaJayanthiKavithaPriya MRadhikaPriya S and Me). We cookies have cooked with each other for a whole year! Can you believe it, A Whole Year of Fun, Cooking, Clicking and Friendship! I am really thankful for having known each of you and all the chit chats that I have shared with you. I would not be writing this post with a cake if it had not been for your support and push! Love you gals!


I have made this Dinosaur cake with 2 round 7" Vanilla Sponge Cakes. You can make the same with other cakes like Chocolate cake. Also can be made with 8" or 9" cakes.

Ingredients (Makes two 7" round cakes)

Large Eggs 3
Self Raising Flour 175gms
Caster Sugar 175gms
Softened Butter 175gms
Baking Powder 1.5tsp
Vanilla Extract 1 tsp

Method of Preparation

1. Preheat the oven to 180 C (350 F).

2. Prepare the cake tins by greasing the bottom with some butter, line the bottom with a parchment paper and dust with some flour. Keep aside.

3. Beat together the eggs, flour, sugar, butter, baking powder and vanilla extract until smooth in a large mixing bowl.

4. Pour the batter into the prepared cake tins. 

5. Bake in the pre-heated oven for about 20-25 mins, or until golden brown, shrinking away from the sides of the tin and springy to the touch.

6. Leave to cool a little and loosen the sides of the cake, then lift the cake out of the tin. Cool on a wire rack. 

7. Leave it in the fridge for a few hours (or over night).

Butter Cream Frosting 

I did only a thin layer of buttercream and had about 1/3 of it left over.

Softened Butter 250gms
Icing Sugar 500 gms

1. Add the butter to a stand mixer. Give it a mix till it is softened.

2. Add the sugar a little at a time and mix till it is combined and is nice and creamy.

How to Assemble - use this template from Betty Crocker!

1.  Cut out Head and Tail from one cake (Though I baked a 7" cake, I just used the 9" template).

2. For body, cut 1-inch slice from edge of remaining whole cake. From cut edge, cut out a small inverted U-shaped piece. You can use the template for this as well.

3. Place body on tray; arrange head and tail pieces next to body.

4. Apply a thin layer of frosting called the crumb coat.

5. Apply the remaining frosting on the cake.

6. Decorate with chocolate buttons. Draw in eye and mouth (I was lazy to make a frosting, so just used some Nutella). 

Thursday, 25 July 2013

Vegetable Balti - Vegetarian Chicken Balti - Balti made with Soya Chunks


Balti is a very popular side dish served in Indian restaurants in UK. It is quite popular  (well, not as popular as Tikka Masala) dish here. Its origins are not quite clear. Some believe that is just originated in Britain, while other sources say they originated in Baltistan in Kashmir. Where ever it came from, it is quite different from the popular Punjabi sides that we were familiar with and we all loved it.

Avant Garde Cookies are making Kashmiri Food this week and though quite a few Kashmiri dishes came to my mind, this was just something that I really wanted to try. So here it is! Hope you will try it and enjoy it.


Ingredients

Onions 2 chopped
Garlic pods 5
Ginger 1 inch piece
Green chillies slit 2
Cumin/jeera 1 tsp
Coriander seeds 1 tsp
Tomato Puree 2 tbsp

Peppers  (of different colours if you get it) 3 cut into squares
Onions 3 cut into squares
Soya Chunks 1 cup (or substitute with potatoes)
Cumin powder 1 tsp
Turmeric 1 tsp
Kashmiri Red Chilli powder 1.5 tsp
Cinnamon powder 2 pinches
Garam Masala 1 tsp


Method of Preparation

1. Heat a little oil in a pan. Add the onions and saute for a few minutes till it starts to colour a little.

2. Add the garlic, ginger, green chillies, cumin and coriander. Saute for a few minutes till it all browns a little.

3. Add to a food processor or blender and grind into a smooth paste. Transfer back to the pan along with 1 cup of water and the tomato paste. Sauté till it all comes together and the colour darkens.

4. In the meanwhile heat oil (little at a time) in a wok. Add peppers and sauté till it is charred a little. Keep aside.

5.  Add the onions and sauté till it is also browned. Keep aside.

6. Cook the soya chunks in boiling water for 5-6 min. Drain and squeeze excess water out of the soya. Sauté that as well in the wok. Just a minute or 2 would do. Or if using potatoes, just boil till cooked.

7. To the onion paste that is cooking add turmeric, cumin powder, chilli powder and garam masala. Sauté for a couple of minutes.

8. Add the veggies and soya (or potatoes). Add 1-2 cups of water if required. Add some salt. Mix everything together. Simmer for a few minutes.

Serve with some roti or naan. Will go well with rice too.


Check out the other AGC thoughout this week 
AnushaJayanthiKavithaPriya MRadhikaPriya S

Also sending to My Legume Love Affair hosted by Aparna, Also check out Lisa's MLLA information page and Susan’s MLLA page.

Thursday, 18 July 2013

Homemade Granola with Fruits and Nuts

Granola is a popular breakfast food made of oats. It usually has some oil/butter in it and is sweetened with some honey, maple syrup or golden syrup. You can add a choice of spices to it. And of course some nuts, seeds and dry fruits. The combination of all these is a super healthy breakfast that no one can resist.


Eating cereal as part of breakfast became a habit when I moved to US, though I have eaten it a few times in India as well. Then along the line came Oats. I would be lying if I told you that I fell in love with it instantly. Over the years I have learned to love it. Oats, some Soy Milk and Raisins is how I like my oats.


Then came the era of Muesli and Granola. My first experience was with a Muesli. Well, you might at this point ask what is the difference. If you do not know, Muesli is basically uncooked oats mixed with fruit and nut. So it is more like toss everything and it is ready to go! But there comes the problem. I am not a uncooked oats kind of person. Plus did I tell you Muesli usually does not have much added sweeteners to it. Well, that is not good either for my taste buds, is it? I tried it a few times and quit. I was told last weekend by someone how she likes to eat her muesli which has been soaked overnight in milk. That kind of sounds interesting. I have to say I am tempted to try.


Well, anyways during those days of not liking Muesli and looking for something different we found Granola. As with a lot of things those days, we did find him in the isles of Costco. We loved it instantly. And we did eat it for a long time and lost him somewhere during our move to UK. I again stumbled upon him (you know Mr.Granola) recently. This time, I am a home cook and a baker. So I knew I had to try it at home.


We do not get the nice thick oats here. All we get is the Scottish Porridge Oats. Its not as thin as the instant ones, but not quite thick as well. Looking for thicker oats ended in a failure. I was almost about to give up when someone told me that they make Granola with Scottish Porridge Oats. And when Avant Garde Cookies decided to make something with the letter G - I knew G is for Granola!!!


Ingredients

Oats 3 cups

Nuts, Seeds and Fruits
Almond 1/2 cup
Sunflower seeds 1/2 cup
Pumpkin seeds 1/2 cup
Dry Fruits (Raisins, Cherries, Orange peel, pineapple etc) 2 cups

Spices
Ginger Powder 1/2 tsp
Cinnamon Powder 1/2 tsp
Salt 1/4 tsp

Wet Ingredients
Golden Syrup 1/2 cup
Oil 2 tbsp
Vanilla Extract 1 tsp

Method of Preparation

1. Preheat oven to 165 C. Brush a baking pan with some oil (use a little of the oil used in the recipe).

2. In a bowl add Oats, almonds, sunflower seeds, pumpkin seeds, salt, ginger powder and cinnamon powder. Give it a nice toss.

3. Mix the golden syrup, oil and vanilla extract in a small bowl.

4. Add this to the oats mix. Mix everything together till the oats are coated with the syrup mix.

5. Transfer to the baking tray.

6. Bake for about 25-30 minutes, stirring every 5 minutes. Bake till the oats are nicely browned, without burning it.

7. It will not be too crunchy when it comes out of the oven. Let it cool and then it will get crunchier.

8.Mix the dried fruits. I felt that the granola had a little too much fruits. Next time I will add only 1 cup of dried fruits.


Check out the other AGC thoughout this week 
AnushaJayanthiKavithaPriya MRadhikaPriya S

Tuesday, 9 July 2013

Mini Apple Pie - Individual Serving Size - Perfect Party Treat!


Making these Apple Pies have been one of my best baking projects ever. Well, you might think it is cause of the taste. It tasted awesome and it was simple to make. But no, that was not why I am so happy today. We woke up early this morning and made these together. My husband, little one and I had a fun morning making these Super Cute Pies. When we were done, the house was smelling so good. Am feeling really happy.


You can choose to make your own pie crust. Its quite simple. Its just a question of mixing flour, butter and water. I just chose to use store bought one this time. Will make my own next time may be.

Avant Garde Cookies chose Pies and Tarts for this week. The moment I heard the theme, I had 2 options that I wanted to try. One was a savoury one and other was this Apple Pie.


For years, I have hated Apple Pies. Don't ask me why. I don't even think it was cause of its taste. As a result, I extended my dislike to all Pies. Then incidentally, I ate a Pecan Pie (from Costco) and fell head over heals in love with it. You might wonder then how I started liking Apple Pie. It is quite a silly way. I had an apple pie from McDonalds as there was not other option for me at that time. And I kind of liked it. Then I thought, if I can like something from McDonalds, then the real deal should be better. Ofcourse it was!


Recipe Source

Ingredients

Ready Roll Short Crust Pastry 2 packs
Green Apples (or any baking apple) 5
Sugar 3/4 cup
Cinnamon 2 tsp
Flour 6 tbsp


Method of Preparation

1. Preheat oven to 200C (400F). Keep a muffin tray ready. No need to grease or flour it.

2. Peal and dice the apple into small bits.

3. Add the sugar, cinnamon and flour to it and give it a toss.

4. Roll out the short crust pastry. If you are making your own dough, just roll it out. I just went for the easy way out and picked it up at the store.

5. Using a 9cm cookie cutter, cut out circles and place them on the muffin tray. Press each circle in muffin tins until all the way up each side, to form little bowls.

6. Spoon in the filling.

7. If you are closing with a lid, cut out another circle with a 7cm cookie cutter. Place on top and using a fork press on the sides to join. Don't forget the little + on the centre to let the steam out.

8. If you are making lattice, cut out 6 strips. Just weave them alternating the weave. Its very easy.

9. Brush with a little milk on top. You can do an eggwash if you choose.

10. Bake for 20 minutes till the top is evenly browned. We are looking for a pale brown colour.

11. Let it cool in the tray for 5 minutes. Then gently pop it out and cool in a wire rack for another 5-10 min.

Serve warm as is or with some Vanilla Ice cream.


Check out the other AGC thoughout this week 
AnushaJayanthiKavithaPriya MRadhikaPriya S

Wednesday, 26 June 2013

Whole Wheat Ceylon Paratas with Moong Sprouts - Kelangu Rotti - Srilankan Rotti


I had once prepared and posted a Ceylon Parata made with potatoes and chickpeas. It was a really tasty dish which does not even need any sides. This week when I had some sprouts, I thought why not try a similar rotti with it. And so I made this. It was quite good, though I would still vote for this one.


Avant Garde Cookies are making Srilankan dishes and I tried a couple that did not work out. So here is my choice. Will have to work on some more Authentic Srilankan Dishes.

Ingredients (Makes 10)

Wheat Flour 2 cups
All Purpose Flour 1 cup
Oil 2 tbsp
Salt to taste

For Stuffing

Onions 2
Potato 3 Boiled
Moong Sprouts 2 cups
Coriander Leaves 2-3 tbsp
Coriander Powder 1 tbsp
Red Chilli Powder 1 tsp

Oil and salt to taste

Grind to Paste

Ginger 1 inch piece
Garlic 6 pods
Cinnamon 1 inch piece
Clove 4
Star Anise 2
Fennel Seeds 1 tsp
Cumin 1tsp


Method of Preparation

1. Mix the All Purpose Flour (Maida) and Wheat Flour in a bowl. Add salt to it and mix well.

2. Add a little oil and the knead into a smooth dough by adding enough water. Remember that because of Maida it will require less water than regular chapatti dough.

3. Place in a bowl. Cover with cling film. Let this rest for a couple of hours.

4. Heat a little oil in a pan. Add finely chopped onions. Saute till it starts to brown.

5. Grind ingredients under - grind to paste. Add to the pan. Saute for a few more minutes.

6. Add moong sprouts and toss for a couple of minutes. Sprinkle some water and cover and cook till the moong is cooked.

7. Add salt, coriander powder and chilli powder. Mix well.

8. Finally garnish with some coriander leaves.

9. Divide the dough and stuffing to 10 parts.

10. Take one portion of the dough. Roll it into a big circle.

11. Add the stuffing and shape it into a square.

12. Fold the dough from left to right and right to left with a little overlap.

13. Fold from top to bottom and bottom to top with a little overlap.

14. Now it will resemble a parcel.

15. Heat a tawa and place the parcel on the pan. Cook on one side and then turn and cook on the other side. You can add a little oil or butter while cooking this.

Enjoy as is or with some raita. Another combination is a gravy called Salna. I will post recipe for that soon.


Check out the other AGC thoughout this week 
AnushaJayanthiKavithaPriya MRadhikaPriya S

Saturday, 22 June 2013

Stuffed Bell Peppers - Peppers Stuffed with Broccoli, Potato and Quinoa - Vegan Stuffed Peppers - Indian Flavoured Stuffed Peppers


I have been wanting to make Stuffed Peppers for ages. I somehow lack confidence when trying to make stuffed dishes. Another one in my list is Stuffed Okra. I cannot imagine how you can slit okra and stuff it with things without breaking it. When compared to that, stuffing pepper was a breeze. There is so much space to stuff :-)


Jayanthi, my friend has a lot of amazing recipes in her blog. The best part is, they are not your everyday stuff. Most of them sound quite Exotic! Had a hard time trying to choose a recipe from her blog for this month's AGC. I really wanted to make the Chocolate Caramel Brownie Cookies and Chocolate Baklava Cigars. But this recipe for Stuffed Peppers caught my attention. I made it for dinner yesterday and we all totally enjoyed it.


Ingredients

Red Pepper 3
Yellow Pepper 3
Onions 2
Tomato 2
Ginger 1 inch piece
Garlic 6 pods
Potato 2
Broccoli 1 head
Quinoa 1 cup (uncooked)

Coriander powder 2 tsp
Chilli Powder 1 tsp
Cumin Powder 1 tsp
Garam Masala 1 tsp
Turmeric 1 tsp
Cumin 1 tsp

Oil and salt to taste


Method of Preparation

1. Heat 2 cups of water in a pan. When it comes to boil, add the quinoa and cook in medium heat till all water is absorbed and quinoa is cooked.

2. Boil or microwave potatoes till they are well cooked. Peal and Mash.

3. In a pan, heat a little oil. Add cumin seeds.

4. When it sizzles, add finely chopped onions and saute till they start to brown.

5. Make a paste of ginger and garlic and add to pan. Saute till the onion mixture is nicely browned.

6. Make a paste of the tomatoes and add to pan. Cook till water is almost absorbed and tomatoes are cooked.

7. Add finely chopped broccoli and saute till it is partly cooked.

8. Add coriander powder, cumin powder, garam masala, chilli powder and turmeric along with some salt. Saute for a couple more minutes.

9. Add mashed potatoes and cooked quinoa and mix everything together. Cook for a couple of minutes and switch off. Let it cool.

10. In the meanwhile, prep the peppers. Using a small knife gently core the top of the peppers and remove the seeds from the inside. You can use a mix of red and yellow peppers or just use red peppers.

11. Stuff each pepper with a portion of the stuffing. You can brush a little oil on the peppers. Place on a baking sheet. Cover with Aluminium Foil, making small dents to let air escape.

12. Preheat oven to 200 C (400 F).

13. Bake the peppers till it is well cooked. It took me 1.5 hrs. It should have been done by an hour, not sure why mine were not. But the end result was fabulous. I turned them around a little bit. Also laid down a couple peppers in between.


The peppers can be enjoyed as a dinner or can be served as a side for Roti.


Check out the other AGC thoughout this week 
AnushaJayanthiKavithaPriya MRadhikaPriya S

Monday, 10 June 2013

Raita with Sprouts

You do get bored making the same Onion-Tomato Raita every day, don't you? Well, nothing wrong with it. It is just awesome and I have to agree nothing can beat the taste of that.

But every so often we do need a change. When one of those waves struck, I made this Masala Raita a long time ago. It was loved by one and all.

Now it was time to experiment with some sprouts. And I have to say, it was way too good. No one would believe something as healthy as this could be this tasty. Perfect accompaniment to some Parata or Biriyani.


Ingredients

Onions 1
Sprouts 1 cup
Yogurt 1.5 cups
Water 1/4 cup (or as needed)
Salt to taste
Oil

Red Chilli powder a few pinches while serving
Chaat Masala a few pinches while serving

Method of Preparation

1. Heat a little oil in a pan. Add the onions and saute for a minute.

2. Add the sprouts and saute for a couple more minutes.

3. Transfer to a bowl and let it cool.

4. Whisk the yogurt well. Add a little water if needed. Add some salt as well.

5. Add the yogurt to the sprout mix. Stir well.

6. Serve topped with some chilli powder and chaat masala.

Avant Garde Cookies are making a dish starting with the first letter of their name. So with R it is Raita!


Check out the other AGC thoughout this week 
AnushaJayanthiKavithaPriya MRadhikaPriya S

Saturday, 25 May 2013

The Very Hungry Caterpillar Rolls (Pizza) and Butterfly Pizza


The Very Hungry Caterpillar is a very popular Children's Book. It is the first book that we read to Neel and it has been a family favourite. It has a beautiful story of a caterpillar, starting out as an egg, developing into a caterpillar, the adventures as a caterpillar, then it gets a cocoon and finally becomes a butterfly.

On Sunday the egg pops and a tiny caterpillar comes out.
On Monday, it eats 1 Apple
On Tueday, it eats 2 Pears
On Wednesday it eats 3 Plums
On Thursday 4 Strawberries
On Friday 5 Oranges
On Saturday, loads of Junk and gets stomach ache
On Sunday, it eats a green leaf, gets a cocoon..
And finally becomes a beautiful butterfly

As you can see, it also teaches little ones Metamorphosis, Days of the week, counting, names of fruits, message about healthy eating.

What's more little ones just love the colours and illustration. And the little worm holes in all the food is adorable.


When Avant Garde Cookies decided to cook from your favourite cook book, my little one and I donned our Aprons and 'cooked' this bread/pizza. he enjoyed both the cooking and eating part. It was a fun project during Easter holidays.


For Dough

Ingredients

Bread Flour (Or All purpose flour) 1.5 cups
Fast Acting Yeast 1 7gm packet (21/4 tsp)
(Note : though I used 1 pkts, now I use only 1/2 and I find it has a better taste. So use just one)
Salt 1/2 tsp
Sugar 1/2 tbsp
Warm Milk little under 3/4 cup (use as required)

Oil a little to grease

Method of Preparation

1. In a bowl, add the flour, yeast, salt and sugar.

2. Warm the milk and add a little at a time and make a dough. Knead it well till it is all incorporated.

3. Apply a little oil all around. Place in a bowl. Cover with cling film and let it rise, till it doubles.

For Green Sauce (Pesto)

Ingredients

Basil leaves few
Parmesan cheese 2-3 tbsp (skip for vegan version)
Sunflower seeds 1 tbsp
Olive oil 3 tbsp

Method of Preparation

1. Add everything to a mixer (food processor) and blend into a paste.

Other ingredients

Mushrooms for legs
Green Pepper small bits for head
Carrots (or olives for eyes)
Tomato sauce for head
Mozerella grated (if making as a pizza)
Olive oil to brush


Putting Together the caterpillar

1. Divide the dough into 15 parts.

2. Take 3 parts and join to form a ball. This will be your head. Flatten it a little.

3. Roll the rest 12 pieces and flatten them. Arrange them to form the body.


4. Add mushroom legs.

5. Brush the caterpillar with oil.

6. Preheat oven to 230C. (I used a fan oven this time. So my baking time was very less). Bake for 8-10 minutes. (It usually takes me more time).

7. If making as Pizza, Spread the sauce and add cheese toppings to all the body and head. I did not make it as a Pizza.

8. Once out of the oven, apply the green sauce for body and red sauce for head. Add eyes, mouth etc to head.

Once the caterpillar was made and enjoyed, my son asked me for more the next day. I had some dough and decided to surprise him with a Butterfly Pizza!


Enjoy!!


For the Butterfly Pizza, I used the same quantity of dough. Shaped as shown in the photo. Used Pesto as sauce. You can use Tomato sauce as well. For the top wings we topped with mushroom and bottom ones we used pineapple as they are my little ones fav toppings. You can use any of your choice.


Check out the other AGC thoughout this week 
AnushaJayanthiKavithaPriya MRadhikaPriya S