Saturday 31 August 2013

Murungai Ilai Adai - Savoury Crepes made with Drumstick Leaves


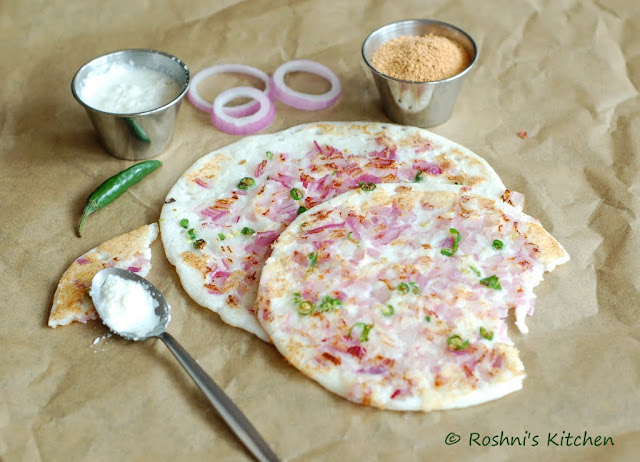
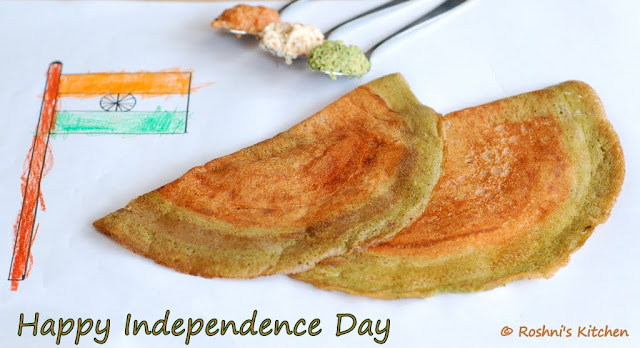
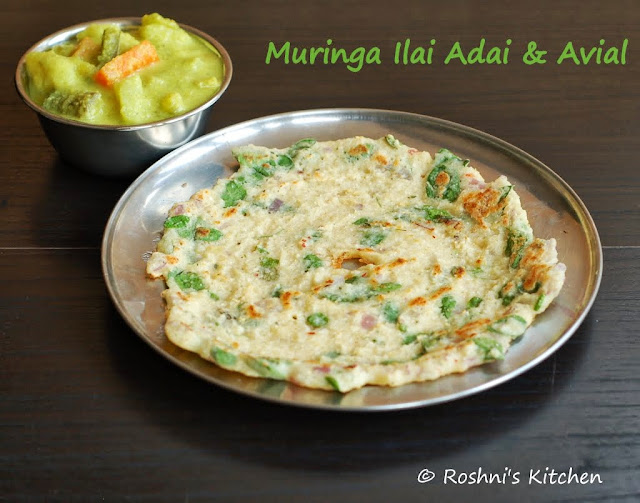
Adai is a lentil and rice crepe. It is very high in protein. Makes a filling breakfast or dinner. It is a very easy recipe to make and very forgiving. A little more or less of any of these ingredients won't make much difference to the taste. So even a novice cook can make awesome adai.


Adai is one of the first recipes that I posted in my blog and I was just looking at the photos and was wondering, how a person can take such aweful photos. I have come a long way from there.

Some Adai recipes in my blog
1. Adai
2. Milagu Adai
3. Oats Adai

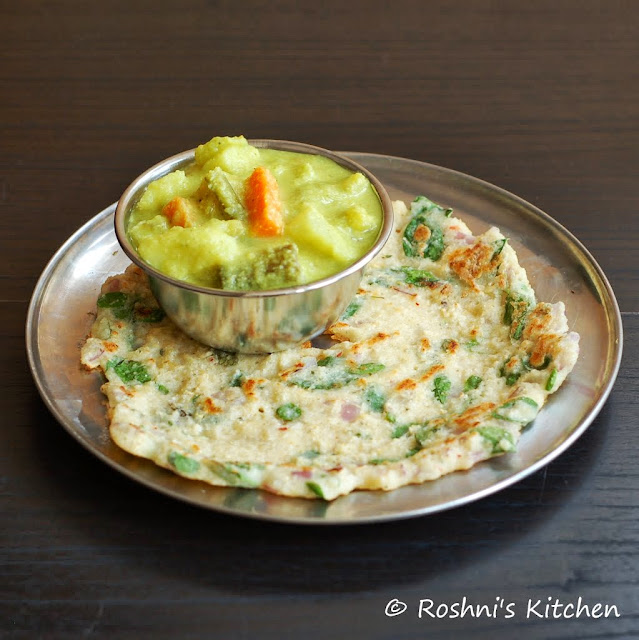
Now coming to today's recipe, the speciality is the Murunga Ilai - Drumstick Leaf. We used to have a tree in our backyard and we could get as much leaves and drum stick as we wanted. Now it is a rarity. I am still glad, well no grateful that we get it in our Indian Store. Hear it is hard to get even in India.


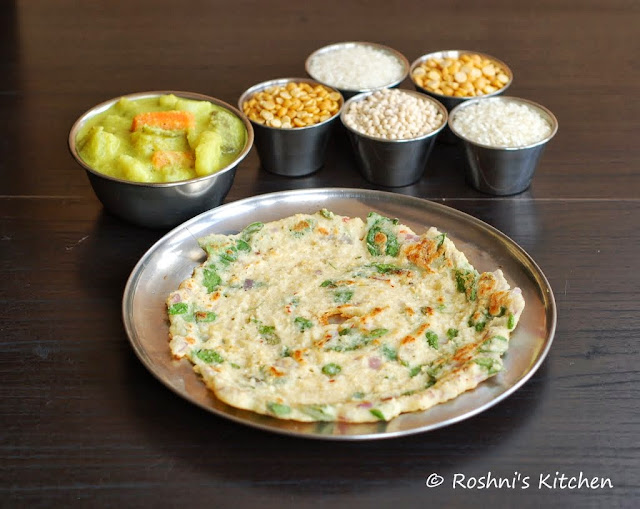
Avial (Recipe here) is served as a side dish for adai. Do not ask me why? No idea. It is just a very popular combo though Avial is usually a side dish for rice. I guess you just have to eat it to fall in love with the combo


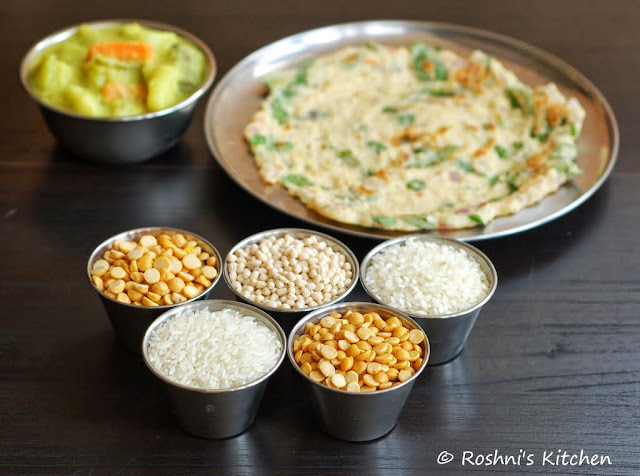
Ingredients (Makes about 15-16 adai)


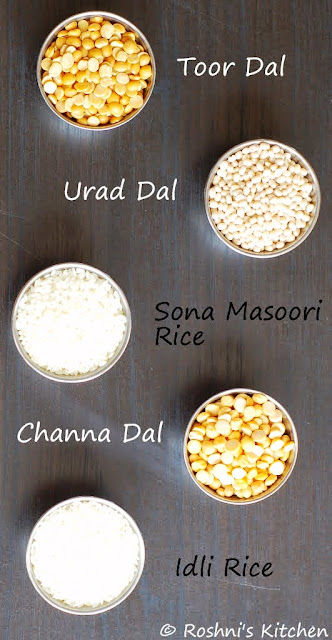
Sona Masuri Rice (or Raw Rice) 1/2 cup
Idli Rice 1/2 cup (or use any rice)
Toor Dal 1/2 cup
Urad Dal 1/2 cup
Channa Dal 1/4 cup

Onion 1 finely chopped
Drumstick Leaves 1 cup tightly packed (use spinach finely chopped if you do not get these leaves)
Dry Red Chilli 1
Green Chilli 2
Curry Leaves few
Hing (Asafoetida) a little

Salt to taste
Oil to cook

Method of Preparation

1. Soak the rice and dal overnight (or for 3-4 hours).

2. Grind into a coarse paste adding enough water along with red chilli, curry leaf, green chilli, hing and salt.

3. Add the onions and drumstick leaves and mix well.

4. In a tawa (flat pan), pour a laddle of the batter and spread with the back of the laddle. Drizzle a little oil and cook the bottom side. It will take a minute or 2.

5. Flip and cook the other side, about a minute.

6. Repeat for the rest of the batter.

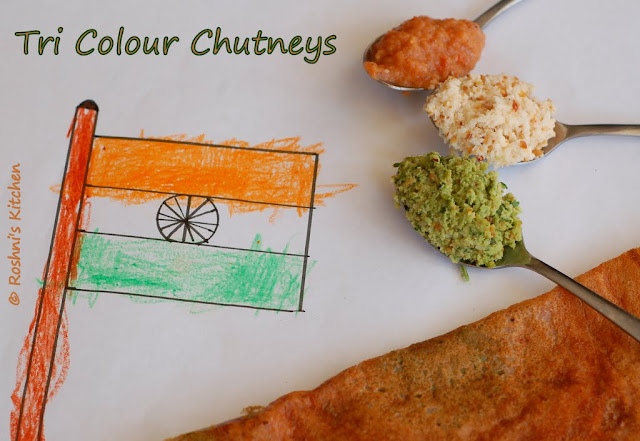
Serve with a chutney or sambar. Avial (a vegetable stew makes an amazing combination for adai. See recipe here).

Thursday 29 August 2013

Batata Nu Shaak - Gujarati Potato Curry


A very simple Potato Dish prepared in the Western State of Gujarat. I made it as part of the Gujarati Thali. Check it out for all other dishes from the cuisine.

Recipe given to me by Vaishali


Ingredients

Potato 4 cubed (no need to peal)
Tomato 1 chopped finely
Oil 2 tbsp
Mustard Seeds 1/2 tsp
Cumin Seeds 1/2 tsp
Hing a little
Turmeric Powder 1/2 tsp
Red Chilli Powder 1 tsp
Cumin Powder 1 tsp
Coriander Powder 1 tsp
Sugar 2 tbsp
Salt to taste
Coriander Leaves to garnish

Method of Preparation

1. Heat oil in a pan. Add the mustard seeds.

2. When it sputters, add the cumin seeds, hing.

3. When it sizzles, add the cubed potatoes. Saute for a couple of minutes.

4. Add the turmeric powder, chilli powder, cumin powder and coriander powder. Saute for another minute.

5. Add the chopped tomatoes, sugar and 1 cup of water.

6. Cook in low flame till all the water is absorbed and the potatoes are cooked.

7. Garnish with finely chopped coriander leaves.

Serve with some warm rotis. 

Wednesday 28 August 2013

Baked Vella Seedai - Sweet Seedai (Cheedai)

Happy Krishna Jayanthi to all of you. Krishna Jayanthi (Gokulashtami) is a celebration of the birth of Lord Krishna. It falls in the Aug-Sept month. A lot of snacks that Krishna likes are prepared to celebrate. Young kids dress up as Krishna and Radha and perform dances. In the evening, Prasadam (all food prepared) is offered to God and little steps are drawn from outside to the prasadam to represent the foot prints of little Krishna (symbolic of Krishna coming and eating the snacks).

Vella Sedai is made with flour and jaggery. It is usually a deep fried snack. But here I have made a baked version of it. It was actually very tasty. I have made a very small quantity. Increase to make more.


Ingredients (makes 20 seedai)

Rice Flour 1/2 cup
Urad Dal Flour 2 tbsp (see recipe below)
Coconut 2 tbsp
Jaggery 1/2 cup
Cardamom 1/8 tsp

Method of Preparation

1. Dry Roast the rice flour in a low flame till the colour changes slightly and a nice aroma comes.

2. Dry roast the pealed whole urad dal. Let it cool and powder into a fine flour.

3. In a bowl, mix the rice flour, urad dal flour and cardamom.

4. Add the jaggery along with 1/4 cup of water to a pan. Simmer till it is melted. Filter to clean out any impurities. Return the jaggery syrup back to the pan. Simmer till it thickens.

5. Add to the flour mix and make a stiff dough. If it is too soft, just add a tsp or so of rice flour. The idea is to make a dough that can be rolled into balls.

6. Preheat the oven to 200C. Line a baking sheet with parchment paper.

7. Make small balls (size of a marble). Arrange on the sheet. Brush a little oil on the balls.

8. Bake on the preheated oven for 15-20 min. I baked mine for 20 min. Check half way thru and give the tray a shake to get uniform baking.

I will bake it for 15 min next time. It was soft when it came out of the oven. But hardened a little after a little while. So the colour is what you should be looking for. 

Also, I forgot to toss in between. So it got a little burned at the base :-) 

Tuesday 27 August 2013

Baked Uppu Seedai - Salt Seedai (Cheedai)

Happy Krishna Jayanthi to all of you. Krishna Jayanthi (Gokulashtami) is a celebration of the birth of Lord Krishna. It falls in the Aug-Sept month. A lot of snacks that Krishna likes are prepared to celebrate. Young kids dress up as Krishna and Radha and perform dances. In the evening, Prasadam (all food prepared) is offered to God and little steps are drawn from outside to the prasadam to represent the foot prints of little Krishna (symbolic of Krishna coming and eating the snacks).

Uppu Seedai is a very popular snack made in Tamil Nadu for Krishna. Making it is quite easy. The dough balls are made as in the recipe below and deep fried. But it has a small problem. It is quite notorious for bursting while frying in the oil. I had an accident (minor one) last year and so I am very scared of making seedai now. Luckily I saw a message from a friend of mine  (latha), who said she made Baked Seedai. So I decided to give it a go. It was really good actually.


Ingredients

Rice Flour 1 cup
Roasted Urad Dal Flour 1 tbsp (see below)
Asafotida 1/2 tsp
Salt 1/2 tsp (or to taste)
Pepper Powder 1/4 tsp
Butter 1 tbsp (Just use oil for a vegan version, butter adds to the authentic taste)
Oil 2 tbsp

More Oil to brush

Method of Preparation

1. Dry Roast the rice flour in a low flame till the colour changes slightly and a nice aroma comes.

2. Dry roast the pealed whole urad dal. Let it cool and powder into a fine flour.

3. In a bowl, mix the rice flour, urad dal flour, asafotida, salt and pepper.

4. Add butter (at room temperature) and oil. Crumble with your hands.

5. Add little water at a time and make a stiff dough. I needed less than 1/2 cup of water. The idea is to make a dough that can be rolled into balls.

6. Preheat the oven to 200C. Line a baking sheet with parchment paper.

7. Make small balls (size of a marble). Arrange on the sheet. Brush a little oil on the balls.

8. Bake on the preheated oven for 20-30 min. I baked mine for 30 min. Check half way thru and give the tray a shake to get uniform baking.

You are looking for a Golden Brown colour for the Seedai. 

Monday 26 August 2013

Gujarati Thali

Gujarat is a state in the Western Side of India. I have special love for that state cause I was born there and my mother grew up there. Though I have not lived there, I have great memories of my childhood holidays spent there.

When Avant Garde Cookies decided to make Thali for this week, I knew I wanted to try Gujarati Thali. I usually make Tamil Thali and Kerala Thali. But I have never been bold enough to try a Thali from another state. This experience has given me the confidence to try out more Thali.


Before I proceed to describe the Thali, let me first say a very very Big Thank You to Vaishaliji. She is a blogger who blogs at Ribbons and Pastas. She helped me come up with the items in this Thali. I have tried to stick to her ideas and have tried to make as Authentic Gujarati as possible. I am posting the Thali today. I will add the individual dishes in the next few days and link back to this post. Stay Tuned!!


Dishes Prepared

Drink 
Chaas - Buttermilk flavoured with cumin, green chillies, ginger and hing

Sweets
Gol Papdi - Made with Wheat Flour, Ghee and Jaggery. It is supposed to be square in shape. it did not quite set for me. So I rolled it into a ball.

Shrikhand - Thickened Yogurt with sugar and cardamom

Side Dishes
Batata Nu Shaak - Potato Curry
Tindora Nu Shaak - Tindora Curry

Dal
Gujarati Dal - Toor Dal cooked with Gujarati Flavours

Starter/Accompaniments
Dhokla - Steamed Besan or Chickpea flour
Leele Chutney - Green Chutney made with coriander and peanuts
Papads
Kachumber - Indian Salad with onions,tomatoes,cucumber tossed in lemon juice

Mains
Rice
Rotli - Thin Roti made with Wheat Flour 

Sunday 25 August 2013

Oats Pesarattu - Oats and Green Moong Dal Crepes

Pesarattu is a crepe made with Green Moong Dal. Check the Original Recipe here. Today's version of it is a healthier version of it with the addition of Oats. A power packed, tasty, and healthy breakfast to give your day a head start.


We love Oats in our house. So it is not surprising that my blog is loaded with Oats Recipes. Do Check out some of these lovely recipes and try them at home.

Oats Pongal
Oats Idli
Oats Adai
Apple Raisin Oatmeal
Vegan Chocolate Banana Oatshake
Classic Oatmeal Raisin Cookies
Homemade Granola with Fruits and Nuts


Ingredients

Green Moong Dal 3/4 cup
Oats 1.5 cups
Green Chilli 1 or 2
Ginger 1 inch bit
Salt to taste
Oil to cook the dosa

Method of Preparation

1. Soak the moong dal overnight. Drain water and grind to a smooth paste by adding a little water along with the green chillies and ginger.

2. Heat a pan and add the oats. Toast it till a nice aroma comes. Cool and powder it. Add to the dal batter.

3. Add enough water to make a thick batter.

4. Heat a tawa and pour a laddle of batter and make dosa (Spread it). Add a little oil to cook it.

5. Cook on one side and flip and cook on the other side.

6. Repeat for the rest of the batter. Serve with Chutney of your choice.

After cooking with Legumes and making Salads, AnuRadhika and I (my recipes) are making Dosa Varieties this month. Stay tuned for more dosa varieties from all of us. 

Friday 23 August 2013

Cinnamon Sugar Soft Pretzels and Garlic Parmesan Pretzel

A pretzel is a type of baked bread product made from dough most commonly found in a unique knot-like shape. Pretzels originated in Europe. The traditional pretzel shape is a distinctive symmetrical looped form, with the ends of a long strip of dough intertwined then, twisted back into itself in a certain way. Now, pretzels of various shapes are available around the world. Pretzels are often seasoned and flavoured with various salts, sugars or other various seeds or nuts.


There are usually 2 types of Pretzels - hard and soft ones. Today's recipe is that of the Soft Pretzel. It is baked as part of the group 'We Knead to Bake'. We are baking a bread a month with the recipes from Aparna and having a blast! Here is this month's link


Ingredients(Makes 12 Large Pretzels or 36 Pretzel sticks)

Flour 31/4 cup (425 gms)
Instant Yeast 2 1/4 tsp ( 7gm packet)
Sugar 3 tsp
Warm Milk 1 cup
Salt 1/2 tsp

For Soda Water
Water 6 cups
Baking Soda 2 tbsp

For Topping
Sugar 1/2 cup
Cinnamon 1 tsp
Melted Butter 4-6 tbsp (as needed)

Method of Preparation

1. In a stand mixer (or a bowl) add flour, yeast, salt and sugar. You can just start with 3 and add 1/4 if needed. I started with 31/4 and so had to add an extra 3 tbsp of milk to make a soft dough.

2. Add milk and knead into a soft dough for about 8-10 min. If you are using Active Dry Yeast instead of Instant Yeast, remember to proof the yeast with the warm milk along with salt and sugar. Add the mix to the flour in the bowl.

3. Form the dough into a ball and place in a large oiled bowl, turning to coat the dough with oil. Cover and allow the dough to rise for about 40 minutes or until doubled in size.

4. Deflate the dough and divide dough into 12 equal portions. If you are making 'pretzel' shaped ones, then you will get 12 pretzels. I made half in the Pretzel shape and rest in the form of Pretzel Sticks. For making sticks, divide each portion into 3 portions. So I got 6 pretzels and 18 sticks.

5. Work with one portion at a time and cover remaining dough to prevent it drying. Roll each portion into an 20-inch-long rope with tapered ends.

6. Cross one end of rope over the other to form a horse shoe shape.

7. Twist the rope at the base. Fold the ends over the circle and into a traditional pretzel shape, pinching gently to seal.


8. If you want to make the Pretzel sticks, just roll each of the smaller portion into logs.

9. Place pretzels on a baking sheet lined with parchment paper. Cover and let rise 10 minutes (pretzels will rise only slightly).

10. Put the 6 cups of water and baking soda in a non-aluminium pan and bring to a boil. Turn down the heat and simmer.

11. Gently lower a pretzel into the simmering water. Cook on each side for about 15 seconds. The pretzel will swell/ puff up a bit.

12. Remove from the water with a slotted spoon, drain all the water and place it back on the baking sheet. Repeat with the remaining pretzels.


13. Preheat the oven to 220C. Bake for about 12 minutes or until pretzels are deep golden brown. Transfer to a wire rack to cool. If making Pretzel sticks, they were ready in 10 min.

14. Melt the butter and keep ready. Mix the sugar and cinnamon and keep ready.

15. As soon as it comes out of the oven, dip in the butter and then dip in the sugar/cinnamon mix.

I also made some of the Pretzels savoury with Garlic Parmesan Flavour. Add Garlic powder to the melted butter. Dip the warm pretzels in the butter mix and then in Grated Parmesan.

Thursday 22 August 2013

Vegan Butternut Squash Soup


I have had my share of soup in my life and I have to say, this is by far one of the best soups I have ever had. Do you see me saying this quite often? Well, I guess I must love my soups :-) Now the challenging question is when it comes to having Soup for Dinner, Am I attracted to the soup or the bread/butter that comes with it! The answer in most cases is the bread. Even in this case that would not have been wrong cause it was soooo good. But the soup beat the bread this time.

Wondering what that bread is? It is a Savoury Kugelhopf baked as a loaf. Check out the recipe, it is an awesome bread.


You don't need a lot of Ingredients or spices to make super tasting Soup. Just the right combo is the key. Totally loved this combination. I will never look at Butternut Squash the same way again. Go on, try it.. I know you want to!


Ingredients (Serves 3-4 as a meal with bread)

Butternut Squash 1 medium
Onion 1
Potato 1
Red Pepper 1
Garlic 4-5 pods
Ginger 1 inch piece

Chilli Powder or Garam Masala 1/2 tsp
Oil and Salt to taste

Method of Preparation

1. Cut the butternur squash into 2 vertically. Brush a little oil and bake in a preheated oven at 150C for 45 min. Scoop out the flesh and keep ready.

2. In a pan, heat a little oil. Add onions and let it brown a little.

3. Add chopped garlic and ginger. Saute for a couple more minutes.

4. Add chopped pepper and potato. Saute till it is cooked. You can add a little (2-3 tbsp) of water if needed.

5. Let the mix cool and make a fine paste. Puree the squash as well.

6. Pout everything back into the pan. Add some salt and garam masala (or chilli powder or pepper powder).

7. Add 1.5 cups of water/stock/milk to it and mix. Bring it to a boil and simmer for a few minutes.

Serve with some bread!

Tuesday 20 August 2013

Vegan Summer Zucchini Risotto - Courgette Risotto


Why go to a restaurant and order Risotto when you can make one at home in less than 30 minutes. Super delicious, healthy and flavourful Risotto made right in your kitchen. Packed with veggies and herbs, you will love the burst of flavours. You can sprinkle some Parmesan Cheese while serving if you want.


Recipe from BBC Good Food

Ingredients

Onions 1 finely chopped
Garlic 2 pods finely chopped
Tomatoes 2 finely chopped
Risotto Rice 350gms
Rosemary 1-2 tsp chopped
Hot Water 1.5 L (6 cups) (or use stock)
Courgettes/Zucchini, diced 2
Frozen Peas 140gms (about 1 cup)
Basil a few leaves
Olive Oil and salt

Grated Parmesan Cheese to serve (optional)

Method of Preparation

1. Heat the oil in a large pan. Add the onions and garlic. Saute for 5 mins until the onion has softened.

2. Add the tomatoes and cook for 3-4 mins until softened and pulpy.

3. Add the rice and rosemary, saute for a minute.

4. Pour in half the water (or stock) and leave to cook for 10 mins or until the liquid has evaporated, stirring from time to time.

5. Add the rest of the water (or stock), then continue to cook for a further 5 mins.

6. Stir in the courgettes and peas, then cook for another 5 mins or so, stirring until the rice is tender, but the mixture is still a bit saucy. Add some salt to taste.

7 Finally add the basil and stir until wilted. Serve immediately.

Sunday 18 August 2013

Onion Chilli Uttappam - Savoury Indian Pancake


Uttapam is similar to dosa and is made with the same batter. The main difference is that it is made thicker and softer than dosa. Also usually it is topped with some veggies. Today I have made a Onion and Chilli Uttapam.


Ingredients (to make 1 uttappam)

Dosa Batter 1/4 cup (see notes below)
Onion finely chopped 2 tbsp
Green Chilli 1/2 tsp
Sesame oil (or any oil) as required.


Method of Preparation

1. Pour Dosa batter on a hot pan. Do not spread it much.

2. Immediately sprinkle the onions and green chillies. Cook on one side. Add a few drops of oil.

3. Flip and cook on the top side just a little.

Serve with some chutneys or molaga podi (lentil spice powder).

Notes : Dosa/Idli Batter

If you are new to making dosa batter, this is a quick description of the method of making Dosa/Idli Batter. I use 1 cup of urad dal (whole pealed) and 3.5 cups of rice (idli rice). Soak rice in hot water for 3 hours and urad dal along with 1 tsp of fenugreek seeds in cold water for 1 hour. grind urad dal with about 2 cups of water adding little at a time. Takes 30 min in my grinder. Keep aside. Grind Rice with about 2 cups of water adding little at a time. It takes 20 min in my grinder. Mix both with 2 tsp of salt. Allow to ferment overnight. Dosa/Idli Batter is ready to use. If making Idli or Uttappam you can use this batter as is. If making Dosa, add some more water to adjust the consistency.

After cooking with Legumes and making Salads, AnuRadhika and I (my recipes) are making Dosa Varieties this month for Palooza in the pan. Stay tuned for more dosa varieties from all of us. 

Saturday 17 August 2013

Mini Checker Board Cookies - Chocolate and Almond Butter Cookies - Eggless Cookies


Checker Board Cookies are so pretty to look at. The more the squares, the better they look, don't they? There are some versions with a dark or white wrap on the outside. I have been dreaming about baking them for ages. Was not bold enough to try a complicated design. Just started off with a 2*2 square.  All in good times :-) This is a beginner version of the cookie and is very very easy to make.


Like I told you before, Avant Garde Cookies have completed an year of cooking together and we are celebrating this month with a lot of specials. Week 1 was Cakes. Check out all our cakes -

Anu - Jamaican Banana Layer Cake
Radhika - Vanilla Sponge Cake with Chocolate frosting
Jayanthi - Tres Leches
Kavi - Oreo Cream Cake
Me - Dinosaur Cake (Vanilla Sponge with Buttercream Frosting)


Now for Week 2, it is cookies!! My son and I had loads of fun baking these. He called it day and night cookies :-) These cookies are nothing but variations of butter cookies or ice box cookies as they are called because of the chilling that is required to cut them into slices. Usually it is cooled in the fridge overnight, but I took a short cut and used the freezer :-) Works well actually.


Ingredients

Butter 113gms (1/2 cup)
Caster Sugar 100gms (1/2 cup)

Yogurt 1/4 cup
Vanilla Extract 1 tsp

Baking Powder 1/4 tsp
Baking Soda a pinch
Salt a pinch

All Purpose Flour 195gms (1.5 cups)

Almond Powder 2 tbsp
Cocoa Powder 2 tbsp


Method of Preparation

1. Beat the butter and sugar till light and fluffy.

2. Add the yogurt, vanilla extract, baking powder, baking soda and salt. Mix well.

3. Add the flour and mix till every thing is combined together. The dough will be very soft at this stage.

4. Split the dough into 2 sections.

5. Add Almond Powder to one portion and mix till combined.

6. Add the Cocoa Powder to the other portion and mix till combined.

7. Shape both into logs and wrap in cling film. Place in freezer for 30-45 min till it sets a little. The square of the log should be the size you want your final cookies to be.

8. Cut the logs into 4 portions.

9. Arrange the strips - chocolate and almond at base. and another almond and chocolate on top. Press them gently to make it stick.

10. Wrap again and place in freezer for another 30 minutes.

11. Slice into thin slices and place on a parchment lined baking sheet. I got about 4 dozen miniatures out of this. So I used 2 sheets.


12. Preheat the oven to 175 C.

13. Bake them for about 8-9 min. They will be very soft when they are done. It will become crunchy when they cool. So do not over bake.


Notes :

1. The bake time depends on how thick or thin you cut the cookies.

2. Make sure that the white portion does not change colour. If it browns, you have baked too long.

3. The cookies will not expand in size much, so you can arrange them near each other. Just leave a little space. 

Thursday 15 August 2013

Kathirikka Gothsu - Eggplant in a Tangy Tamarind Sauce - Side Dish for Venn Pongal


Venn Pongal (recipe here) is a rice and lentil based dish served for breakfast in South India. It is quite rich with ghee (clarified butter) and cashews. It is flavoured with pepper, cumin and ginger. The best side dish for Pongal is a Gothsu. It can be prepared with tomato called tomato gothsu (recipe here) or with eggplant. Other sides that go great with Pongal are Sambar and Coconut Chutney.


Ingredients

Onions 1
Eggplant 1 big

Mustard 1/2 tsp
Hing/Asefoetida a pinch
Dry Red Chilli 1
Green Chilli 1
Curry Leaves few

Tamarind Paste 1.5 tsp
Water 3 cups
Rice Flour 1 tsp (optional)

Oil and salt to taste


Method of Preparation

1. Bake the eggplant in an oven @ 230C for about 30 min. Grease it a little bit and make 3-4 slits on it before baking. Rotate it half way thru. Let it cool. Peal the skin and mash the eggplant. If you do not have an oven, you can char the eggplant on the stove top as well. Just use the smaller variety of eggplant (2 or 3).

2. In a pan, heat a little oil. Add the mustard seeds. When it sputters, add the red chilli (broken), green chilli (slit), curry leaves (chopped) and hing.

3 When it sizzles, add the onion and saute for a few minutes till it starts to brown.

4. Add tamarind paste and water. Add some salt and mix well. Bring to a boil and cook for a few minutes till the sauce thickens. You can optionally add a little rice flour to help it along.

5. Now add the eggplant paste and cook for few more minutes.

Serve as a side for Pongal. Will work great as a side for Dosa/Idli or even with rice and roti. 

Monday 12 August 2013

Tri Colour Dosa - Tomato Dosai and Spinach Dosai - Happy Independence Day


Happy Independence Day to all my friends from India! As a person living outside India, teaching my son about our culture is very important to me. And as all Indians would agree, food forms a great part of all our celebrations. So I thought what better way to teach my son the colours of our National Flag than thru food. Here today, to make Dosa I have used regular dosa batter and coloured it using tomato puree and spinach puree.


I have also got the recipe for an amazingly easy Tri Colour Parata/Roti as well. I used Carrots and Spinach to colour the roti. You can ofcourse on a normal day make the carrot roti and spinach roti separately. It is super easy and adds to the nutritional value of the roti.

 I served the dosa with Tricolour Chutneys. Chutneys served today are Tomato Onion Chutney (Orange), Thenga Thogayal (White) and Coriander Thogayal (Green).


Hope you enjoy all the recipes. Do stop by to give me feedback!

Ingredients

Dosa Batter (See notes below) 1.5 cup divided into 3, Should be of idli batter consistancy at this stage.

For Orange Colour
Take 1/2 cup and add a 1-2 tbsp of Tomato Paste till you get the desired colour.

For White Colour
Take 1/2 cup and just add a little water to get the desired consistency

For Green Colour
Take 1/2 cup and to that add 1 cup of spinach (pureed). Add a little water to make the puree.

Make sure that the batter is not too runny. You can add things like Green Chilli, Cumin etc to the dosa batters to make it more tasty. But this itself tasted great.

To Make Dosa

1. Pour the tomato batter (2tbsp) on the pan.

2. On top of that pour 2 tbsp of white

3. Finally add 2 tbsp of green batter.

4. Do a circular motion with a laddle to spread the batter (like you do for normal dosa).

5. Cook on one side and flip and cook on the other side.

In this method it is a little hard to get the white colour. Another option is to make the 3 separate and enjoy them :-) Or you can pour the 3 batter one below the other and spread each horizontally.

Notes : Dosa/Idli Batter

If you are new to making dosa batter, this is a quick description of the method of making Dosa/Idli Batter. I use 1 cup of urad dal (whole pealed) and 3.5 cups of rice (idli rice). Soak rice in hot water for 3 hours and urad dal along with 1 tsp of fenugreek seeds in cold water for 1 hour. grind urad dal with about 2 cups of water adding little at a time. Takes 30 min in my grinder. Keep aside. Grind Rice with about 2 cups of water adding little at a time. It takes 20 min in my grinder. Mix both with 2 tsp of salt. Allow to ferment overnight. Dosa/Idli Batter is ready to use. If making Idli or Uttappam you can use this batter as is. If making Dosa, add some more water to adjust the consistency.

After cooking with Legumes and making Salads, AnuRadhika and I (my recipes) are making Dosa Varieties this month. Stay tuned for more dosa varieties from all of us. 

Saturday 10 August 2013

Beetroot Stir Fry - Just 2 ingredients and 2 spices


Who says kids won't eat vegetables. They will as long as it is prepared in a way that they will love. We do not eat meat at home and so most of our sides have veggies in it. And I love those sides. But even I find it difficult to eat steamed veggies without spices. This is my attempt to make a simple stir fry without using all elaborate ingredients associated with Indian Dishes.

Believe me you will have kids asking for seconds.


With this post I am planning to start a series of posts with the Theme - Indian Food with Minimal Ingredients. The aim is to use minimal ingredients without compromising the taste. When some one wants to try making Indian food, they should not have to go shopping for 20 different spices (which many Indian dishes have). Trick is to know which are the key ingredients that bring out the flavour of the dish!

Another recommendation I have for someone trying to make Indian food is to go buy Spices in an Indian Store. Most cities now have one. You will find that the spices sold in Western Supermarkets/Shops are often over priced (3-4 times the value in Indian stores). So be adventurous and pop into an Indian store, ask for help and pick your spices and lets cook!


Ingredients

Beetroot 3
Onion 1
Cumin Seeds 1/2 tsp
Chilli Powder or Smoked Papprika 1/2 tsp (use 1 tsp for spicy)

Oil and Salt to taste

Method of Preparation

1. Finely chop the onions.

2. Peal and chop the beet roots.

3. In a pan, heat a little oil. Add the cumin seeds and let it sizzle.

4. Add the onions and saute till it starts to brown.

5. Add the chopped beets and give it a stir. Cook covered till the beets are almost cooked.

6. Add some salt and chilli powder as required. Mix and cook for a few more minutes.

Serve as a side dish with rice or any dinner!

Thursday 8 August 2013

Dinosaur Cake (with the recipe for the Perfect Vanilla Sponge Cake)


My son wanted to do a Dinosaur Theme for his 4th Birthday! I ordered some balloons, banners, candles, plates, cups etc with that theme. Planned for a little tea party with his friends and their family. I have not made any elaborate cakes before. So the option was to order some fancy cake or to make a simple (no frosting one) at home.

With the new KitchenAid Stand Mixer sitting on my counter, ordering cake seemed wrong. So I was thinking of making something super simple. While looking online to see how complicated making a dino cake is, I saw a lot of 3D ones and I knew they were not for me. I suddenly chanced upon this one and this seemed alright. My husband promised me all the support and so we embarked on the cake making journey. Have to say it was not as bad as I thought it is going to be.

This cake also is for the wonderful group of bloggers part of Avant Garde Cookies (AnushaJayanthiKavithaPriya MRadhikaPriya S and Me). We cookies have cooked with each other for a whole year! Can you believe it, A Whole Year of Fun, Cooking, Clicking and Friendship! I am really thankful for having known each of you and all the chit chats that I have shared with you. I would not be writing this post with a cake if it had not been for your support and push! Love you gals!


I have made this Dinosaur cake with 2 round 7" Vanilla Sponge Cakes. You can make the same with other cakes like Chocolate cake. Also can be made with 8" or 9" cakes.

Ingredients (Makes two 7" round cakes)

Large Eggs 3
Self Raising Flour 175gms
Caster Sugar 175gms
Softened Butter 175gms
Baking Powder 1.5tsp
Vanilla Extract 1 tsp

Method of Preparation

1. Preheat the oven to 180 C (350 F).

2. Prepare the cake tins by greasing the bottom with some butter, line the bottom with a parchment paper and dust with some flour. Keep aside.

3. Beat together the eggs, flour, sugar, butter, baking powder and vanilla extract until smooth in a large mixing bowl.

4. Pour the batter into the prepared cake tins. 

5. Bake in the pre-heated oven for about 20-25 mins, or until golden brown, shrinking away from the sides of the tin and springy to the touch.

6. Leave to cool a little and loosen the sides of the cake, then lift the cake out of the tin. Cool on a wire rack. 

7. Leave it in the fridge for a few hours (or over night).

Butter Cream Frosting 

I did only a thin layer of buttercream and had about 1/3 of it left over.

Softened Butter 250gms
Icing Sugar 500 gms

1. Add the butter to a stand mixer. Give it a mix till it is softened.

2. Add the sugar a little at a time and mix till it is combined and is nice and creamy.

How to Assemble - use this template from Betty Crocker!

1.  Cut out Head and Tail from one cake (Though I baked a 7" cake, I just used the 9" template).

2. For body, cut 1-inch slice from edge of remaining whole cake. From cut edge, cut out a small inverted U-shaped piece. You can use the template for this as well.

3. Place body on tray; arrange head and tail pieces next to body.

4. Apply a thin layer of frosting called the crumb coat.

5. Apply the remaining frosting on the cake.

6. Decorate with chocolate buttons. Draw in eye and mouth (I was lazy to make a frosting, so just used some Nutella). 

Wednesday 7 August 2013

Pulikachal - Puli Sadam - Tamarind Rice - Puliyodarai

Pulikachal is a tamarind based sauce and is used to make a rice variety called Puli Sadam (or Tamarind Rice). It can be used as an awesome spread for Sandwiches too. Its quite popular in South India. It keeps well for a long time. So you can make the sauce ahead of time and keep in fridge. Just make sure you use a clean and dry spoon to take it out.

My best memories of Puli Sadam is from my childhood. When we did train journeys (2 days worth of it) to get to my grand parent's house, my mom used to pack food for us. Poori Masala was usually for day 1. Day 2 usually was puli sadam and Idli with molaga podi. And loads of snacks packed from home. Not to forget the coffee/tea from the train. Though just mediocre, we used to love buying them with some snacks from different states we used to pass by. One of the nights, my dad would buy us Railway Meals as well. Again, it was not great tasting, but we used to look forward to it!


This post is for my friends M and N who love Puli Sadam. We used to take some rice variety while going hiking. And after a long hike, picnic was fun. Miss you guys!

My MIL makes really awesome Pulikachal. She packs a jar for us whenever we visit. It lasts in the fridge for us for upto a month.. A real treat.


The Red Chilli and Puli (tamarind) you use for this recipe is very much dependant on the type you get. Most recipes call for 10-15 red chillies. But mine was super hot chilles and the 2-3 that I used made my rice nice and spicy. So it is about making it and experimenting with the quantity based on your chilli. I would recommend starting low and upping it if needed.

Ingredients

Mustard 1/2 tsp
Urad Dal 1 tsp
Channa Dal 1 tsp
Hing/Asafetoda 1/4 tsp
Dry Red Chilli 1
Curry leaves few
Tamarind Paste 1.5 tbsp
Peanuts 1/4 cup
Sesame Oil (or any oil) 2-3 tbsp
Salt a little

To Dry Roast
Channa Dal 2 tbsp
Coriander Seeds 1 tsp
Fenugreek Seeds 1/2 tsp
Dry Red Chilli 2 (usually ppl add upto 10 chillies here. But mine are super spicy and this itself make the sauce very spicy)

Method of Preparation

1. Heat a pan and add the channa dal. Dry roast till it browns a little. Remove and keep aside.

2. Add the coriander seeds, fenugreek seeds and broken dry red chilli. Roast till sizzles a little and add to the dal.

3. Powder them and keep ready. Mix the tamarind paste with 2 cups of water and keep ready.

4. In the same pan, add Sesame Oil (or any oil). Add the mustard.

5. When the mustard sputters, add the channa dal and urad dal.

6. Add Hing, Dry Red Chilli and Curry leaves.

7. Add the Tamarind Water. Bring it to a boil.

8. Add the powdered spices and give it a mix. Add the peanuts as well.

9. Cook till the mix thickens and forms a paste.

10. You can mix required quantity of the mix with rice and eat.

I was able to make Puli Sadam with 3 cups of rice using the above mix.

Tuesday 6 August 2013

Papaya Smoothie - Tropical Detox Smoothie

Papaya is a sweet, buttery tropical fruit. When raw, it is used in India to make side dishes. Ripe fruit can be eaten as is, or as a salad or in the form of Juice or Smoothie. The combination of papaya, yogurt, ginger and mint make this smootie a wonderful Detox Smoothie. It is quite filling and is great for your digestive system.


I have not used any sugar or sweeteners cause my Papaya was super sweet. Add some if need be. You can also optionally add some ice cubes to this. My husband preferred it with very less mint, but I loved it with loads. So adjust to your taste.


Ingredients (Makes 2 cups)

Papaya pealed and chopped 1.5 cups
Milk 1/4 cup
Yogurt 1/4 cup
Ginger 1 tbsp chopped
Mint 1 tbsp chopped (use less for milder flavour)

Method of Preparation

1. Add the ginger and mint to a blender and grind it.

2. Add the papaya and blend again. You can blend into coarse or smooth as per your preference.

3. Add milk and yogurt and give it a final blend. 

Sunday 4 August 2013

Savoury Kugelhopf - Savoury Gugelhupf - A Savoury Bread with Sundried tomatoes and Onions - Eggless Bake

A Kugelhopf (also spelt as Kugelhupf or Gugelhupf) is a yeasted sweet cake well known in the Alsace region of France, as well as in Germany, Switzerland, and Austria, and variations of this are also found in some countries of Eastern Europe. The most common story about the Kugelhopf is that Marie Antoinette (the same lady of the “let them eat cake” fame!) brought it from her home country Austria, to France upon her marriage to King Louis XVI.


The Kugelhopf is typically baked in a special pan that that is round with a hole in the centre, somewhat like a bundt pan but heavier. Since it is a yeasted cake, the Kugelhopf has a dense bread-like texture and is made from a somewhat enriched dough like brioche but is not as rich. It is considered similar to a coffee cake that might be eaten for or with breakfast, or could be part of an afternoon snack with coffee. 


This savoury version is also good for breakfast, as a snack or with a simple soup. A lesser known version of the Kugelhopf is its savoury Alsatian version called the Kugelhopf aux Lardons. “Lardons” is the French word for bacon, and this version is typically made with onions, ham/ bacon, walnuts and herbs. I have used a loaf tin to bake this. 
  
Ingredients

All Purpose Flour 3 -31/2 cups
Instant Yeast 2 tsp 
Salt 1 tsp
Butter, at room temperature 75gms
Warm Milk 3/4 cup
Eggs 2 (replace each egg with 1 tbsp of flax seed powder dissolved in 3 tbsp of water)
Oil as required for sauteing onions and for brushing pans
Onions, finely chopped 1 (about a cup)
Sundried Tomatoes, finely chopped 1/2 cup
Pumpkin Seeds 2 tbsp
Sunflower Seeds 2 tbsp
Black Pepper, powdered 1 tsp
Dry Italian Herbs 1 tsp


Method of Preparation

1. In a stand mixer (or processor or by hand) mix 3 cups of flour, yeast, and salt.

2. Then add the butter, a little at a time, and process till incorporated.

3. Add the warm milk and process till mixed. 

4. Now add the eggs (or flax seed mixture) and process till mixed. You will now have a soft and sticky dough. Knead some more, adding more flour, a little at a time and just enough till the dough pulls away from the sides of the bowl. I did not add any more than the original 3 cups

5. Your dough will be very soft, elastic and just short of sticky. Transfer the dough to an oiled bowl, cover and let it rise until double in volume. This can take from 1 1/2 hours to 2 1/2 hours. Mine was done in 1 hour.

6. In the meanwhile, heat oil in a pan and sauté the onions with a pinch of salt till they turn golden brown. Remove and let it cool.

7. Grease a loaf tin (or a kugelhopf mould or bundt pan).

8. Once the dough has risen, deflate it. Then work the stir-fried onions, sundried tomatoes and the seeds along with black pepper and herbs into the dough. The best way to do this is to flatten the dough out and spread all this over the surface, fold the dough over and then knead it. This will ensure a more uniform incorporation of the “filling”. Do not add more flour!

9. Roll the dough into a longish log, long enough to fit into the mould comfortably. Lift the “log” of dough and place it in the mould. 

10. Cover and let the dough rise for about an hour or so, until it reaches the edge/ rim of the mould. (mine was done in 30 min).

11. Preheat the oven and bake the Kugelhopf at 200C (400F) for about 35 to 40 minutes until the top is golden brown and sounds hollow when it is tapped. I stopped mine at 30 min, but feel I should have left it for another 5 min. 

12. Unmould the Kugelhopf and let it cool on a rack. Slice and serve. This Kugelhopf should serve about 10.

Recipe and Step by Step Instruction by Aparna