Showing posts with label Sweets. Show all posts

Monday, 9 November 2015

Rava Ladoo - Rava Coconut Laddoo - Rava Laddu - Sooji ka Ladoo

Rava Ladoo is a laddu made with Semolina or Sooji Rava. You have to use a finer variety of rava. Not the powdery kind you use for Pani Puri. If your rava is a little too coarse, just pulse it in a mixie to get the texture right. Same with sugar. Not too coarse, not too powdery.

There are many different ways to make this laddu. Addition of coconut or not is a variation. Same with Milk. I have made this version with Coconut cause that's how we eat in our state Kerala. Most Tamilian Versions skip the coconut. Adding milk helps in rolling the laddu easily. But it reduces the shelf life of the laddu.


Saturday, 7 November 2015

Jalebi - North Indian Jalebi - Diwali Recipe

Jalebi is a very popular North Indian Sweet. This is not to be confused with the South Indian Sweet called Jangari (which also is sometimes referred to as Jalebi). The North Indian version that I have made here used Maida or All Purpose Flour, its thin, crispy and sugary. The South Indian version is made of Urad Dal Batter, it is thicker, softer and chewy.

I am a big fan of the South Indian Jangari. Am yet to post the recipe here for that though i made it before. This one is prepared on the special request of my son who usually does not like Sweets. He own words were it is crispy, sweet and yummy, what's not to like. So here you go.


Tuesday, 3 November 2015

Chocolate Mysore Pak - Ghee Mysore Pak - Easy Foolproof recipe - Diwali Special


Diwali is just round the corner. All of us will be preparing sweets and savories in the coming days and getting ready to celebrate. Mysore Pak is a very popular sweet and some consider it very tricky to make. But with the right technique, it is quite easy to make. This is a version with chocolate flavour. My mother used to make it. I made this on my brother's request.

Thursday, 17 September 2015

Pidi Kozhakattai - Sweet Arisi Kozhakattai - Steamed Sweet Dumpling made with rice

Pidi Kozhakattai is a steamed sweet dumpling made out of of rice. I have posted a savoury version of the same before. It is prepared for Ganesh Chathurti.


Tuesday, 21 October 2014

Chocolate 7 Cup Cake - Chocolate Burfi - Diwali Sweet

Diwali is just a day away and I am totally enjoying making sweets to share with friends and family. Hope your Diwali preparations are coming along well. Wishing you all a very Happy and Prosperous Diwali!

Its another celebration in my blog. It is nearly 3 years old (just 2 more weeks). And this is my 601st post (well, I missed celebrating the 600th post)! I made the 7 cup cake and posted for you a couple of years back. This time I am presenting an even yummier version with some chocolate!


Monday, 20 October 2014

Kaju Katli - Cashew Fudge - Vegan, Gluten Free, Indian Diwali Sweet

Diwali season is time to eat sweets to your hearts content. I love sweets and can never stop eating them. So to me, this season has been all about making loads of sweets. Though I wanted to try some new sweets this year, I ended up making Mysore pak and 7 cup cake a lot.


My son is the total opposite of me. He does not care much for anything sweet. But then there are a few things he eats as he fancies at that time. He used to like 7 cup cake last year. This year, he has chosen Kaju Katli. So I was all excited to fulfill his request. This sweet is usually a big hit among adults and children alike.

Tuesday, 14 October 2014

Boondi Ladoo - Diwali Sweet - Step by Step recipe - Vegan, Gluten Free

Diwali is just a week away. We are all busy planning what we are going to make for our loved ones. I am also working on what I am making for my family (collecting their wish list). How can I forget the blog? I need something new to celebrate Diwali with my wonderful readers. I will start off this year with an awesome sweet - Boondi Ladoo.


Wednesday, 23 July 2014

Plum and Raisin Puffs - Indian Food Bloggers Meet - Kitchen Aid Contest


Did you know that the first Indian Food Bloggers Meet is happening in Bangalore on Aug 1st-2nd 2014? I am so excited to be in India at that time. You will understand my sentiment if you are a blogger. I am going to meet my friends of the last couple of years for the first time. It feels like I have known these gals all my life. Its hard to believe I have never met them. So now my dream comes true.


Check out this link for more details of what is happening at the event. There are so many wonderful sessions on Food Photography, Food Writing, Master Classes, a goody bag to take home and the opportunity to meet some wonderful food bloggers. Many of these people have helped me understand the world of blogging and baking. I would never be so confident if it had not been for the virtual support of these wonderful bloggers.


Now the event is studded with contests and prizes to be won. So here I am sending my entry to the Kitchen Aid Contest. I am a big fan for Kitchen Aid. My husband got me a Kitchen Aid Stand Mixer for my last birthday. I have used it almost every day in the last year. Be it to make the humble atta for my daily Chapati, or my weekly bread fix or the cakes and cookies that I have whipped up. So looking forward to a chance to win the Kitchen Aid Chopper! What an addition it would be to my kitchen.


Ingredients (Makes 9)

Puff Pastry Sheet 1
Plums 2
Raisins 2 tbsp
Sugar 1 tbsp (more for sweeter pastry)
Cinnamon 1/4 tsp

Milk for brushing
Sugar for Dusting 1 tsp

Method of Preparation

1. Chop the Plums into small pieces.

2. Add the Raisins, Sugar and Cinnamon. Toss well.

3. Spread the puff pastry and cut it into 9 pieces.

4. Add a tbsp of the mix into each puff sheet.

5. Fold it into two and seal the edges.

6. Make small slits on top to let steam out while baking.

7. Brush on top with milk and sprinkle the sugar on it.

8. Preheat oven to 220 C and bake for 15-20 min till the top is slightly browned.

9. Cool on a wire rack. 

Wednesday, 13 November 2013

Nimish - A Rich Creamy Dessert!

Awadhi Cuisine originates from Lucknow in the Northern India. It is the cuisine of the Nawabs and hence rich in its variety and taste. Popular dishes from this cuisine include Biriyani and Kebabs. The Nawabs brought chefs from as far as Persia to cook in the royal kitchens and so you will see a lot of Middle Eastern influence in this Cuisine.


Coming to today's recipe, I wanted to make something from Awadhi Cuisine for our group Avant garde Cookies. The first thing that came to my mind was to make Kebabs. Its been in my list for way too long. But then I happened to see Rick Stein's show on India. If you have not seen it, do check it out. It gives you a perspective of India that you would never have got before. The recipes featured, the restaurants visited, the cultural aspects - mind blowing.


Nimish is made during the cold months. It has an interesting method of preparation. Early morning dew is collected on a sheet spread outside and it is collected and mixed into cream. Well, I would one day like to see how they do that. For now, I did not bother collecting dew of any kind. Just simple Nimish. It makes an Awesome Royal Dessert!

Though I stuck to the original recipe, next time I might try some more flavouring like Chocolate or Mango to it to add more depth of flavours!

Ingredients (makes 4 generous servings)

Double Cream (Heavy Whipping Cream) 300 ml
Powdered Sugar 50gms
Rose Water 1 tsp
Saffron a generous pinch
Milk 80ml (1/3 cup)
Pistachio to garnish

Method of Preparation

1. Warm the milk and add saffron to it. Let it sit till the colour is infused into the milk. Mine was actually not a good saffron, so though I get the taste it does not impart great colour. Hence my Nimish is white instead of the pale yellow it should be :-) Let this mix cool down.

2. Whip the cold double cream till you get a whipped cream consistency.

3. Fold in the milk, sugar and rose water.

4. Transfer to serving cups. I was able to fill 4 medium size ramekins.

5. Cover and cool in the fridge for a few hours.

6. Chop some Pistachio Nuts and sprinkle on top before serving. 

Thursday, 31 October 2013

Mysore Pak - Ghee Mysore Pak - Diwali Sweets - Easy Foolproof Recipe


Mysore Pak is a very popular South Indian Sweet made with Chickpea Flour. It just has 3 ingredients - Chickpea Flour, Sugar and Ghee. Growing up I always saw my mum make mysore pak with such ease that I thought it was the easiest sweet ever. When I first moved out of my house for work, I made Mysore Pak for my first Diwali. I had my mom on phone all the while :-)


There are 2 kinds of Mysore Pak. One is called the Ghee Mysore Pak which as the name suggests will be soft and dripping with Ghee. The other kind is the Porous Mysore Pak also called Honeycomb Mysore Pak. It has a beautiful porous texture cause of the tiny air bubbles trapped inside. There is no argument as to which one is better. There are people who love both. I will post recipe for Porous kind some other day.


Now coming to this Mysore Pak recipe. Most people find making mysore pak very daunting. You have to know about the 1 string, multi string etc. (need to know more about what it is, read here). This recipe calls for none of that. I learned it a few years ago from a colleague's wife. I have been making it this way for years now and never had a bad lot.


Ingredients (Makes 16 pieces)

Chickpea flour (Besan) 1 Cup
Sugar 1.5 Cups
Ghee 1 Cup (Use upto 2 cups if you like. for me 1 was good enough. i have made with 2 cups and it will be wet with ghee and awesome. you can try that as well sometime!)

Method of Preparation

1. Melt the ghee in a pan and keep it warm and ready. Grease a 7*7 square cake tin (or any plate) ready.

2. Sieve the chickpea flour well. In a heavy bottomed pan, add the besan and roast it till the raw smell is gone. It will take around 3-5 min. Keep aside in a bowl.

3. Add 1/2 cup of ghee to the besan. Mix well till there are no lumps. You can optionally cool the besan and then sieve it one more time before adding ghee.

4. In the same pan, wipe with a cloth and add the sugar along with 3/4 cup of water. Mix well.

5. Let the sugar mix come to a rolling boil. Switch off.

6. Add the besan-ghee mix to the sugar and mix well.

7. Put the mix back on the stove and start stirring.

8. Add the rest of the ghee a little at a time mixing well. Cook in a medium low flame.

9. Mix till the whole thing starts to come together. If you work your spatula thru the middle of the pan, you can see the line clearly before the sweet joins up together. :-) It will start to collect at the base and change colour.

10. That is your cue. Pour the sweet into the greased plate. It will be quite liquid like at this stage. Don't worry. It will set.

11. After about 10-15 min, cut the pieces (draw lines). Do not separate or try to take it out of the plate.

12. Once it is completely cooled, take the pieces out.

Store in an airtight container. Enjoy!

Tuesday, 29 October 2013

Coconut Burfi - Thenga Burfi - Coconut Fudge - Diwali Sweet - Vegan Option


Coconut Burfi is a sweet made with just a very few ingredients. Main components are coconut and sugar cooked with some water. It is flavoured mildly with cardamom. You add a little bit of ghee (clarified butter) at the end for added flavour. If you want to make it Vegan you can skip it as well. It is one of the rare sweets made without ghee. Most indian sweets are drenched in ghee.


There is an incident that comes to my mind every time I think of coconut burfi. We grew up in a very close knit community where we would all eat from each other's houses (uninvited). So if a sweet or savoury is made in a house all the neighbourhood children got a share of it when they pop into the kitchen. But with coconut burfi, i once took it to a little extreme. One of my neighbours made it so well that I popped in to her house every 10-15 min to eat them. Well, I kept at it till I made sure that the entire box was empty :-)


Usually it is made with freshly grated coconut. When doing that make sure that you grate only the top white part and not the bottom brown bit. I actually made these with Frozen coconut and believe me, if I do not tell you, you will not be able to tell the difference. So for those of you sitting in foreign countries with no access to fresh coconut, do try it with a good quality frozen coconut. Take the required quantity. Thaw in microwave for 1.5 min and you are all set.

Ingredients (Makes 16 pieces)

Coconut Grated 2 cups
Sugar 1.5 cups
Water little over 1/2 cup
Cardamom Powder 1/4 tsp
Ghee (Clarified Butter) 2 tsp (optional)

Method of Preparation

1. Grease a 7*7 square tin. Or any plate.

2. Heat a Thick (Heavy) bottomed pan or a non stick pan. Add the sugar and water to it.

3. Boil till you reach the 1 string consistency. (Take a slightly cooled drop of sugar mix on your index finger. Touch with your thumb. Separate the fingers. If the sugar forms a thread it means you have reached 1 string).

4. Add the coconut and mix well on medium flame.

5. Keep stirring till the water mostly evaporates and the mixture comes together.

6. Add the ghee and cardamom powder.  Mix well.

7. Transfer to the plate. Even out the top. It will be a little moist at this stage. Do not worry. It will solidify as it cools.

8. Let it cool for some time (about 10 min).

9. Mark lines on it to cut the burfi. Do not cut fully or separate them at this stage.

10. Let it cool completely. Cut into pieces and store in an airtight container.

Sunday, 27 October 2013

Maida Burfi - Maida Cake - Vanilla Fudge - Diwali Sweet


Diwali season has started. All the houses are buzzing with preparation for Diwali. Every year I also look forward to making some awesome sweets and savouries. Traditionally at home, my mom makes a few sweets and savouries. And along with that is a Lehiyam. Do check out the recipe on Lehiyam in my blog. It has amazing medicinal properties. After eating all the goodies, this works as a great digestive.


In the morning, we wake up much before dawn. Then have an oil bath. We all get special new clothes all purchased specially for the day. Then we enjoy some sparklers and fireworks. The whole street comes alive with the festivities. Next we visit our family and friends. We share our sweets with everyone and enjoy the holidays.


I start this diwali with this sweet recipe from my friend Radhika's blog. It is quite easy to prepare. The only thing you need to be mindful of is the 1 string consistency. In India we do not use Candy Thermometer. The doneness of sugar is defined by the strings. How, you ask? Spoon out a little syrup, and when it is warm enough to touch and still hot, take a drop on your index finger. Touch with your thumb and separate. If a single thin string forms, it is a one string consistency.

Ingredients (makes 32 pieces)

Maida/All Purpose Flour 2 1/4 cups (290 gms)
Sugar 3 cups
Ghee (Clarified Butter) 3/4 cup
Water 3/4 cup
Vanilla Extract 1.5 tsp
Cardamon a pinch

Method of Preparation

1. Grease two 7*7 square cake tins. Or just any big plate.

2. Sieve the flour and keep ready.

3. In a pan, add the ghee and melt it.

4. When ready, add the flour and still in low flame for 3-4 min till the raw smell is gone. Switch off.

5. In another pan, heat the water and sugar. Boil it till it comes to a 1 string consistency. See notes above.

6. Add the syrup to the flour mix. Stir vigorously for about 2 min till it comes together. Though mine came really good, I would have loved to stop just 10-15 sec before.

7. Keep a close eye. Once it starts collecting, transfer to the greased plates. Flatten the top with a flat surface.

8. Cut when the fudge is still warm.

9. Once cooled transfer to an airtight container.

Enjoy!

Monday, 23 September 2013

Khaliat Nahal - Middle Eastern Honey Comb Bread - Sweet and Savoury Versions


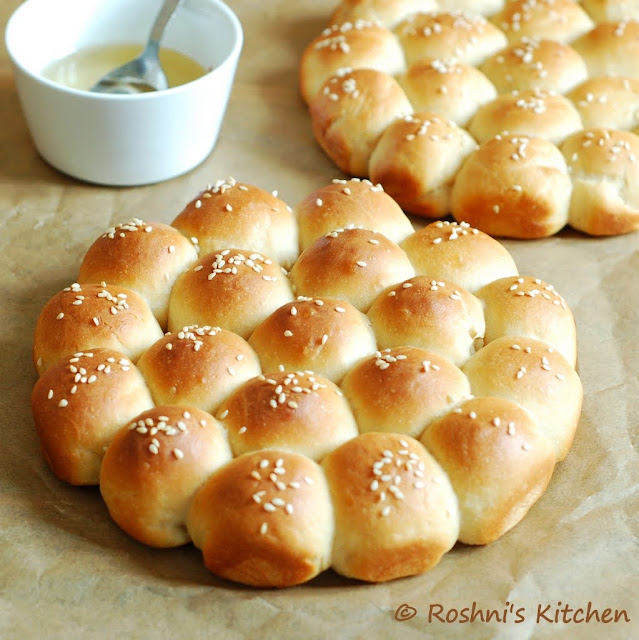
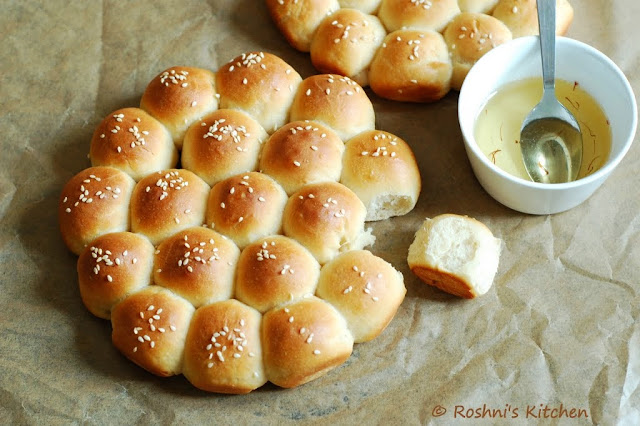
Khaliat al Nahal (also known as Khaliat Nahal) translates as Bee’s Hive in Arabic. This is because the buns are baked close to each other in a round pan where they form a honeycomb like pattern. They’re traditionally made sweet and glazed with honey flavoured syrup, though savoury versions are also made. Traditionally, the filling used in this bread is a small piece of plain cream cheese. I have used some Cheddar Cheese in one batch and made the other batch without any filling


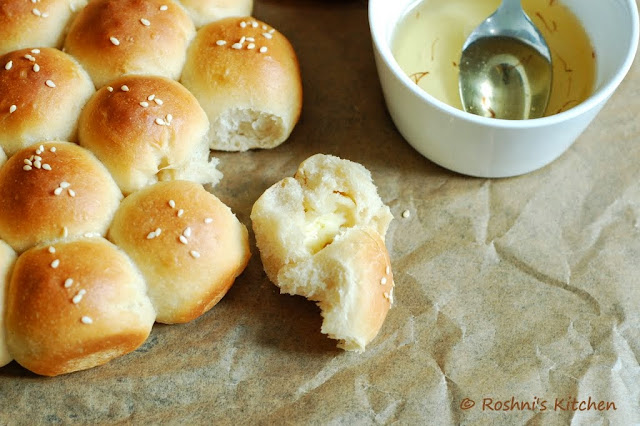
You can choose to do any filling of your choice. As I mentioned before, a cream cheese filling is traditional. But you can play around with options. I sued Cheddar cheese. You can use veggies or Paneer as well. As for the syrup, traditionally as soon as the bread comes out of the oven, pour the prepared syrup. I wanted to make an all in one bread. So I kept the stuffing neutral - just cheese. No spices. I made the bread with a little salt and a little sugar. Not as sweet as the sweet version. And served the sugar syrup as a dip along with some soup. So both in the same bake right?


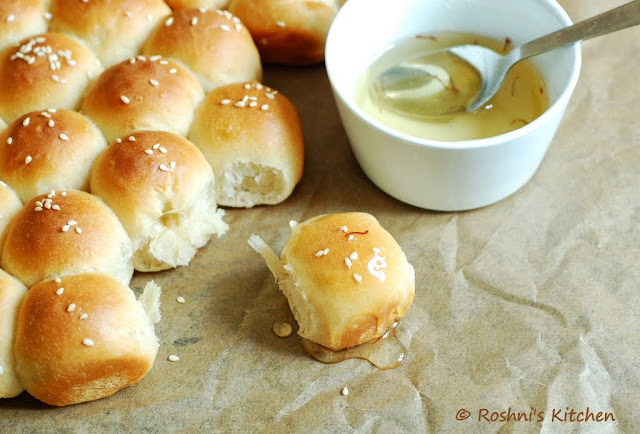
Sugary Goodness! This one is a bread bite with sugar syrup poured all over. It was soooo good. I would highly recommend trying the sugar syrup with this bread.


Ingredients

For the dough
Lukewarm milk 1 cup
Fast acting Instant yeast 1.5 tsp
Sugar 1 tsp *
Strong White Bread Flour (or all purpose flour) 325gms (2.5 cups)
Salt 3/4 tsp *
Butter, melted and cooled 40 gms
Milk for brushing the dough 2 tbsp
White sesame seeds for sprinkling on top 2 tbsp

Note : If making as just sweet bread, use 3tbsp of sugar and 1/4 tsp of salt. I made it with 1 tsp sugar and 3/4 tsp salt.

For the filling
Cheddar Cheese - about 80gms, a very small bit per bread. I stuffed only 1/2 the above recipe.

Sugar Syrup/ Glaze
Sugar 1/4 cup
Water 3 tbsp
Saffron a pinch
Honey 1 tsp
Lemon juice 1/2 tsp

Method of Preparation

1. Add flour (reserve 1/2 cup and add as required), yeast, sugar, salt and butter in the mixing bowl. Mix well. If using active dry yeast, proof it using the warm milk.

2. Add the milk and combine till well kneaded. Add the reserved flour as needed. I used the whole 2.5 cups of flour.

3. Shape the dough into a ball and place it in a well-oiled bowl, turning it to coat completely with the oil. Cover and let it rise till double in volume, for about an hour.

4. Turn the dough out onto your work surface. You won’t really need to flour it as the dough is quite manageable as it is. Cut it into 2 halves. Work with 1 half keeping the other covered. 

5. With your palms, roll out each half a rope. The size of each piece and the number depends on what size tray you are using and how many circles you are going for. I made mine in 2 small 7" sandwich tins. So each portion I divided into 19 small balls. It will be very small balls. Once baked it was the size of a small lemon. 

And oh, I weighed the dough, divided into half. Then just divided the weight with 19 to get the weight of each portion. Was easier that way for me.

6. Flatten each ball and add a piece of cheese or any stuffing of your choice. Cover and make into a ball. Roll it within your palm.

7. Place the balls in a baking tray in a pattern. I did one in a centre, 6 around it, then placed another layer on the top, trying to align with the middle and top.

8. Let it rise for a second time for about  30 min.

9. Brush on the top with milk. Sprinkle some sesame seeds.

10. Bake for about 25-30 min till the top is browned.

11. Let it rest for 5 min and then cool on a wire rack.

Serve with some soup or drenched in sugar syrup

Sugar Syrup : To make the syrup, in a pan heat the sugar and water with the saffron till warmed and sugar is dissolved. Switch off and add the honey and lemon juice. 


 It is baked as part of the group 'We Knead to Bake'. We are baking a bread a month with the recipes from Aparna and having a blast! Here is this month's link

Wednesday, 28 August 2013

Baked Vella Seedai - Sweet Seedai (Cheedai)

Happy Krishna Jayanthi to all of you. Krishna Jayanthi (Gokulashtami) is a celebration of the birth of Lord Krishna. It falls in the Aug-Sept month. A lot of snacks that Krishna likes are prepared to celebrate. Young kids dress up as Krishna and Radha and perform dances. In the evening, Prasadam (all food prepared) is offered to God and little steps are drawn from outside to the prasadam to represent the foot prints of little Krishna (symbolic of Krishna coming and eating the snacks).

Vella Sedai is made with flour and jaggery. It is usually a deep fried snack. But here I have made a baked version of it. It was actually very tasty. I have made a very small quantity. Increase to make more.


Ingredients (makes 20 seedai)

Rice Flour 1/2 cup
Urad Dal Flour 2 tbsp (see recipe below)
Coconut 2 tbsp
Jaggery 1/2 cup
Cardamom 1/8 tsp

Method of Preparation

1. Dry Roast the rice flour in a low flame till the colour changes slightly and a nice aroma comes.

2. Dry roast the pealed whole urad dal. Let it cool and powder into a fine flour.

3. In a bowl, mix the rice flour, urad dal flour and cardamom.

4. Add the jaggery along with 1/4 cup of water to a pan. Simmer till it is melted. Filter to clean out any impurities. Return the jaggery syrup back to the pan. Simmer till it thickens.

5. Add to the flour mix and make a stiff dough. If it is too soft, just add a tsp or so of rice flour. The idea is to make a dough that can be rolled into balls.

6. Preheat the oven to 200C. Line a baking sheet with parchment paper.

7. Make small balls (size of a marble). Arrange on the sheet. Brush a little oil on the balls.

8. Bake on the preheated oven for 15-20 min. I baked mine for 20 min. Check half way thru and give the tray a shake to get uniform baking.

I will bake it for 15 min next time. It was soft when it came out of the oven. But hardened a little after a little while. So the colour is what you should be looking for. 

Also, I forgot to toss in between. So it got a little burned at the base :-) 

Tuesday, 30 July 2013

Granola Trifle


Last week I made some Homemade Granola. You will not believe how easy it is to put together a Granola at home. Once you make it, you will never buy again. After a couple of days of eating the Granola with milk, my mind wandered in search of something new to do with the Granola. So here you go. Super Simple Trifle. You can eat this as breakfast or you can even serve this as healthy dessert!

Don't want to make your own Granola? No worries, just use a store bought one.


Ingredients

Granola 3/4 cup (Homemade Granola recipe here)
Flavoured Yogurt 1 cup (I used blueberry yogurt)
Berries of choice (I did not have have any that day)

Method of Preparation

1. Take the serving cup and start with a layer of Granola 1/4 cup.

2. Add Half the yogurt.

3. Add some more granola (1/4 cup)

4. Add the rest of the yogurt.

5. Top with the rest of the granola.

6. Finish off with a layer of berries (As I said, I did not have any that day). But berries add to a freshness to the Trifle. So don't miss it.

Don't forget to check the Homemade Granola!

Monday, 22 July 2013

Microwave Chocolate Fudge - Microwave Chocolate Palkova - 10 min recipe


Ever since I made Palkova in a microwave in less than 10 minutes, I wanted to make the chocolate version of it. I tried it this week and it was amazing. The cocco powder kind of took away the 'palgova'ness of the sweet and gave it a more 'fudge'y taste. It disappeared so fast. We all loved it. Well, not me cause I do not like any milk based sweets. But even I ate some portion of this cause the chocolate invited me


Ingredients

Condensed milk 1 can
Yogurt 2 tsp
Ghee 1 tsp
Cocco powder 1 tbsp


Method of Preparation

1. Take all the above ingredients in a microwave safe bowl. I used a big pyrex bowl .The bowl should be deep as the milk will keep boiling over.

2. Heat for 2 minutes. Keep an eye on it all the time. If it rises, take out and stir and continue with the minute.

3. Do it again for 1 minute. Stir and put it back in. Keep doing this till your fudge attains a grainy texture and is not watery.

4. Microwave times will vary. It took me 8 minutes (it may take as less as 5 min). Keep in mind that it hardens when it starts to cool. So you want it to be a little bit guey when you stop stirring.

Saturday, 20 April 2013

Gajar Ka Halwa - Carrot Halwa - 400th Post - Step by Step recipe


Gajar Ka Halwa / Carrot Halwa is a very popular Indian Dessert. The sweeter the carrots, the better the taste. Basically it is Grated Carrots cooked in milk and sweetened with a little sugar. You can optionally add some Khoya (crumbled paneer) to this to give it some richness.


My blog which I started as a small little venture has grown so much under my eyes. Well, I might sound quite formal here. But I have to say it. It could not be achieved without your support. My family (my Husband, little one and my dad) have been very good Guinea Pigs. Eating up all that I make. The friends (and some very special ones) that I made in the blogging world. You have become like a family to me. And then my friends who encourage me when I meet them or thru online feedback. Some of you who try the recipes posted, some who tell me they got inspired to cook cause of me and many whose recipes I try out! And all the internet users who come my way.. Wow, it really feels great. Thank you for encouraging me and teaching me.. Love you all.


Ingredients

Carrots Grated 2 cups
Milk 2 cups
Sugar 1/4 cup + 2 tbsp
Cashews few
Ghee 3 tbsp


Method of Preparation

1. Wash and Peal the carrots. Grate the carrots. I used a fairly big size grater. That was a thing I wondered before I started making. The size of the grater. I was not sure if I should go for smaller size. Looking around I realized that bigger size is better. Otherwise the result will be very mushy and will not have a texture.


2. Heat ghee in a pan. I added 2 tbsp and reserved 1 tbsp for the end. Add cashews. Fry till they brown a little. Take out of the ghee and keep aside.


3. Add the grated carrots to the ghee and saute till the carrots are slightly cooked.


4. Add milk and simmer till the milk is all drained out. Keep stirring in between. Using a non stick pan will help cause other wise, at this step it will start sticking to the bottom of the pan.


5. Add sugar and mix. The mix will start to be liquid again.


6. Add 1 tbsp of ghee to this while cooking. Cook till all the water is absorbed again.


7. Garnish with roasted cashews. Serve warm with some Vanilla Icecream.


Tuesday, 26 February 2013

Pongala Pasayam - Sarkara Payasam - Attukal Pongala Special

Attukal Bhagavathi is a goddess worshiped in my home town Trivandrum. Every year millions of women offer pongala (prayer offering) to attuakal amma (mother). People arrive from all parts of the state and even from other states. They set up hearths with bricks and they make payasam (similar to chakkara pongal) and therali appam.


Around 7km radius of the temple women sit in lines with their hearths. The priest at the temple lights the fire in the temple hearth and the fire is transferred from one hearth to the next.

Women prepraring Payasam and Therali in a brick hearth on the streets of Trivandrum (Photo by Santosh)


Earthen Pots and Pans being sold in the market (Photo by Santosh)


Around 3.5 million women offer pongala to Attukal Amma. The priest lit the temple hearth at around 10:15. At around 2:30, priests from the temple (around 250 odd) sprinkle the holy water on all the preparations and the offering to goddess is complete.

It is the largest women's gathering in the world and has made it to the guinness records. If you are in Trivandrum, please do visit the temple.

Attukal Bhagavathy Temple - Trivandrum, Kerala


I am presenting to you the recipe of Pongala Payasam that is made as an offering for the Bhagavathi. The recipe is pretty simple. Though quite similar to Chakkara Pongal prepared by Tamilians on Pongal day, this payasam has a unique taste cause of the added coconut and the no milk factor.

Thanks to Shoba Chechi and Aswathy for the recipe... Thanks to Santosh for the photos of the festival...


Another neivedhyam (offering) is Therali Appam.  I have posted the recipe for that before. Do check that here.


Ingredients

Rice 1 cup
Water 7 cups
Jaggery 2 cups
Coconut 1 cup
Cardamom powder 1/4 tsp
Cashews few
Raisins few
Ghee 2 tbsp


Method of Preparation

1. Bring 7 cups of water to boil.

2. Add rice to it and cook till it is well done. The water will be almost absorbed now. Check with the spatula to make sure cause once the jaggery is added the rice will not cook anymore.

3. Add the jaggery (powdered) and mix. It will melt and liquefy the payasam. Simmer for a few minutes.

4. Add coconut and cardamom powder along with 1 tbsp of ghee. Mix well and cook for another 3-4 minutes. The payasam will start to solidify now.

5. In the end, heat ghee in a small pan and add cashews. When they brown, keep aside. In the same pan, add the raisins and roast. Add the cashews and raisins along with the ghee to the payasam

Enjoy! Some ppl like to add some sliced bananas to this while eating.