Friday 31 August 2012

Vegetable Rice in 5 minutes

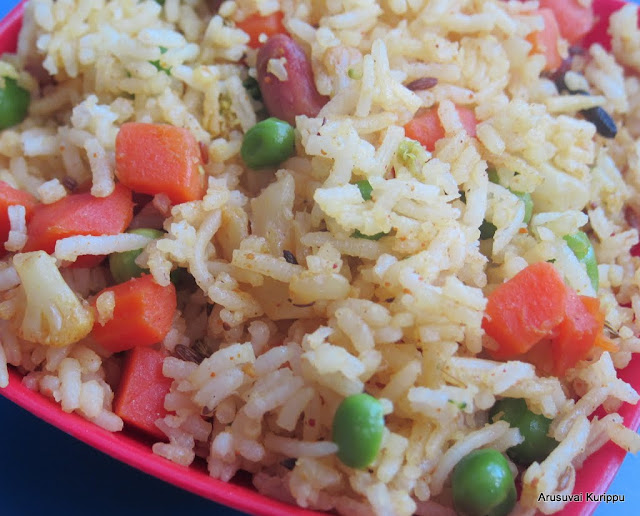
You will not believe it if I say this can be prepared in 5 minutes and it is super healthy, being loaded with vegetables.

If you are making for lunch box, just pop into the kitchen and keep the rice in cooker and vegetables in microwave. Finish all your morning work and come back in 20 minutes and finish the rest in 5 minutes.

This is my son's fav. He will eat it everyday if I would give him. I am happy to give him as this is super healthy. He likes his with loads of peanuts or cashews :-)


Ingredients
Basmati Rice 2 cups
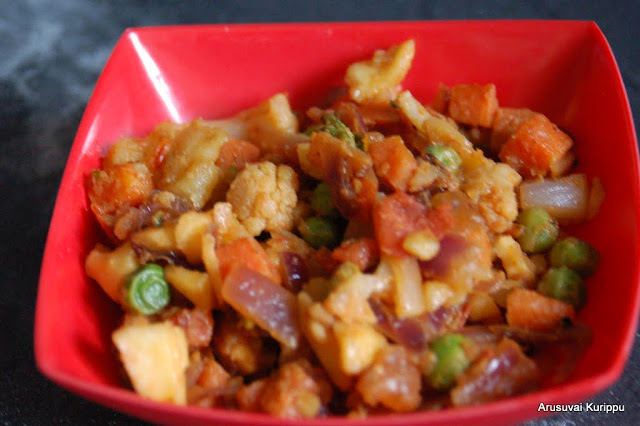
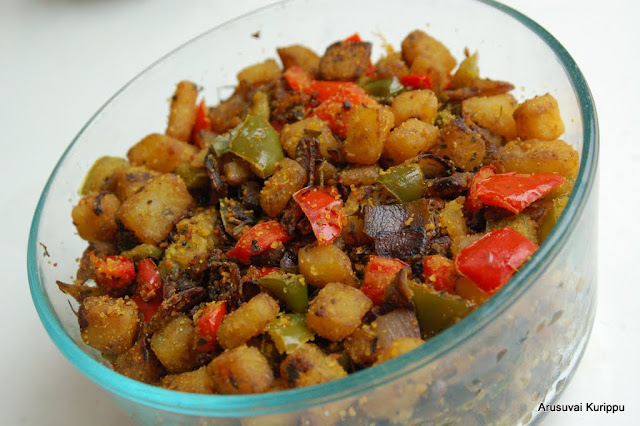
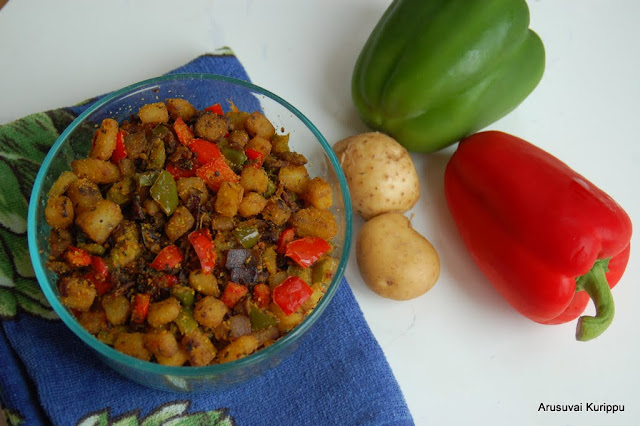
Vegetables 5-6 cups frozen vegetables
Garam Masala Items - cinnamon 1 inch piece, clove 2, star anise 2, bay leaf 1, saunf 1 tsp, cumin 2 tsp
Aachi Biriyani Masala 2 tsp (more for spicy version)
Turmeric 1 tsp
Channa Dal 1 tsp
Peanuts 1 tbsp

Oil and Salt to taste

Method of Preparation

Prep work (Ok this does not come in the 5 minutes. But you will only need another 5 minutes to do this job) :-)

1. Cook Basmati Rice with enough water. Add a little salt and butter along with water to get a nice taste and texture.

2. Microwave the vegetables in the meanwhile for about 10-15 minutes.

Now set the timer - 5 minutes.

3. Heat oil in a pan. Add peanuts and channa dal.

4. When it starts to brown, add all the garam masala items.

5. When it sizzles, add the vegetables. Add Aachi Biriyani Masala. Other masala can be used. Or use just garam masala with some chilli powder. Add some more salt if needed.

6. Mix everything well  and saute for 1 minute.

7. Now add the rice. Mix well and serve.

Linking this to Show me your hits - Rice - Event by Sangee, hosted by Vardhini

Thursday 30 August 2012

Mint Rasam - Pudina Rasam

Rasam is such a versatile dish. You can make it in tons of combinations and each one is unique. For a long time, I was scared of making rasam (this was when I started cooking). Though it looks super simple, it has a knack that has to be developed. I am not sure how many of you agree with this. Also, I used to make the same rasam all the time. But the inspiration to make variety of rasams comes from my grandma who used to make so many varieties. Every day there will be a kozhambu/sambar and a rasam. If we stayed for 2 weeks during the holidays, every day will be a different kozhambu and different rasam.

Also another tip that I learned a long time ago is never to boil the rasam after it froths and boils. I honestly don't know why. But every one of from older generation teaches you that. 


Ingredients

Tomato 1
Green Chilli 2 slit
Mint Leaves 3 tbsp chopped
Rasam Powder 1.5 tsp
Toor Dal 1/4 cup cooked in 3 cups of water
Tamarind Paste 1/2 tsp
Mustard 1/2 tsp
Jeera/Cumin 1/2 tsp
Curry Leaves few
Ghee for tempering 1 tsp
Oil and salt to taste

Method of Preparation

1. Heat a little oil in a pan. Add finely chopped tomatoes and chillies. Cook till tomatoes are done.

2. Add chopped mint leaves and saute for a couple of minutes.

3. Pressure cook the toor dal with 3 cups of water for about 4 whistles. Whisk the cooked toor dal. Add to the pan. 

4. Add some tamrind paste, rasam powder and salt. Add another cup of water if needed. 

5. Bring it to a boil and when it froths switch off.

6. In a small pan, heat ghee. Add mustard. When it sputtes, add jeera and curry leaves. Pour over the rasam.

Serve with rice and a dry curry or papads.

Linking this to Onam Special @ Sharan's Samayalarai


Wednesday 29 August 2012

Palada Payasam

Ada is one of my favourite ingredients to make payasam. Ada is prepared from scratch by making a paste of rice flour, smearing on banana leaf and then steaming. I am not doing it this time, just using store bought ada. There are two variations of this payasam - Palada Payasam (Made with Sugar and Milk) and Ada Pradaman (Made with Jaggery and Coconut Milk)

Today I present to you the recipe of Palada Payasam.


This year as Onam is on 29th (a wednesday), I decided to make just payasam and a simple lunch today and then a feast on the weekend.. Stay tuned for the Onam Sadya!!

Ingredients (Makes 3 cups)

Dried Ada About 1 cup
Milk 2 cups
Condensed Milk 1/2 cup
Cardamom 1/2 tsp
Saffron a few strands

Method of Preparation

1. First step is to cook the ada. Boil water (about 3-4 cups) and add the ada to boiling water. Cook till it is soft and you are able to cut with a spoon. Keep stirring as the ada will stick to the bottom. It took me about 10 minutes. Drain. Wash in cold water and keep ready.

2. In the meanwhile, in a thick bottomed pan heat milk. Bring it to a boil. Ideally, you should boil till it reduced to half and then add sugar. I am not that patient. So I just used some condensed milk to give it a nice thickness and colour.

3. Add the condensed milk and saffron. Let it simmer for a few more minutes.

4. Add cooked ada and cardamom powder. Stir and simmer for a few minutes.

Palada is ready to be served.

Wishing all the readers of my blog a Very Happy Onam.


Linking this to Show me your hits - Rice - Event by Sangee, hosted by Vardhini
Linking this to Onam Special @ Sharan's Samayalarai


Oats Adai

Basking on the success of Oats Idli, I made the Oats Adai the very next day. This was our thought process. Husband asked me - can you made adai tomorrow. I said sure. and then - can you suggest a variation to the regular adai so that I can post in my blog. He had just finished eating Oats Idli and so to tease me he said - why not add oats. Little did he know that it is an actual recipe and I will make it...

It tasted quite like the normal adai. Did not find much difference. The only thing that we found different was the graininess of rice that you find in adai was missing. So imagine while making regular adai, you by mistake make a fine paste instead of the 'kara kara' paste. Something like that. Tasty never the less. Will be making this often.


Makes about 15 adai

Ingredients

Oats  2 cups
Toor Dal 1/2 cup
Urad Dal 1/2 cup
Channa Dal 1/4 cup
Onion 1 finely chopped
Red Chilli 1 (Add more for spicy adai)
Curry Leaves few
Hing
Salt

Optional (I did not add this time. But I usually add for adai)
Coconut, green chilli, coriander leaves

Method of Preparation

1. Soak the dal overnight or atleast 5-6 hours.

2. Toast the oats in a pan. Powder it.

3. Drain water from the dal. Add red chilli, hing and salt. Also add green chilli, curry leaf and coriander leaf if using. Grind into a coarse paste with enough water.

4. Transfer to a vessel. Add the oats as well. Add more water if needed.

5. Mix in the chopped onions as well.

6. Make dosas as you will with normal adai.

Enjoy with chutney or molaga podi


Linking this to EP Herbs and Spices - Curry Leaf and Red Chilli Event by Julie hosted by Poonam

Tuesday 28 August 2012

Garlic Bread Stick

You have to make this super soft bread to eat the softest and tastiest bread ever. I found this recipe in a blog and followed it almost fully. It is an effort to replicate Olive Garden (An Italian Restaurant in US) and I have to say, the bread tastes as good as or even may better than Olive Garden breadstick.


Serve it with a warm bowl of soup or with pasta or just plain as an appetizer with some dips. It is sure to be a party pleaser.


Ingredients

Bread Flour (or All Purpose Flour) 4 cups
Warm Water 1.5 cups (i used a little over)
Fast acting yeast 1 7gm packet (about 21/4 tsp)
Melted Butter 2 tbsp
Sugar 2 tbsp
Salt 1 tsp

For Brushing
Butter 3 tbsp
Garlic Powder 2 tsp
Salt 1/2 tsp

Method of Preparation

1. Take flour in a bowl. Add yeast, sugar and salt. Mix well. If you are using active yeast, proof it before using.

2. Add butter and mix. Make a dough using warm water. Knead till you get a soft pliable dough.

3. Place it on the work top. Roll it into a square. Cut into 12 small pieces. Then roll them like small snakes.

4. Place the rolled dough on a baking sheet lined with parchment paper. Cover with damp cloth or cling wrap. Let it sit for 1 hour.

5. Preheat an oven @200C. Place the baking tray in the oven for 6 minutes.

6. In the meanwhile prepare the butter. Melt the butter and add the garlic and salt. Mix well.

7. Take baking tray out of the oven and brush with half of the butter mix. Bake for another 6-7 minutes till it is slightly browned on the top.


8. Take out and brush with some more of the butter mix.

9. Cool for a couple of minutes and Serve


Linking this to Lets Cook - Starters - Event by Radhika
Linking this to I Love Baking

Monday 27 August 2012

Roasted Tomato and Barley Soup

The idea behind this recipe is the same as that is used in the Tomato Basil Pasta Sauce and the Eggplant Sub. I have added barley as well to the tomoto soup to make it a complete meal. Barley is new member in my kitchen. I fell in love with it when I made this Barley Biriyani

Though basil originally is from India, you hardly see it being used in Indian cooking. It has an awesome smell and taste. Barley is rich in Amino Acids. And tomatoes are so full of anti oxidants. This soup will make a super healthy and filling meal.

Oh! For those of you wondering about the cup - I got it in a car boot sale (British equivalent of yard sale) for 20p (Rs16) :-) And my husband was not too happy with me accumulating junk... So I promised him I will throw it away after I take a tomato soup photo... Am I going to?? No way... Have to find another reason to tell him so that I can keep it :-)


Add a yummy bread to dip!

Ingredients (Serves 5-6 generous cups)


Tomatoes 15
Onion 1
Celery 1 stalk
Garlic 4 pods
Basil Leaves a handful
Barley 1/4 cup
Italian Seasoning 1/2 tsp

Oil and salt to taste


Method of Preparation

1. Soak barley overnight and drain the water. Add 3/4 cup of water and pressure cook for 4 whistles. Drain excess water. Keep ready. Or cook barley on stove top.

2. Preheat oven to 175C. Cut the tomato into 2. Place in a baking tray facing upwards. Brush with a little oil on the top. Sprinkle the italian seasoning. Bake for a hour.

3. In a pan, heat a little oil. Add chopped onions and garlic. Saute till it browns a little.

4. Add celery as well and cook for a little bit.

5. Add chopped basil leaves and mix. Cool this.

6. Grind to a smooth paste and transfer back to the same pan.

7. Grind the tomatoes as well in batches and add to this pot. Add any juice from tomato in the baking sheet as well.

8. Add barley and some salt as needed and simmer for a few minutes.

Serve with bread of choice. Bread recipe coming tomorrow! Stay Tuned!


Linking this to Lets Cook - Starters - Event by Radhika
Linking this to I Love Baking

Sunday 26 August 2012

Dal Tadka

When a blog friend of mine Anu posted a dal recipe from Tarla Dalal book - Dals, I remembered I had not made dals from it in a while. So decided to give this simple dal a shot. It is super comforting to eat with rotis


Ingredients

Split masoor dal (Split red lenthils) 1 cup
Moong dal (Split yellow lenthils) 1/2 cup
Green chillies 2
Ginger 1 inch piece grated or finely chopped
Garlic 4 pods grated or finely chopped
Turmeric 1/2 tsp

Oil and Salt to taste

For tempering

Mustard 1/2 tsp
Cumin 1 tsp
Red Chilli 1
Onions 1 big chopped
Tomato 2 chopped


Method of Preparation

1. Take dal in a vessel. Add 4 cups of water, slit green chillies, ginger, garlic and turmeric. Pressure cook till the dal is well cooked. I cooked for 5-6 whistles. Whisk and keep aside

2. In a pan take some oil or ghee. Add mustard. When it sputters, add cumin.

3. When it sizzles, add onions and saute till it starts to brown.

4. Add tomatoes and cook till it is well done and oil starts to separate.

5. Add the cooked dal and salt. Mix well.

Garnish with coriander leaves and serve with roti

Friday 24 August 2012

Oats Idli

Oats are quite popular in our house. We eat it as a porridge and we all love it. Making savoury with oats was not a popular thing in our house. I somehow convinced my husband a few weeks ago for a Magic Mingle event and made Oats Pongal. Though it is a popular dish in the internet, it was not a hit in our family.

When I saw Radhika post the recipe for Oats Idli, I was attracted to it from the click. She described it as a family favourite. I told my husband it is a sure hit. He was not too sure. He asked me "Are you sure she said it was a hit and not that she got hit". But I trust Radhika completely. Never failed with any of her recipes. So I made it.

I am soooo glad I tried it. We all loved it sooo much. Even made some mini idlis for my little one with it. This recipe is a keeper.


Indredients (Makes about 20 idlis)

Oats 2 cups
Rava/Semolina 1 cup
Yogurt 1 cup
Water 1.5 cups
Eno Fruit Salt 1 tsp
Mustard 1/2 tsp
Urad dal 1 tsp
Channa Dal 1 tsp
Hing a little
Grated carrots 4
Oil and Salt to taste


Method of Preparation

1. Heat a pan and toast the oats for a couple of minutes. Cool and powder it.

2. In the same pan, heat a little oil. Add mustard.

3, When it sputters, add urad dal and channa dal. When it browns, add carrots and saute for a couple of minutes. You can optionally add some green chillies, curry leaves and coriander leaves. I did not today.

4. Add the rava and saute for 2 more minutes.

5. Add to a bowl. Add the oats and salt. Mix well.

6. Add yogurt and required water and mix to form a batter.

7. Grease the idli moulds. Add fruit salt to the batter. Mix and pour to the moulds.

8. Steam for about 15 minutes (after the steam starts coming from the cooker). Take out and cool for a couple of minutes.

Serve with chutney.

Thursday 23 August 2012

Sukhiyan - Pullayar Chathurthi Special

Sukhiyan is basically Moong Dal, Coconut and Jaggery cooked together and then dipped in a batter of Maida and Rice Flour and then deep fried. I make a variation of this with just coconut and jaggery. I am presenting that recipe to you.


I am a crazy fan of jaggery sweet (any sweet if truth be said). But husband is not too keen on jaggery sweet and kid not keen on any sweet. So I decided not to make a lot. Made a very small batch for Pullayar Chathurthi. But guess what, they both loved this and I felt bad for not making a big batch.. It has to happen like that right?

Though we worship many Gods, for some reason I am always at peace when I pray to Pullayar. Just sitting there looking at him makes me happy. Its like he is telling me - Don't worry, I am always there with you.


Ingredients (Makes 6 sukhiyans)

For Stuffing 
Coconut 1/2 cup
Jaggery 1/4 cup powdered
Cardamom 1/8 tsp

For Batter
Maida 8 tbsp
Rice flour 1 tbsp
Turmeric powder 1/8 tsp
Salt 1/4 tsp
Sugar 1/4 tsp


Method of Preparation

1. In a bowl, mix maida, rice flour, turmeric, salt and sugar. Add about 1/2 cup of water and make a thick paste.

2. Heat a small pan. Add the powdered jaggery along with 1 tbsp of water. Let it melt.

3. Once melted and frothing, add coconut shredded and cardamom. Mix well  and cook in low flame till all the water is evaporated and the coconut cooks into the jaggery. Takes about 5 minutes.

4. Transfer to a plate. And make into 6 balls when it is warm. Tip to roll when is hot - Keep a bowl of cold water. Dip your hands in it and then roll a ball. Repeat.

5. Heat oil in a pan. Dip the stuffing in the batter preparared and drop into hot oil, few at a time.

6. Fry in medium heat till it gets a nice yellowish brown colour. Take out into a tissue paper.

Wednesday 22 August 2012

Ashoka Halwa

We @ Avant Garde are cooking Multi cuisine this week - starting with our own Tamil cuisine. Ashoka Halwa was one of the sweets in our Engagement Menu. That was the first time I tasted it. Loved it sooo much. I even requested it to be included in the Wedding Menu. And it holds a special place in my heart. When I saw this recipe in Nalini's blog, I knew I had to try making it.

Today, we celebrate our 7th Anniversary of our Engagement! 


It is a comparatively easy Halwa. It will be ready before you know it, if prepared in small quantities. There is not as much stirring to do as in the case of most Halwas. It came out as good as the ones in our wedding :-)

Moong Dal : Sugar : Ghee ratio recommended by Nalini is 1:2:3. But as she did I stopped at 2 cups of ghee. It tasted pretty good with that as well. But ofcourse, it will be better with more.

Ingredients

Moong Dal 1 cup
Sugar 2 cups
Ghee 2 cups
All Purpose Flour/Maida 4 tbsp
Caradamom 1/2 tsp
Orange food colour a pinch
Cashews a few
Raisins a few


Method of Preparation

1. Cook the Moong Dal with enough water in a pressure cooker till it is well cooked. It should be mushy. If it still has its shape, just run it in the mixie.

2. Heat a little ghee in a pan. Fry the cashews. Keep aside.

3. Add the raisins and fry and keep aside.

4. Add the maida and stir till it gets a slight brown colour.

5. Now add the Moong Dal and stir till it starts to come together.

6. Add the sugar, cardamom powder, food colour and 1 cup of ghee. Mix and keep stirring till the sugar melts and the ghee is almost absorbed. Make sure there are no lumps formed.

7. Add more ghee and stir again.

8. Once done, switch off and garnish with cashews and raisins.

Tip : Once you are done enjoying, if there is any left you can keep in fridge. Just before eating, keep in microwave it softens and the ghee melts around and gives it the same fab taste as fresh made halwa.


Check out the other AGC thoughout this week 
AnushaJayanthiKavithaPriyaRadhikaVeena

Linking this to Celebrate Month of Shravan - Event by Jagruthi hosted by Sangee

Tuesday 21 August 2012

Kathirikka Pitla

Kathirikka Pitla is a very traditional gravy made in Tamil homes. Presenting to you an awesome gravy for rice which does not even need a side dish.


Ingredients

Kathirikka/Eggplant 1 big (about 2 cups chopped)
Toor Dal 1/2 cup
Karuvadam 1 cup (optional)
Mustard 1/2 tsp
Curry Leaf few
Hing a little
Tamarind paste 1/2 tsp
Turmeric 1/2 tsp

Oil and salt to taste

To roast and grind

Coriander Seeds 1.5 tsp
Channa Dal 1 tsp
Whole pealed Urad Dal 1 tsp
Red Chilli 3 (more for spicier pitla)
Coconut 1/2 cup


Method of Preparation

1. Preferably in a non stick pan, dry roast the coconut. When it starts to change colour, add the coriander seeds, channa dal, urad dal and red chillies. Roast till the coconut is reddish in colour and the other ingredients are also roasted. Cool and grind into a smooth paste adding 1/2 cup of water.

2. In another pan, heat some oil. Add mustard seeds. When it sputters, add curry leaves and karuvadam (if using). Fry for a minute or 2.

3. Add chopped eggplant. Saute for 2-3 more minutes till the eggplant starts to wilt.

4. Add a couple of cups of water and tamarind paste. Cook till the eggplant is well cooked. Most of the water will be absorbed by now.

5. In the meanwhile pressure cook the toor dal with a couple of cups of water till it is nice and mushy. Whisk it and make a smooth liquid.

6. Add the paste, salt, turmeric powder and dal. Add more water (I added 2 more cups, check before adding). Bring to a boil and simmer till everything comes together.

Note :

1. If you feel the gravy needs more spice, you can optionally add some sambar powder.

2. Karuvadam is not a standard ingredient. I have a lot of it in stock and my MIL suggested it will taste good in Pitla. So I tried and really liked it.

3. My MIL adds Cooked Channa (chickpeas) to pitla. My mom does not. I have tried it and it does taste good.

Linking this to EP Herbs and Spices - Curry Leaf and Red Chilli Event by Julie hosted by Poonam

Monday 20 August 2012

Vegetable Manchurian

Another Indo-Chinese Preparation from my kitchen. This time I decided to do the Manchurian with vegetables. I did not quite have all the vegetables that I wanted. I would have liked some cabbage and spring onions. But this was good never the less... try your choice of vegetables.


Ingredients

For Manchurian balls
Cauliflower 1 small chopped
Carrots 3 chopped
Green Pepper 1
Maida 3/4 cup
Bread Crumbs 3/4 cup
Corn Flour 1 tbsp
Chilli Powder 1 tsp
Salt a little

For Gravy
Red Pepper 1
Onions 2
Soya Sauce 3 tbsp
Tomato Chilli Sauce 1/2 cup (I used 1/4 cup tomato chilli sauce and 1/4 cup tomato ketchup so that it is mild for my little one)
Corn Flour 2 tbsp

Other ingredients to add (I skipped)
Garlic 6 pods sliced
Ginger 1 inch piece sliced
Red Chilli Flakes 1 tsp

Method of Preparation

1. Chop all the vegetables finely. I used only half the green pepper. reserved the rest for the gravy.

2. In a bowl mix maida, bread crumbs, corn flour, chilli powder and salt. remember bread crumbs might also have salt in it.

3. Mix in the vegetables and add water little at a time and make a dough. Roll into small balls. I made about 25 balls. This might sound like a lot. Believe me you will eat quite a few before it gets to the gravy...


4. Heat oil in a pan. Deep fry them a few at at time. I used a big pan and fried about 8 at a time. Cook in medium flame as you do not want the outside to brown and inside dough to be half cooked.

5. Drain into a tissue paper and keep aside. Just look at this golden beauties.. are you not tempted to grab a few?


6. In a small bowl, add the corn flour (2tbsp) and add a cup of water. Combine well. Combine the soy sauce, chilli sauce to the same bowl. Keep aside

7. In another pan, heat a little oil. When it starts to smoke, add the ginger, garlic and chilli flakes (if using). Add the onions (sliced) and saute for 3 minutes in high heat.

8. Add the sliced green pepper and red pepper. Saute for another 3 minutes.

9. Add the combined sauce. Add some salt if needed. Bring to boil and simmer for 2 more minutes. Add more water if you need a gravy.

10. Add the fried vegetable balls and mix well.

Garnish with spring onions for the perfect taste. I did not have any :-( Still it tasted good.

Don't forget to check the other Indo Chinese recipes in my blog

Gobi Manchurian
Vegetable Lomein - Noodles
Vegetable Fried Rice

Saturday 18 August 2012

Stuffed Bun

After the successful bake of Dinner Roll, I decided to give stuffed buns a shot. I have seen lot of recipes and I took inspiration from it. I just modified the recipe for dinner roll and made these.


Masala stuffing can be anything of your choice. You can use eggs or meat as well. I just prepared a super easy stuffing.

Ingredients for Masala

Onions 1
Tomato 1
Potato 1
Mixed vegetables 2 cups
Paneer 1/2 cup
Aachi Biriyani Masala 1 tsp (use garam masala and chilli powder instead if you want)
Oil and salt to taste

Method of Preparation

1. Heat oil in a pan. Add sliced onions. Saute till it browns.

2. Add tomatoes and cook till it is all mixed up.

3. Add steamed mixed vegetables, paneer, boiled and mashed potatoes, achi masala and salt. Mix well and cook for a few more minutes. Switch off and let it cool a little. Separate into 9 equal parts. I had a little left after I stuffed 9 buns.


Ingredients for bun

Bread Flour (you can use APF) 3 cups
Salt 1 tsp
Sugar 2 tbsp
Fast Acting Instant Yeast 1 pkt (7 gm, 21/4 tsp)
Warm Milk 1 cup
Warm Water 1/4 cup
Butter 3 tbsp
Oil to layer the top

To brush on top

Milk 2 tbsp
Butter 1 tbsp
Sesame seeds a little

Method of Preparation

1. Take warm milk and water in the mixing bowl. Add the butter to it and melt it. Add yeast, sugar, salt and mix well.

2. Add the flour little at a time and mix well. Brush the top with a little oil.

3. Keep covered with a wet cloth for about 1-1.5 hours till it doubles in size.

4. Punch out and knead well again. Divide into 9-10 balls.

5. Flatten them and add a scoop of the stuffing to it.


6. Fold and close the dough. Place it on a parchment paper layered baking tray.


7. Cover again with moist cloth and let it rest for another 30 minutes.


8. Brush the top with a mix of milk (2 tbsp) and butter (1 tbsp).

9. Bake for 15-20 minutes @ 200 C till the top is nicely browned.


The photos don't do justice to how awesome they tasted.


Linking this to Lets Cook - Starters - Event by Radhika
Linking this to I Love Baking

Thursday 16 August 2012

Potato Capsicum Zunka

This is one of my fav sides. I have eaten this when my friends bring in lunch box. But never succeeded before. Always ended up with a mushy subzi. Read tip in the recipe to find out how to avoid it. Also never close the pan with lid while cooking. My friend Sameera makes the best zunka ever.


Ingredients

Potato 2 medium
Green Pepper 1
Red Pepper 1
Onions 2
Besan/Gram Flour 6 tbsp
Cumin 1 tsp
Curry leaves few
Chilli Powder 1 tsp
Coriander Powder 1 tbsp
Turmeric 1/2 tsp
Kasuri Methi 1 tbsp

Method of Preparation

1. Chop the peppers and cook in microwave for about 10 minutes

2. Heat oil in a pan. Add cumin and curry leaves.

3. When it sizzles, add chopped onions. Saute till it is browned.

4. Add chopped potatoes and cook till potatoes are almost done.

5. Add the pepper and turmeric, chilli powder, coriander powder and salt. Mix well.

6. Add besan lilttle at a time. Sprinkle a little, stir, then sprinkle again. Do it in 8-10 steps. Believe me, the patience at this step is soooo worth it.

7. Cook in low flame for 5 minutes.

8. Add the kasuri methi and mix well.  Cook for few more minutes.

Serve with warm rotis.


Linking to Dish It Out - Potatoes and Peppers - Event by Vardhini, hosted by Anu

Wednesday 15 August 2012

Barley Biriyani

We @ Avant Garde Cookies have chosen Secret Ingredient as the theme for this week. A partner gives you a secret ingredient and you have to make something with that ingredient. My partner for this week, Veena gave me Barley.

That was an interesting ingredient for me. I have seen some recipes using barley since I started blogging. It has never featured in our house. Not My kitchen, not my Mum's kitchen nor my MIL's kitchen. My only tryst with barley was when I was little and got Jaundice. I was given barley water a lot to drink. So I was a little skeptical. How am I supposed to cook something that I have never tasted. That is the whole challenge, right?

I am glad I got barley as the ingredient. It tasted soooo good...


Ingredients

Barley 1 cup
Onion 1
Tomato 1
Mixed Vegetables 3 cups
Bay leaf 1
Cardamom 1
Clove 2
Cumin 1 tsp
Turmeric 1/2 tsp
Aachi Biriyani Masala 1 tsp
Curry leaves few
Channa Dal 1 tsp
Urad Dal 1 tsp

Method of Preparation

1. Soak barley overnight. Pressure cook with 2.5 cups of water for about 4-5 whistles. Drain excess water if any and keep aside.

2. Heat oil in a pan. Add channa dal and urad dal. When it starts to brown, add curry leaves, turmeric powder, cumin, cardamom, bay leaf, clove. Saute till it starts to sizzle.

3. Add chopped onions. Saute till it starts to brown.

4. Add tomatoes and cook till it is well done. 

5. Add Aachi biriyani masala and salt. My fav. It has a unique taste. you can use any biriyani masala or even substitute with garam masala. 

6. Add cooked vegetables. I used Frozen. So I just cooked in microwave for 10-15 minutes. 

7. Once it is all mixed well, add the barley and mix well.


Check out the other AGC thoughout this week 
AnushaJayanthiKavithaPriyaRadhikaVeena

Linking this to event Independence Day by Sharan

Tuesday 14 August 2012

Tri Colour Paratas - Tiranga Parata - Happy Independence Day

Indian National Flag colours are Orange, White and Green with a blue coloured chakra at the centre. I am dedicating this to the olympic athletes who made our nation proud. Narang Gagan, Vijay Kumar, Saina Nehwal, Mary Kom, Yogeshwar Dutt, Sushil Kumar and the countless others who fought the battle on our behalf. The Nation Salutes you!


Ingredients (Makes about 8 paratas)

For Orange colour
Wheat Flour 1/2 heaped cup
Carrots 2
Chilli Powder 1/2 tsp
Salt a little
Oil a few drops

Method of Preparation

1. Chop the carrots roughly. Grind in a mixie along with the chilli powder and salt.

2. Take flour in a bowl. Add the carrot mix and the oil to it. Mix well. Add enough water and make into a dough.

Careful about the water as there is very little dough and carrot also has a lot of moisture

For Green Colour
Wheat Flour 1/2 heaped cup
Spinach a handful
Green Chilli 1
Salt a little
Oil a few drops

Method of Preparation

1. Grind spinach in a mixie along with the green chilli and salt. Add a little water if need be.

2. Take flour in a bowl. Add the spinach mix and the oil to it. Mix well. Add enough water and make into a dough.

For White Colour
Wheat Flour 1/2 heaped cup
Salt a little
Oil a few drops

Method of Preparation

1. Take flour in a bowl. Add salt and the oil to it. Mix well. Add enough water and make into a dough.

Method of Preparation

1. The three colours of dough are ready.


2. Roll them into 3 logs and place them in a row. Join together slightly. Do not put too much pressure as we want to avoid them overlapping as much as possible.


3. Cut into 8-9 equal parts.


4. Now rolling time.... Dip in flour while rolling as you will for normal rotis. First roll from top to bottom (orange to green) to get the height that you are looking for.

5. Then turn and roll horizontally to get the required width.


6. Cook both sides in a pan and serve with side of your choice.


The taste does not change much from normal rotis. But the health factor is definitely high. Plus kids will love picking different sections with different colours :-) You can try the carrot and spinach rotis separately as well.


Photo Courtesy NDTV


Linking this to Celebrate Month of Shravan - Event by Jagruthi hosted by Sangee
Linking this to event Independence Day by Sharan