Friday 29 March 2013

Curry Leaf and Jeera Pulao


Have I told you before that Curry leaf is my favourite herb? Ofcourse I would have. I just cannot get enough of it. So much so that, I have assigned my husband a new job. Just outside where he gets out of the station, there is an Indian shop. Friends have been telling me that the shop stocks a lot of fresh Indian vegetables. So every Monday, my husband picks up a bunch of fresh curry leaves from that shop. I would not have been happier if every Monday he picked up a bunch of roses.

While we were at the whole shopping at the Indian shop, my husband also wanted to pick up an Indian vegetable as well. So I have set aside a day of the week (Tuesday) to make what he brings home. Its quite nice to just get a random vegetable to cook with.. No need to plan at least for one day of the week.

I have realized that it is little things that make you happy... You don't need anything fancy to cheer up.

Ingredients

Rice 2 cups
Onions 1 sliced
Curry leaves 1/2 cup
Urad dal 1 tbsp
Pepper 1/2 tsp
Jeera/Cumin 2 tsp
Garlic 2 pods
Oil and Salt to taste

Method of Preparation

1. Pressure cook rice with enough water.

2. Heat a little oil in a pan. Add urad dal and roast till it starts to brown.

3. Add pepper and curry leaf. Switch off. Saute till the curry leaf wilts.

4. Add to a mixie and powder.

5. Heat oil in a pan. Add cumin. Let it sizzle.

6. Add sliced onions and garlic. Saute till it is browned.

7. Add the powdered curry leaf mix and salt. Switch off.

8. Add the cooked rice and mix well.

Thursday 28 March 2013

Pepper Tofu

Tofu is used in our house quite often. When I first moved to US, I used to hate the slimy tofu. But over the years I have learnt to love it. This dish though will win the heart of even the most ardent tofu hater.


Ingredients (Serves 5-6)

Tofu 2 blocks
Red Pepper 1
Green Pepper 1
Onion 1
Soy sauce 2 tbsp
Tomato sauce 4 tbsp
Pepper powder 1.5 tsp
Garlic 2 pods
Ginger 1 inch piece
Corn flour 2 tsp
Whole Pepper 2 tsp


Method of Preparation

1. Drain water out of the tofu. Place it in a paper towel and keep it like that for 15 minutes to drain off any excess water. If tofu does not come in a water pack you can skip this step. Cut the tofu into small pieces.

2. Heat oil in a pan. Add the tofu pieces and fry till it is browned on all sides. Keep aside.

3. Heat some oil if needed. Add the chopped ginger and garlic.

4. Add chopped onions (cut into squares).

5. After a couple of minutes, add the peppers (cubed again).. Saute for a couple more minutes till it wilts a little, but still has it crunchiness.

6. Add the fried tofu, mix well.

7. Now add the soy sauce, tomato sauce and corn flour mixed with a little water.

8. Add the pepper powder and coarsely crushed pepper. Add some salt. Remember sauces have salt it. So adjust accordingly.

9. Switch off after a couple of minutes.


Linking this to the Spring Event hosted by Radhika and Anusha.


Wednesday 27 March 2013

Hot Cross Buns - Easter Recipe - Tangzhong Method


Though I have not eaten Hot Cross Buns when I was little, I sure knew the song! 1 a penny, 2 a penny - Hot Cross Buns!

Well, though I said I have not eaten it, the buns you get in Indian Bakeries (atleast in Kerala) tasted quite similar to these buns. Soft Sweet buns with some dry fruits (mainly tutti fruiti) with subtle hints of spices like cinnamon and cardamom. 

When I learned the use of Tangzhong (roux) while baking Muffin Rolls with my baking group, I decided to use that method to make these as well. It gave the buns a super soft texture. 


Hot Cross Buns make their way to the Supermarket in abundance during early Spring in time for Easter. Sometimes I wonder if it is even worth making this when I can buy a pack of 6 buns for just a pound. Well, that is a battle I will always have to fight. Avant Garde Cookies are making Easter Specials this week. This is my pick for the week. Hope you enjoy it.

Ingredients


For The Tangzhong (Roux) - use half of this

All Purpose Flour 1/3 cup
Milk 1/2 cup
Water 1/2 cup

For The Dough
All Purpose Flour 2.5 cup
Sugar 5 tbsp
Salt 1/4 tsp
Milk Powder 2 tbsp
Fast Acting Instant Yeast 2 tsp
Milk 1/2 + 1/8 cup (original recipe called for 1/2 cup milk + 1/8 cup cream)
Tangzhong 1/3 cup tangzhong (use half of the tangzhong from above)
Unsalted butter (room temperature) 25gm

Other ingredients for Hot Cross bun
Cinnamon 1 tsp
Cardamom powder 1/4 tsp
Mixed dried currants 1/2 cup

For the cross on the top
All Purpose Flour 4 tbsp
Water 4 tbsp

For Glaze
Warmed Golden Syrup 1-2 tbsp


Method of Preparation

For Tangzhong

1. Whisk together lightly the flour, water and milk in a saucepan until smooth and there are no lumps. 

2. Place the saucepan on the stove, and over medium heat, let the roux cook till it starts thickening. Keep stirring/ whisking constantly so no lumps form and the roux is smooth.

3. If you have a thermometer, cook the roux/ tangzhong till it reaches 65C (150F) and take it off the heat. Otherwise, watch the roux/ tangzhong until you start seeing “lines” forming in the roux as you whisk/ stir it. Take the pan off the heat at this point.

4. Let the roux/ tangzhong cool completely and rest for about 2 to 3 hours at least. It will have the consistency of a soft and creamy crème patisserie. If not using immediately, transfer the roux to a bowl and cover using plastic wrap. It can be stored in the fridge for about a day. Discard the tangzhong after that. 

The Bread Dough:

1. Add the flour, salt, sugar, powdered milk, cinnamon, cardamom and instant yeast in a bowl. Give it a quick mix. 

2. In another small bowl mix the milk, cream and Tangzhong (1/3 cup, half of what was made above) till smooth and add to the bowl. 

3. Mix till the dough comes together. 

4. Now add the butter and knead till you have a smooth and elastic dough which is just short of sticky. The dough will start out sticky but kneading will make it smooth. If the dough feels firm and not soft to touch, add a couple of tbsps of milk till it becomes soft and elastic. 

5. When the dough is done, you should be able to stretch the dough without it breaking right away.  When it does break, the break should be form a circle.

6.  Form the dough into a ball and place it in a well-oiled bowl turning it so it is well coated. 

7. Cover with a towel, and let the dough rise for hour or 2 (till almost double in volume).

8. Place the dough on your working surface. Spread it with you hands. Sprinkle the dry fruit mix on top and roll it. Knead till it is distributed well. 

9. Divide into 8 equal portions. Roll into a nice ball. Flatten with your palm. Place it on a baking sheet lined with parchment paper. 

10. Let it rise for another 30min to an hour. 

11. Prepare a mix of the flour and water. Add it to a piping bag or ziplock (just make a very very small cut in one corner). 

12. Brush the top of the roll with some milk (or eggwash).

13. Pipe a cross on top. 

14. Preheat an oven to 170C. Bake for 25-35 min. Mine took about 33 min. 

15. Once it is out of the oven, place it on a cooling rack and immediately brush with some warmed golden syrup.

Let it cool and enjoy with some butter.


Check out the other AGC thoughout this week 
AnushaJayanthiKavithaPriya MRadhikaPriya S

Original recipe from Aparna's blog cooked as part of the We Knead to Bake


Tuesday 26 March 2013

Gujarati Khichdi - Vegetable Dal Khichdi

I have been cooking 'North Indian' food a lot, especially sides for Roti. Well, for someone from South (that too all the way to the tip of India), most things are North Indian and most of what I have eaten are those served in Indian restaurants in US, which in a way serves mainly Punjabi dishes. And if you ever visit a South Indian in US, it is basically Tamil food.

I decided lately that I will start exploring some cuisines of other states as well. This is part of that venture. I have made a few Rajastani and Gujarati dishes already. Will try to explore more as this culinary journey continues.

I have tried to follow Vaishali's recipe, though ended up making a few minor changes.


Ingredients

Rice 1.5 cup
Moong dal 3/4 cup
Channa dal 1.5 tbsp
Toor dal 1.5 tbsp

Bay leaf 2
Clove 4
Cinnamon 2 inch piece
Cumin/Jeera 2 tsp
Red chilli 3
Hing a little
Turmeric 1 tsp
Chilli powder 1 tsp

Potato 1
Beans 10-15
Carrot 2
Peas 1/2 cup

Tomato 2
Spinach 1 cup

Oil and salt to taste

Ghee for serving


Method of preparation

1. Soak the rice and dal for an hour.

2. In a pressure cooker, heat some oil. Add the bay leaf, Clove, Cinnamon, Cumin and red chilli.

3. Add Hing, Turmeric and Chilli powder.

4. Now add the chopped potato, carrot, beans and peas. Give it a stir.

5. Drain the rice and dal. Add to the cooker.

6. Finally add the chopped tomato and spinach. Add some salt as well.

7. Add 6 cups of water. Close the cooker and cook for 2 whistles.

8. Serve with ghee drizzled on top. Some papad and pickle will complete the meal. And oh, don't forget some Chaas (spiced buttermilk)

Monday 25 March 2013

Eggless Vanilla Sponge Cake with Nutella Buttercream Frosting


When you live far from your family, its very sad that you miss all birthdays, festivals etc. So I get super excited when we get to celebrate it together. My Dad, Mom and Brother celebrate birthdays within 12 days of each other. As a child I always used to feel left out as mine was a few months later. So this time of year is a Birthday time at our house. 

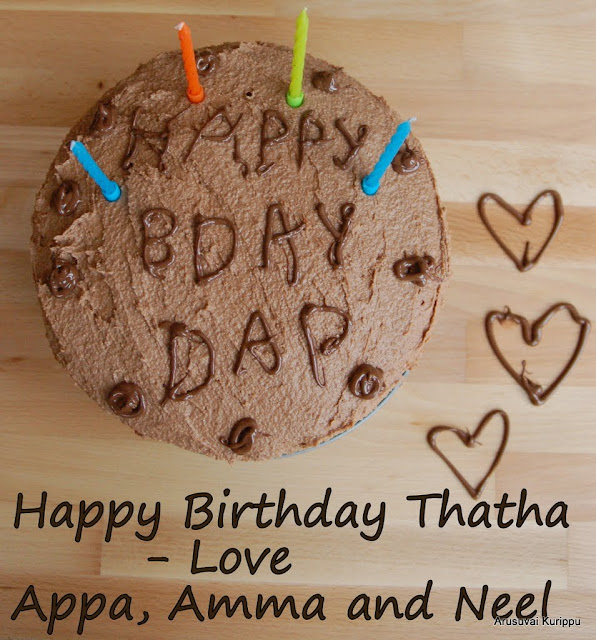
Interestingly, this is the second time in a row that I am able to celebrate my dad's birthday with him. Last year, I was in India at this time and this year he is visiting us.

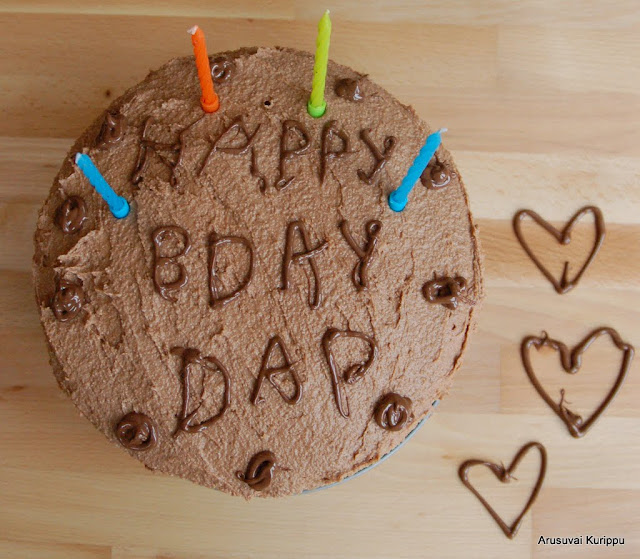
Happy Birthday Daddy!!


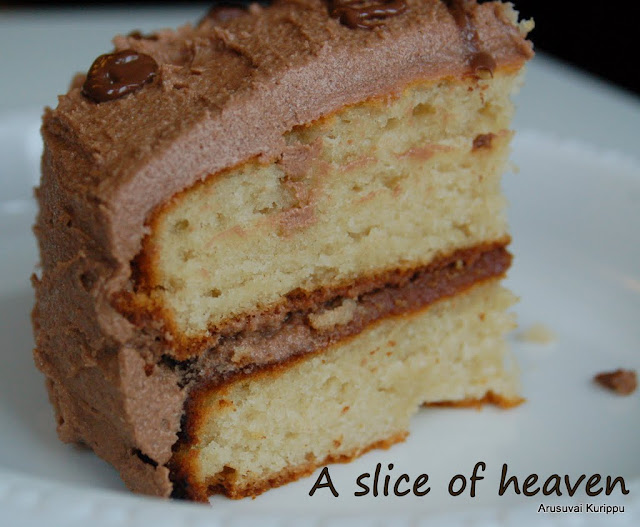
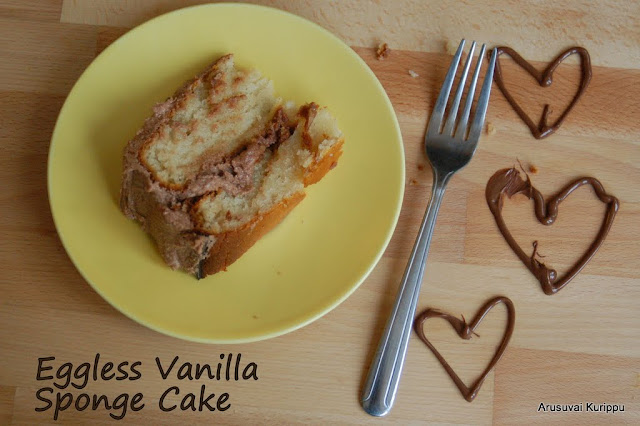
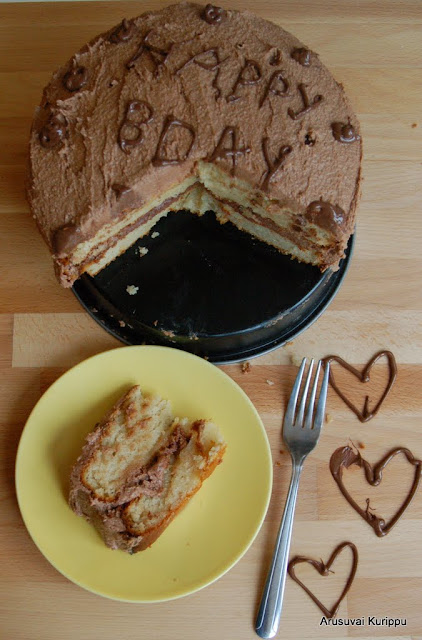
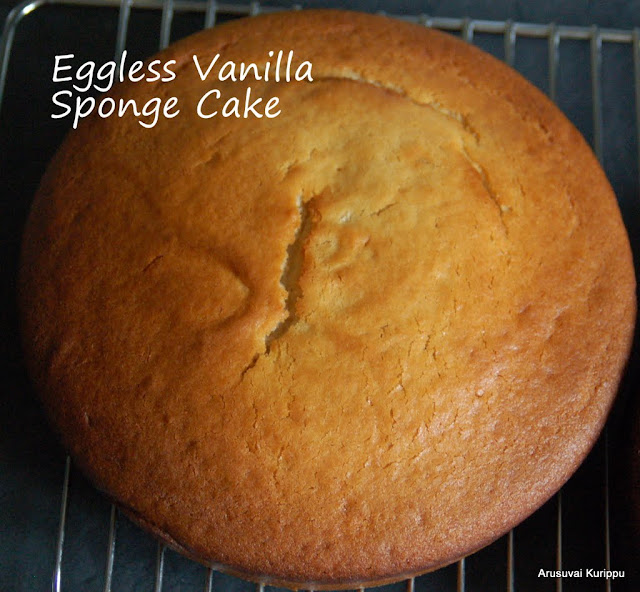
I made this Eggless (cake is butterless as well) Vanilla Sponge Cake for his birthday. It is my first attempt to frost a cake. Very happy with what I made. Will keep working on my skills to get a perfect decoration next time :-)

This is a very simple recipe to follow and can be adapted to make any other cake if you wish. I have made it eggless and without butter. Well, the fact that the Buttercream frosting is loaded with butter beats the purpose. But then you can just make it without any frosting and enjoy it with tea/coffee in the afternoon. It uses Yogurt and Oil.

I do not need to sell the Nutella, do I? Have never seen anyone who does not like Nutella. Usually to eat nutella you do not need anything but the jar and your fingers :-). If that is not you, ok then the jar and a spoon. That is as far as I get with my jar. So to spare some to cook with it took some will power. I had some left over frosting. It was divine to just dig into it with a spoon.. Nope not a teaspoon, a tablespoon!!


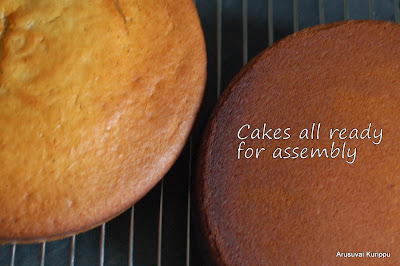
I doubled all the measurements below and made 2 cakes in 7" round tins. Make sure all the ingredients are at room temperature.


Ingredients for 1 cake (7" round tin)

Recipe from Sharmis Passions

All Purpose Flour 1.5 cups
Yogurt 1 cup
Sugar 3/4 cup
Baking soda 1/2 tsp
Baking powder 11/4 tsp
Oil 1/2 cup
Vanilla Essence 1.5 tsp

Method of Preparation

1. In the mixing bowl, take the yogurt and powdered sugar. Mix well.

2. Add Baking soda and Baking powder and mix. Let it rest for 5 minutes till bubbles form on the top.

3. In the mean, while sieve the APF twice and keep ready.

4. Grease a baking tin and dust it with a little flour. Preheat the oven to 200 C.

5. When the yogurt mix is bubbled, add oil and vanilla essence. Mix again.

6. Add the flour and give it a nice mix till it is all incorporated.

7. Pour into the baking tray.

8. Bake for 10 min at 200 C and then reduce oven temperature to 180 C. Bake for a total of about 25-30 min. Mine was done in 29 min (next time I plan to stop at 28 min).


Nutella Butter Cream Frosting

Recipe from Kitchen Treaty

Ingredients

Butter 1 cup (about 250 gm)
Powdered Sugar 2 cups
Nutella 2/3 cup
Vanilla 1 tsp

Method of Preparation

1. Add soft butter at room temperature to a bowl. Using a hand mixer, whip it a little.

2. Add sugar and continue to beat till it is creamy. around 10 minutes.

3. Add the nutella and vanilla. Beat for a couple more minutes.

Nutella Butter cream is ready. Yummmmm

Assembly


Cool the cakes well. Place one of the cakes upside down. Apply a generous layer of the butter cream. Place the second cake base side down on top of the butter cream. Apply butter cream on the top and side. I used Nutella in a ziploc bag to write. Will buy some cake decorating and piping bags for next time :-)

Saturday 23 March 2013

Muffin Rolls (Hokkaido Milk Bread) With Tangzhong

Want to make the softest bread you would ever eat? Look no further than here. After the challenge of making Croissant last month, we have ventured into the making of Hokkaido Milk Bread. It uses a Roux which is called Tangzhong. Do it look like I am talking Chinese/Japanese here. Well, in a way I am. This method was perfected in Asian countries. To know more about this technique and history, do hop on to Aparna's blog. Thank you for the recipe and all the step by step instructions. 


Ingredients

For The Tangzhong (Roux) - use half of this

All Purpose Flour 1/3 cup
Milk 1/2 cup
Water 1/2 cup

For The Dough
All Purpose Flour 2.5 cup
Sugar 3 tbsp
Salt 1 tsp
Milk Powder 2 tbsp
Fast Acting Instant Yeast 2 tsp
Milk 1/2 cup
Cream  1/8 cup 
Tangzhong 1/3 cup tangzhong (use half of the tangzhong from above)
Unsalted butter (room temperature) 25gm

Milk to brush on top


Method of Preparation


For Tangzhong

1. Whisk together lightly the flour, water and milk in a saucepan until smooth and there are no lumps. 

2. Place the saucepan on the stove, and over medium heat, let the roux cook till it starts thickening. Keep stirring/ whisking constantly so no lumps form and the roux is smooth.

3. If you have a thermometer, cook the roux/ tangzhong till it reaches 65C (150F) and take it off the heat. Otherwise, watch the roux/ tangzhong until you start seeing “lines” forming in the roux as you whisk/ stir it. Take the pan off the heat at this point.

4. Let the roux/ tangzhong cool completely and rest for about 2 to 3 hours at least. It will have the consistency of a soft and creamy crème patisserie. If not using immediately, transfer the roux to a bowl and cover using plastic wrap. It can be stored in the fridge for about a day. Discard the tangzhong after that. 

The Bread Dough:


1. Add the flour, salt, sugar, powdered milk and instant yeast in a bowl. Give it a quick mix. 

2. In another small bowl mix the milk, cream and Tangzhong (1/3 cup, half of what was made above) till smooth and add to the bowl. 

3. Mix till the dough comes together. 

4. Now add the butter and knead till you have a smooth and elastic dough which is just short of sticky. The dough will start out sticky but kneading will make it smooth. If the dough feels firm and not soft to touch, add a couple of tbsps of milk till it becomes soft and elastic. 

5. When the dough is done, you should be able to stretch the dough without it breaking right away.  When it does break, the break should be form a circle.

6.  Form the dough into a ball and place it in a well-oiled bowl turning it so it is well coated. 

7. Cover with a towel, and let the dough rise for hour or 2 (till almost double in volume).

8. Place the dough on your working surface. Divide into 12 equal portions. 

9. Roll out each portion of the dough with a rolling pin into an oval shape, about 1/8” thick. Take one end of the dough from the shorter side of the oval and fold it to the middle of the oval. Take the other end and fold so it slightly overlaps the other fold. 

10. Roll this folded dough with the rolling pin so the unfolded edges are stretched out to form a rectangle. Roll the rectangle from one short edge to the other, pinching the edges to seal well.

Photo courtsey Aparna. (My step by step did come as good as this. So I am borrowing the pic taken by Aparna who gave us the recipe and steps)

11. Place each roll of dough in a well-oiled muffin cup and cover with a towel. Allow to rise for about 45 minutes.

12. Brush the top of the roll with some milk (or eggwash).

13. Preheat an oven to 170C. Bake for 20-30 min till the top is nicely browned. 

14. Once it is out of the oven, place it on a cooling rack. 

15. Let it cool and enjoy with some butter. 


Other Breads baked as part of the group - We Knead to Bake

January      : Whole Grain Pull Apart Bread with tomato-onion chutney spread
February    : Classic Croissants 

Missi Roti - Besan ki Roti - Rajastani Special

Missi Roti is a very popular flat bread prepared mostly in the Western Indian State of Rajastan. It is not quite as popular as Naan and Roti. It is made primarily with Besan or Gram Flour. Wheat Flour is added to it. The ratio of wheat flour to besan varies. Also the spices added varies. 


Due to the presence of besan, the roti is very healthy - high in protein. And quite filling too.  Check out the recipe for Kadhi Pakoda here


Ingredients (Makes 10 rotis)

Besan/gram flour 1.5 cups
Wheat Flour 1.5 cups
Onion 1 finely chopped
Red Chilli powder 1 tsp
Turmeric 1/2 tsp
Ajwain 2 tsp
Hing a little
Salt to taste

Method of Preparation

1. Add the besan/gram flour, wheat flour, chilli powder, turmeric, ajwain, hing and salt to a bowl. Mix well.

2. Add the chopped onions and mix again.

3. Now add water a little at a time to make a stiff dough. Remember that besan absorbs water faster than wheat flour and it will become very sticky. So add only little at a time. Also, this will use less water than when using just wheat flour.

4. Divide into 10 balls.


5. Roll like you do rotis by dipping in wheat flour as needed.

6. Heat a tawa and place rolled dough on it. Cook on one side. 

7. When brown spots appear on it, turn and cook on the other side. 

8. Apply some butter once it comes out of the pan.

Serve with some Kadhi Pakoda or Yogurt or Pickles. 

Friday 22 March 2013

Kadhi Pakoda - Onion Pakoda Kadhi


Kadhi is basically a yogurt sauce thickened by Besan/Gram flour and seasoned with spices. Many varieties of Kadhi exist based on what else goes in the Kadhi. Today I prepared my favourite Kadhi - Kadhi Pakoda. Kadhi with Onion Pakaoda Dumplings. It was a perfect pair for the Missi Roti that I made. (recipe tomorrow).


Ingredients (Serves 6)

For Pakoda
Besan 2 cups
Onions 2 big sliced and cut into 2
Red Chilli  Powder 1 tsp
Turmeric 1/2 tsp
Hing a little
Baking soda a little
Salt 2 tsp
Oil for frying

For Kadhi

Yogurt 2 cups
Water 3 cups
Besan/Gram flour 4 tbsp
Chilli Powder 1 tsp
Turmeric 1 tso
Jeera/Cumin 2 tsp
Curry leaves 2-3 sprigs
Hing 1/8 tsp

Oil and salt to taste

Method of Preparation

For Pakodas


1. In a bowl mix together Besan, Red Chilli Powder, Turmeric, Hing, Baking soda and Salt.

2. Add water to make a very thick paste.

3. Add the sliced onions as well and mix


4. Heat oil in a pan. When it is hot, add small portions of the batter into it. Fry a few at a time.

5. When one side is cooked, turn and cook the other side as well.

6. Drain and keep in a kitchen paper to absorb excess oil.

For Kadhi


1. Mix the yogurt and besan in a bowl. Keep aside.

2. Heat a little oil in a pan. Add the jeera, hing and curry leaves.

3. When it sizzles, add the yogurt mix along with the water.

4. Add add the chilli powder, turmeric and salt. Mix (or whisk) everything together.

5. Cook in a medium-low flame till it comes to a boil and simmer for a little bit. It will start to thicken. (It will thicken a lot if kept for a few hours. So add more water and reheat if using after a few hours).

6. Add the pakodas just before serving.. If you like them really soaked, you can add it before as well.

Thursday 21 March 2013

Chole Bhature


Chole Bhature is usually a restaurant favourite among South Indians. Puri is usually made at home and Bhature is enjoyed in restaurants. Who does not love that Super Sized Bhature? I am glad to tell you that mine tasted really close the restaurant style Bhature (Just a little smaller). Do note that the Bhature has stayed puffed up even after hours of making it (the semolina/rava) helps achieve this (read details below).


Ingredients (makes 12-13)

All Purpose Flour (Maida) 2.5 cups
Rava/Semolina 2.5 tbsp
Baking soda 1/2 tsp
Salt 1/2 tsp
Sugar 1 tsp
Curd/Yogurt 3/4 cup
Water as required
Oil 2 tbsp to rub on dough

Oil for deep frying

Method of Preparation


1. Take the flour, semolina, baking soda, salt and sugar in a mixing bowl.

2. Give it a mix with your fingers.

3. Add the curd and mix to form a crumbly mix.

4. Add water as required to prepare a stiff dough. Please note that Maida requires much less water than wheat flour.

5. Smear some oil on the top and cover. Let it rest for atleast a couple of hours.

6. Give the dough a quick knead and divide into 12-13 balls. The number depends on the size you want. I made relatively smaller Batura. Even for the small one I needed as much dough as I would for a chapati cause you are rolling it much thicker. For a couple of them, I did the mistake of rolling thinly and it did not puff up well.

7. Roll into cirlces. You do not need any flour to dust. But use it if you require. Another thing I found was that rolling all at the same time and then frying did not quite work well as the disc kept shrinking (maida does that unlike wheat flour).

8. Heat oil  in a pan. Add the rolled disc into the oil with your left hand. Immediately press on it with a slotted spoon on your right hand till it puffs up. Turn and cook on the other side. Drain into a kitchen paper.

9. Now simmer the gas and work on the next portion of the dough - roll it, fry it and drain it. Repeat till you are done with the whole batch.

Unlike Poori a few goes a long way. 3-4 will be quite filling. I could not eat more than 2.


Serve this with Chole. I have a couple of Chole recipes in my blog. I have used Punjabi Chole here today. You can also use the Coriander Chole or even Kadala Curry. Potato Masala used for Poori will also taste awesome.

Wednesday 20 March 2013

Nombu Uppadai - Savoury Adai prepared for Nombu

Nombu is a tamil festival celebrated on the first day of Tamil month of Panguni (March-April). Adai (sweet and savoury) are made for this festival. I have already posted the Sweet some time ago. Taking the chance this time to present to you the Savoury version as well.


Ingredients (Makes 16 adai)

Rice Flour 1 cup
Water 2 cups
Mustard 1/2 tsp
Urad dal 1 tsp
Curry leaves few
Green Chillies 2 (as per taste)
Ginger (optional)

Cowpeas (thatta payar, vanpayar) 1/4 cup
Coconut pieces (cut into small rectangles, we call it thenga pallu) 2 tbsp

Oil and salt to taste


Method of Preparation

1. Soak cow peas overnight and pressure cook till it is well cooked, but still has its shape. Drain water. Keep ready.

2. Dry roast the rice flour till it is slightly reddish in colour. Keep aside.

3. Heat some oil in pan. Add oil. Add mustard. When it sputters, add the urad dal. When it starts to sizzle, add the curry leaves, green chilli and coconut. Saute for a minute.

4. Add water to this. (keep water ready before you heat the pan). Bring it to a boil. Add 1 tsp of salt.

5. Keep the gas in low, and add the rice flour. Mix well. Keep stirring till there are no lumps and the water is all absorbed.

6. Add the cow peas and mix well again. Switch off.

7. Make small balls out of this mix and pat it on a banana leaf or plastic cover. Make a small hole in the centre.

8. Transfer it as is in the banana leaves to idli plates. Or you can slightly grease the plates and put the adai directly on the plate.

9. Steam for around 10 min (or till cooked well).

Don't forget to check out the recipe for Sweet Adai as well in my blog. To know more about the festival and its celebration, do check out here.

You don't need the excuse of the festival to make these. It will make a filling breakfast or evening tiffin. 

Tuesday 19 March 2013

Dal Maharani

Dal Maharani is a variation of Dal Makhani, which I have posted before. It uses Whole Urad Dal and has a very creamy texture to it though it does not use much fat in it. It has an awesome medley of flavours that you will fall in love with.

AGC are bloghopping this week. I am cooking from Veena's blog. I am quite familiar with her blog and love it. I have previously made Nankatai from her blog which has been a great success in our house. I chose this recipe cause I fell in love with the name. A dal fit for a queen!


Ingredients (Serves 5-6 ppl)

Whole Black Urad Dal 2 cups
Rajma 1/2 cup
Water 5 cups

Cumin 2 tsp
Poppy seeds 2 tsp
Garlic 10 pods
Ginger 2 inch piece
Green Chilli 2
Red Chilli 2
Curry Leaves 2 sprigs
Turmeric 1 tsp
Garam Masala 2 tsp
Kashmiri Red Chilli powder 1 tsp

Tomato 3
Curd 2 tbsp
Coriander leaves to garnish

Oil and salt to taste

Method of Preparation

1. Soak the dals overnight. Drain and pressure cook with the 5 cups of water till it is well cooked.

2. Heat oil in a pan. Add the cumin seeds, poppy seeds, sliced garlic, sliced ginger, sliced green chillies, red chillies and curry leaves.

3. When they are slightly roased, add finely chopped tomatoes. Mix well and cook till the tomatoes are mushed well.

4. Add the curd, turmeric powder and kashmiri red chilli (you can add regular chilli powder as well. add in less quantity) along with some salt.

5. Now add the cooked dal along with the water in it (as required). I added 2 more cups of water to it.  Also add the garam masala.

6. Simmer for a little while till it all comes together.

Garnish with coriander leaves and serve with roti or rice.

Sunday 17 March 2013

Vazhakka Erissery - Erissery with Raw Plantain

Erissery is a speciality of Kerala. The speciality is that it does not have many spices. The flavours mainly come from coconut, pepper and cumin and of course the tempering with coconut oil. I have prepared this with Vazhakka (Raw Plantain). Usually it is prepared with a combination of Vazhakka and Chena (Elephant Yam). Use equal quantities of both if you have it. Just Vazhakka also tasted awesome.

For the dal, I have used Cow Peas (Van payar/Thatta payar). You can also use the white one popularly known as Black eyed peas. Oh, and I have used loads of dal in this (more than traditionally used). You can just make it with 1/2 cup instead of the 1.5 cups that I have used.


Ingredients

Vazhakka 5
Cow peas 1.5 cups

Coconut 1 cup
Pepper 1.5 tsp
Jeera 1 tsp
Turmeric 1/2 tsp

Tempering
Mustard 1/2 tsp
Red Chilli 1
Curry leaves few
urad dal 1 tsp
Coconut oil

Method of Preparation

1. Soak the peas overnight and pressure cook for 1 whistle till it is cooked well (still retaining shape.

2. Heat some water in a pan. Add pealed and chopped plantain. Boil till it is cooked well, but has its shape.

3. Make a paste of coconut, pepper and cumin. Add to the pan.

4. Add the cow peas and some salt. Simmer everything for a few minutes.

5. Temper with coconut oil. Add mustard. When it sputters, add urad dal. When it starts to brown, add red chilli and curry leaves. Add this mix to the Erissery.

Friday 15 March 2013

Chow Chow Poriyal - Chow Chow Thoran


Chow Chow is a very popular vegetable used in Tamil Nadu. Interestingly, you will not find ppl from many parts of India using this. I have already made a kootu with this before. Do check that out as well.

I like chow chow in this form more than the kootu. I feel you get a burst of freshness when you eat it as a poriyal. Made this on a cold gloomy afternoon. So the photos are all dull, but believe me the flavours were fresh!!

Ingredients

Chow Chow/Chayote 3 big ones (about 5 cups)
Coconut 1/2 cup
Green Chilli 1
Curry leaves few
Mustard 1/2 tsp
Turmeric 1/2 tsp

Oil and salt to taste


Method of Preparation

1. Peal the chow chow. Cut into 2 and core the seed out. Chop into small pieces

2. Heat a little oil in a pan. Add mustard. When in sputters, add turmeric.

3. Add the chopped chow chow and give it a stir. It will leave water. But it will soon get absorbed. Do not cover. Else it will become mushy.

4. After 5 minutes or so, it will be almost cooked.

5. Pulse the coconut, green chilli and curry leaves. Add it to the pan along with some salt. Mix and cook for a few more minutes.

6. The coconut will absorb any excess water. Serve with some sambar and rice.

We enjoyed it with some Pala Kottai Pitla (Pitla with jackfruit seeds and eggplant)

Adding a couple of photos of Chow Chow also known as Chayote from the internet. For reference of those who do not know it.. Have borrowed the photos from Wiki Article


This is how it looks when cut. The white thing is the seed that needs to be cored out

Thursday 14 March 2013

Pala Kotta Pitla - Pitla with jackfruit seeds and eggplant

Pitla is a sambar like gravy made with roasted coconut, coriander seeds and dals. Typically the vegetables used are Eggplant/Kathirikka and Pavakka. We had an interesting discussion today at home as to why. We have no answers :-) 

Other things added to the Pitla are Channa or Kala channa, vadam like Karuvadam and Jackfruit seeds. I have posted of recipe for Pitla with Eggplant and Karuvadam before. The use of Jackfruit seed was new to me till my husband suggested it.


Ingredients


Kathirikka/Eggplant chopped (about 3 cups chopped)
Toor Dal 3/4 cup
Pala Kottai/jack fruit seed/chakka kuru 1.5 cups
Mustard 1/2 tsp
Curry Leaf few
Hing a little
Tamarind paste 1/2 tsp
Turmeric 1/2 tsp

Oil and salt to taste

To roast and grind

Coriander Seeds 1 tbsp
Channa Dal 1 tbsp
Urad Dal 1 tsp
Red Chilli 5
Coconut 1 cup


Method of Preparation

1. Preferably in a non stick pan, dry roast the coconut. When it starts to change colour, add the coriander seeds, channa dal, urad dal and red chillies. Roast till the coconut is reddish in colour and the other ingredients are also roasted. Cool and grind into a smooth paste.

2. Peal the outer white cover of the jackfruit seeds. Break it into 2-3 smaller pieces. You can optionally remove the brown skin as well. I left it in. 

3. In another pan, heat some oil. Add mustard seeds. When it sputters, add curry leaves.

4. Add chopped eggplant. Saute for 2-3 more minutes till the eggplant starts to wilt.

5. Add a couple of cups of water and tamarind paste. Cook till the eggplant is well cooked. Most of the water will be absorbed by now.

6. In the meanwhile pressure cook the toor dal with water till it is nice and mushy. Whisk it and make a smooth liquid.

7. Add the coconut paste, cooked seeds, salt and dal. Add more water if needed. Bring to a boil and simmer till everything comes together.