
A group of bakers - We Knead to Bake made Croissants this month... From scratch!!! If you are like my husband, you might ask what is the big deal. Well, I can buy croissants for less than a £. So it is hard to explain to my husband why I need to spend 3 days making it.
To me it was to prove that I can do it. To acquire a skill. Does that sound good enough reason.. If it does, please do read on.

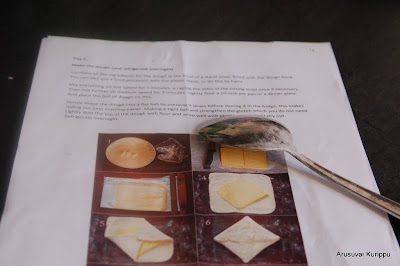
Aparna mailed us detailed instructions and photos on the first of this month. We all discussed it over the last few weeks. It was an exciting journey. We are all looking forward to the next month's bread already :-)
Aparna's instructions - our bible. 8 pages full of detailed steps and pics. Could not have done it without this.
Ingredients
For Dough
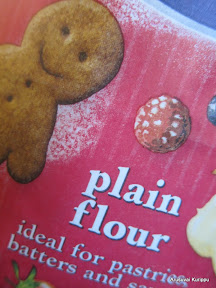
All Purpose Flour 4 cups
Milk 1/2 cup + 2 tbsp
Water 1/2 cup + 4 tbsp (original used 2 tbsp, i felt it needed 4 tbsp)
Granulated Sugar 1/4 cup
Unsalted Butter (Soft) 40 gm
Fast acting instant yeast 1 tbsp + 1/2 tsp
Salt 2 tsp
For Lamination
Butter 250 gm (cold unsalted)
Milk or Eggwash
Method of Preparation
Day 1 - Preparing the dough
1. Combine all the ingredients (APF, Milk, Water, Sugar, Butter, Yeast, Salt) in a bowl. Knead till combined and rolled into a ball. Do not over knead as you do not want gluten to form.
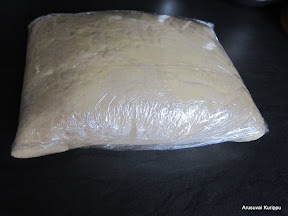
2. Place it on a plate, cover with cling film and refrigerate overnight.

Day 2 - Laminating the dough
Prepare the butter
1. Cut 2 squares (10") of parchment paper. Cut the cold butter into 1/2" slabs. Place these pieces on the parchment paper to form a 6" square. Cut the
butter further into pieces as required to fit the square. Top with the other
piece of parchment paper.

2. Using a rolling pin, pound the butter to make the pieces stick together and then flatten out to a 7-8" square. Trim the edges of the butter to make a neat square. Put the trimmings
on top of the square and pound them in lightly with the rolling pin.
Refrigerate this while you roll out the dough.

Laminating the dough
1. Place the dough in a lightly floured surface. Roll it into a 10 1/2" square.
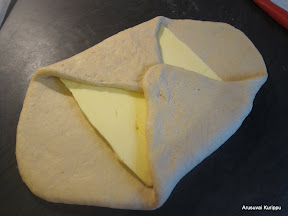
2. Place the butter on the dough to form a diamond shape. (Make sure the butter is neither too hard nor too soft. Hard butter will be brittle and break. Soft butter will leak)

3. Fold one side of the dough over the butter. Fold the opposite side on top of this. Now fold the top part over the butter and then fold in the bottom over the top. Make sure that the dough fully covers the butter. No leaks.

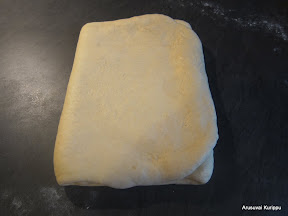
4. Flour the surface and press the dough gently. The roll to elongate the dough (do not widen) till you get a rectangle of 8" by 24".

5. Along the length, mark at 8" and 16". Fold the left 8" to the center. Fold the right 8" over the left one. Cover with cling wrap and freeze for 15 minutes.
6. Repeat
the rolling and folding, this time rolling in the direction of the two open
ends (from the shorter sides to lengthen the longer sides) until the dough is
about 8" by 24". Once again fold the dough at 8" from left to centre and at 16" from right to centre. Cover with cling wrap and freeze for another 15 minutes.
7. Take the dough out and repeat the above step for one time (3rd rolling). Fold and cover with a cling wrap. This time refrigerate overnight.
Day 3 - Shaping, Proofing and Baking
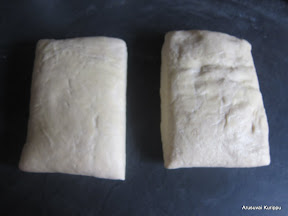
1. Take the dough out of the fridge and cut into 2 pieces along the longer side. Refrigerate one part while you work on the other part.
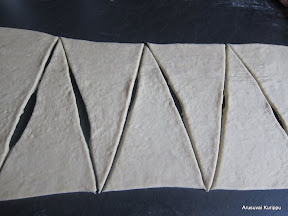
2. Roll on a lightly floured surface to make a 8" by 22" rectangle. Trim off the edges to make a perfect rectangle. Make sure you have atleast have 20" length.

3. Time to cut into triangles. One the top side, mark at 5" intervals. You will have 3 marks (4 sections). One the bottom, start the mark at 2.5" and mark at 5" intervals. You will have 4 marks.
4. Cut into triangles from top to bottom. You will have 7 big triangles and 2 side bits.
5. Take each triangle. Stretch it from top to bottom one more time.
6. Make a small notch on the top.

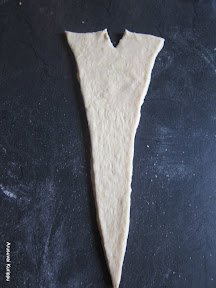
7. Make a small flip on the notch. The will help the croissant to get the crescent shape.
8. Roll the dough from the wider side to the tip tucking the tip under and joining the claws at the end.


9. Place it on a parchment paper lined baking tray. Brush with a little milk/eggwash.
10. Proof (let it rest) for 2-3 hours till it rises (will not double). Slightly cover it (without touching the croissant) or keep inside the oven (without turning on).
11. Preheat oven to 200 C. Brush with some more milk/eggwash and bake the croissants for 15-20 minutes till it is lightly browned on top. Mine were done in 15 minutes. Do remember to rotate the tray half way thru to get even baking


Check the other bakers and detailed instructions in Aparna's Post
Original recipe in Fine Cooking
Also check this video for a beautiful demonstration of the process.

8. Roll the dough from the wider side to the tip tucking the tip under and joining the claws at the end.
9. Place it on a parchment paper lined baking tray. Brush with a little milk/eggwash.
10. Proof (let it rest) for 2-3 hours till it rises (will not double). Slightly cover it (without touching the croissant) or keep inside the oven (without turning on).
11. Preheat oven to 200 C. Brush with some more milk/eggwash and bake the croissants for 15-20 minutes till it is lightly browned on top. Mine were done in 15 minutes. Do remember to rotate the tray half way thru to get even baking
Check the other bakers and detailed instructions in Aparna's Post
Original recipe in Fine Cooking
Also check this video for a beautiful demonstration of the process.

Lovely Rosh.. Real bakery effect. Great patience. Thanks for the recipe.
ReplyDeleteoh they look swell rosh; your patience and efforts have paid off i guesss
ReplyDeleteI love home made...those are always superior than shop bought...lovely croissants.
ReplyDeleteperfect croissant Roshni....looks yummy!
ReplyDeleteThese look wonderful Roshni...Have to get down and try baking some
ReplyDeleteKudos to u roshini..great job dear well deon
ReplyDeleteDo u live un uk ?
Looks great...Beautifully done Roshini..
ReplyDeletewow...u have done it so well Roshni! looks delicious..
ReplyDeleteOMG! Perfectly done....
ReplyDeletehttp://recipe-excavator.blogspot.com
lovely looking croissants and i see you did what I did too, took a print out! Without such a detailed guide, I would not have been able to do these.
ReplyDeleteLooks perfect. Perseverance and patience always pays, right.
ReplyDeleteDelicious looking buttery croissants,perfectly made and flaky..
ReplyDeleteOh what lovely, big croissants you've made!! Now that I think about it, I should have made big ones too! I was too scared to consume all that butter so made mini croissants!
ReplyDeleteThey look beautiful!! Well done!
ReplyDeleteLooks so amazing and inviting.. awesome job dear.. Love it :)
ReplyDeleteLovely pastries! Great work!
ReplyDeleteLovely pictures Rosh. Can't take my eyes off them. You did an awesome job!Jayanthi(www.sizzlingveggies.com)
ReplyDelete