Want to make the softest bread you would ever eat? Look no further than here. After the challenge of making Croissant last month, we have ventured into the making of Hokkaido Milk Bread. It uses a Roux which is called Tangzhong. Do it look like I am talking Chinese/Japanese here. Well, in a way I am. This method was perfected in Asian countries. To know more about this technique and history, do hop on to Aparna's blog. Thank you for the recipe and all the step by step instructions.

Ingredients
For The Tangzhong (Roux) - use half of this
Milk to brush on top

Method of Preparation
The Bread Dough:
Ingredients
For The Tangzhong (Roux) - use half of this
All Purpose Flour 1/3 cup
Milk 1/2 cup
Water 1/2 cup
Milk 1/2 cup
Water 1/2 cup
For The Dough
All Purpose Flour 2.5 cup
Sugar 3 tbsp
Salt 1 tsp
Milk Powder 2 tbsp
Fast Acting Instant Yeast 2 tsp
Milk 1/2 cup
Cream 1/8 cup
Sugar 3 tbsp
Salt 1 tsp
Milk Powder 2 tbsp
Fast Acting Instant Yeast 2 tsp
Milk 1/2 cup
Cream 1/8 cup
Tangzhong 1/3 cup tangzhong (use half of the tangzhong from above)
Unsalted butter (room temperature) 25gm
Milk to brush on top
Method of Preparation
For Tangzhong
1. Whisk together lightly the flour, water and milk in a saucepan until smooth and there are no lumps.
2. Place the saucepan on the stove, and over medium heat, let the roux cook till it starts thickening. Keep stirring/ whisking constantly so no lumps form and the roux is smooth.
3. If you have a thermometer, cook the roux/ tangzhong till it reaches 65C (150F) and take it off the heat. Otherwise, watch the roux/ tangzhong until you start seeing “lines” forming in the roux as you whisk/ stir it. Take the pan off the heat at this point.
4. Let the roux/ tangzhong cool completely and rest for about 2 to 3 hours at least. It will have the consistency of a soft and creamy crème patisserie. If not using immediately, transfer the roux to a bowl and cover using plastic wrap. It can be stored in the fridge for about a day. Discard the tangzhong after that.
The Bread Dough:
1. Add the flour, salt, sugar, powdered milk and instant yeast in a bowl. Give it a quick mix.
2. In another small bowl mix the milk, cream and Tangzhong (1/3 cup, half of what was made above) till smooth and add to the bowl.
3. Mix till the dough comes together.
4. Now add the butter and knead till you have a smooth and elastic dough which is just short of sticky. The dough will start out sticky but kneading will make it smooth. If the dough feels firm and not soft to touch, add a couple of tbsps of milk till it becomes soft and elastic.
5. When the dough is done, you should be able to stretch the dough without it breaking right away. When it does break, the break should be form a circle.
6. Form the dough into a ball and place it in a well-oiled bowl turning it so it is well coated.
7. Cover with a towel, and let the dough rise for hour or 2 (till almost double in volume).
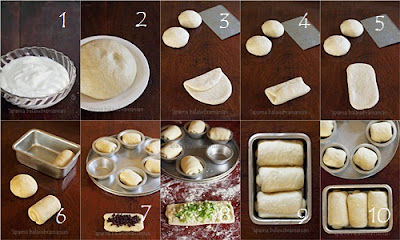
8. Place the dough on your working surface. Divide into 12 equal portions.
9. Roll out each portion of the dough with a rolling pin into an oval shape, about 1/8” thick. Take one end of the dough from the shorter side of the oval and fold it to the middle of the oval. Take the other end and fold so it slightly overlaps the other fold.
10. Roll this folded dough with the rolling pin so the unfolded edges are stretched out to form a rectangle. Roll the rectangle from one short edge to the other, pinching the edges to seal well.
Photo courtsey Aparna. (My step by step did come as good as this. So I am borrowing the pic taken by Aparna who gave us the recipe and steps)
11. Place
each roll of dough in a well-oiled muffin cup and cover with a towel. Allow to
rise for about 45 minutes.
12. Brush the top of the roll with some milk (or eggwash).
13. Preheat an oven to 170C. Bake for 20-30 min till the top is nicely browned.
14. Once it is out of the oven, place it on a cooling rack.
15. Let it cool and enjoy with some butter.

Other Breads baked as part of the group - We Knead to Bake
January : Whole Grain Pull Apart Bread with tomato-onion chutney spread
February : Classic Croissants
15. Let it cool and enjoy with some butter.

Other Breads baked as part of the group - We Knead to Bake
January : Whole Grain Pull Apart Bread with tomato-onion chutney spread
February : Classic Croissants
Very attractive muffin rolls, beautifully done.
ReplyDeletelooks really soft... :)
ReplyDeleteThe pattern on the muffins are so pretty!
ReplyDeleteAmazing rolls ...they are lovely !
ReplyDeleteThese rolls look super cute.
ReplyDeleteRosh!! you know how dumb i got? I tried placing the rolls in muffin tins vertically. While i should have done it horizontally. Somehow sometimes i use my brains too much. Very cute rolls
ReplyDeleteAmazing bread with step by step presentation....
ReplyDeleteLovely rolls...perfectly baked Rosh
ReplyDeleteCute and perfect looking rolls Roshni..
ReplyDeleteLove the rich colour on those muffin buns!!
ReplyDelete