Baking Bread is addictive. I am just way too addicted to it. I could just make it everyday. Love the feeling of kneading the dough. Then watching the dough raise (am totally in love with yeast) - well this is a love hate relationship. Though after buying fast acting instant yeast, it has never failed me, I am always checking every 10 minutes to see if my dough is rising. (thanks to cling film I am not disturbing anything) :-) Shaping the dough, stuffing it and watching it bake (yes I peep though the glass door) and then finally the smell of freshly baked bread all around the kitchen! What's not to love!
I made some Stuffed Braided Bread last week and we all loved it. Got many positive reviews as well. Got a few feedbacks after ppl made it. Thanks a lot to all of you who tried it and especially those who took the effort to write to me or send me photos. (you know who you are, thank you, thank you, thank you)
I saw this video of a guy braiding bread and knew instantly that I wanted to do what he was doing. Watch the video and I am sure you will fall in love with it and will rush to the kitchen immediately. This is the result of my baking adventure.
You can also brush this bread with some garlic butter as I did in the Garlic Bread recipe.


Ingredients
Bread Flour (or All Purpose Flour) 3 cups
Fast Acting Instant Yeast 2 packets (7gm each)
Salt 1 tsp
Sugar 1 tbsp
Oil 2 tsp
Milk 1.5 cups + a little for brushing on top
Method of Preparation
1. Take the flour, yeast, sugar and salt in a bowl. Add the oil and mix well.
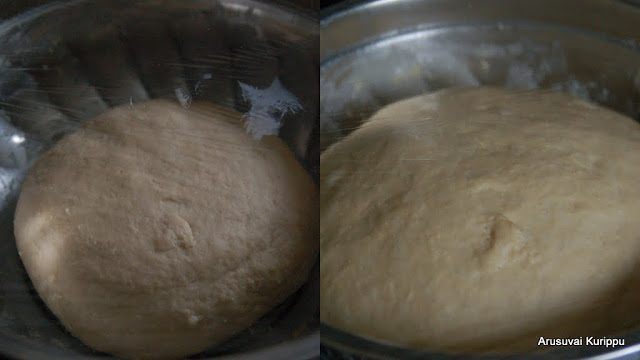
2. Make into a dough by adding enough warm milk. I used a little over 11/4 cup of milk. Knead well. Cover and keep aside for 1.5 hours till the dough doubles in size.
3. Knead the dough that has risen to let out the air pockets. Split into 10 pieces.
4. Take each piece and stretch into long cords. Keep all the dough and strings covered all the time.

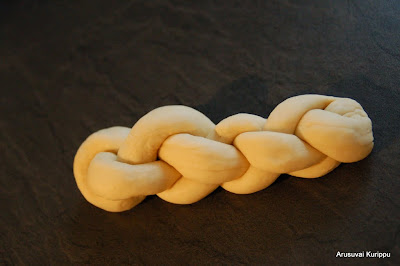
5. Braid the method by your chosen method. (see below).
6. Arrange on a baking tray lined with parchment paper. Cover and let it rest for another 20-30 min.

7. Brush a little milk on the top. Bake in a preheated oven @200C for about 12-15 minutes. Mine were done in 13 minutes.
Three Strand Braid
1. Lay the three strands on a work surface. Join one of the ends.

2. Start by taking the left strand and move to the centre. Now take the right strand and move to the centre. Repeat - left to centre then right to centre.

3. Once done, tuck the ends.

4. Follow baking instructions above
Five Strand Braid
1. Lay the five strands on a work surface. Join one of the ends.
2. Separate 3 strands to the right and 2 to the left.

3. Take the outer from right (one with 3 strands) and move to the centre. Shift that to the left set.
4. Take the outer from left (one with 3 strands) and move to the centre. Shift that to the right set.

5. Repeat steps 3 and 4 till you are done with the strands. Tuck the ends.

6. Follow baking instructions above
Two Strand Braid
This one is a little hard to explain. Please do check the video if you are making it.
1. Place one strand on the work surface horizontally.
2. Place the next one vertically on top crossing the first one at the centre.
3. Take the horizontal one (both ends). Place the right side on the top of the vertical strand. Then place the left side on the top of the right side.
4. Now take the vertical one (both ends). Place the top over the horizontal and the bottom over the top.
5. Repeat steps 3 and 4 till end of strand. Tuck the ends.
6. Follow baking instructions above
I made some Stuffed Braided Bread last week and we all loved it. Got many positive reviews as well. Got a few feedbacks after ppl made it. Thanks a lot to all of you who tried it and especially those who took the effort to write to me or send me photos. (you know who you are, thank you, thank you, thank you)
I saw this video of a guy braiding bread and knew instantly that I wanted to do what he was doing. Watch the video and I am sure you will fall in love with it and will rush to the kitchen immediately. This is the result of my baking adventure.
You can also brush this bread with some garlic butter as I did in the Garlic Bread recipe.
Ingredients
Bread Flour (or All Purpose Flour) 3 cups
Fast Acting Instant Yeast 2 packets (7gm each)
Salt 1 tsp
Sugar 1 tbsp
Oil 2 tsp
Milk 1.5 cups + a little for brushing on top
Method of Preparation
1. Take the flour, yeast, sugar and salt in a bowl. Add the oil and mix well.
2. Make into a dough by adding enough warm milk. I used a little over 11/4 cup of milk. Knead well. Cover and keep aside for 1.5 hours till the dough doubles in size.
3. Knead the dough that has risen to let out the air pockets. Split into 10 pieces.
4. Take each piece and stretch into long cords. Keep all the dough and strings covered all the time.
5. Braid the method by your chosen method. (see below).
6. Arrange on a baking tray lined with parchment paper. Cover and let it rest for another 20-30 min.
7. Brush a little milk on the top. Bake in a preheated oven @200C for about 12-15 minutes. Mine were done in 13 minutes.
Three Strand Braid
1. Lay the three strands on a work surface. Join one of the ends.
2. Start by taking the left strand and move to the centre. Now take the right strand and move to the centre. Repeat - left to centre then right to centre.
3. Once done, tuck the ends.
4. Follow baking instructions above
Five Strand Braid
1. Lay the five strands on a work surface. Join one of the ends.
2. Separate 3 strands to the right and 2 to the left.
3. Take the outer from right (one with 3 strands) and move to the centre. Shift that to the left set.
4. Take the outer from left (one with 3 strands) and move to the centre. Shift that to the right set.
5. Repeat steps 3 and 4 till you are done with the strands. Tuck the ends.
6. Follow baking instructions above
Two Strand Braid
This one is a little hard to explain. Please do check the video if you are making it.
1. Place one strand on the work surface horizontally.
2. Place the next one vertically on top crossing the first one at the centre.
3. Take the horizontal one (both ends). Place the right side on the top of the vertical strand. Then place the left side on the top of the right side.
4. Now take the vertical one (both ends). Place the top over the horizontal and the bottom over the top.
5. Repeat steps 3 and 4 till end of strand. Tuck the ends.
6. Follow baking instructions above
Superb!!! I loved your baking style... Book marked this. Will definitely try once.
ReplyDeletewow amazing,well explained...delicious bread.
ReplyDeleteYou have done simply fabulous,beautiful braids Roshni.
ReplyDeletebeautifully done Roshni...bread looks so soft! thanks for the detailed recipe with pictorials...have to try this soon
ReplyDeletewow...Wonderfully detailed pictures..Thanks...
ReplyDeleteI absolutely love it Rosh!! :D You are becoming a Master! this looks like a piece of Art!
ReplyDeleteHow much active dry yeast we need to use if we don't have instant yeast?
ReplyDeleteI have not used myself.. but I have read that you can use the same quantity.
Delete